4.17.4. Integrating with a SAML Identity Provider
You can integrate your Open edX installation with federated identity solutions that use the SAML 2.0 (Security Assertion Markup Language, version 2.0) standard. An example is Shibboleth, a single sign on system that is used by many educational institutions.
4.17.4.1. Exchange Metadata
SAML metadata is an XML file that contains the information necessary for secure interactions between identity providers and security providers. You send the URL of your metadata file, created when you configured your installation as a SAML service provider, to each identity provider that you want to add. Similarly, you obtain the metadata URLs from identity providers before you add and enable them for your installation.
4.17.4.2. Add and Enable a SAML Identity Provider
To add and enable a SAML 2.0 identity provider, follow these steps.
Log in to the Django administration console for your base URL. For example,
http://{your_URL}/admin.In the Third_Party_Auth section, next to Provider Configuration (SAML IdPs) select Add.
Note
If you want to change the configuration of an existing provider, next to Provider Configuration (SAML IdPs) select Change, and then select Update for the provider that you want to configure.
Enter the following information for the provider.
- Icon class: Specifies a Font Awesome image for the button that users will select to access the sign in page for this IdP. The fa-sign- in icon is used by default. For university or institutional providers, a suggested alternative is fa-university.
- Name: The name of the IdP as you want it to appear on the sign in page.
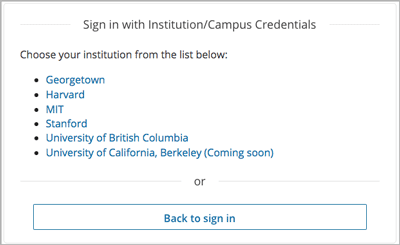
- Secondary: Select this option to include the IdP in an intermediary list of providers that users access from a Use my institution/campus credentials button on the sign in page.
- Backend name: The default, tpa-saml, is optimized for use with Open edX and works with most SAML providers. Select a different option only if you have added a custom backend that provides additional functionality.
- IdP slug: A short, unique name to identify this IdP in the URL. The slug becomes part of a URL, so the value that you enter cannot include spaces.
- Entity ID: The URI that identifies the IdP. This ID must match the value specified in the metadata XML file.
- Metadata source: The URL of the XML file that contains this provider’s metadata.
Specify your selections for any of the other, optional configuration options. For more information about these options, see Configuration Options for SAML Identity Providers.
When you are ready to enable the provider, select Enabled at the top of the page. Alternatively, save your configuration settings and enable the provider at another time.
Select Save or one of the other save options at the bottom of the page.
Next, you can test an enabled provider.
4.17.4.3. Configuration Options for SAML Identity Providers
To customize the registration process for IdP, you make selections for these optional fields on the Add Provider Configuration (SAML IdP) page.
Skip Registration Form: If you select this option, users are not asked to confirm the user account data supplied for them by the IdP (name, email address, and so on). Select this option only for providers that are known to provide accurate user information.
By default, users review a registration form with the supplied account details.
Skip Email Verification: If you select this option, users are not required to confirm their email addresses, and their accounts are activated immediately upon registration.
By default, users receive an email message and must select a link in that message to activate their user accounts.
User ID Attribute: Required. This value is used to associate the user’s edX account with the campus account. It is not displayed to users.
By default, uses
userid,urn:oid:0.9.2342.19200300.100.1.1.Optional user attributes: You can indicate specific URN values for the following user attributes.
By default, the registration form includes all of the following attributes if they are sent by the IdP.
- Full Name Attribute:
commonName,urn:oid:2.5.4.3 - First Name Attribute:
givenName,urn:oid:2.5.4.42 - Last Name Attribute:
surname,urn:oid:2.5.4.4 - Username Hint Attribute:
userid,urn:oid:0.9.2342.19200300.100.1.1 - Email Attribute:
mail,urn:oid:0.9.2342.19200300.100.1.3
If the identity provider sends a value that you do not want to be included on the the registration form, you can enter a value such as “DISABLED” or “IGNORE” in that field.
- Full Name Attribute:
4.17.4.4. Test an Enabled SAML Provider
To verify the sign in process for an IdP that you have enabled, follow these steps.
On the Django administration console, in the Third_Party_Auth section, select Provider Configuration (SAML IdPs).
Check the icon in the Metadata ready column for the IdP. After the provider’s metadata is fetched successfully from the URL that you provided as the metadata source, a check mark in a green circle appears and the provider is ready for use immediately.
You might need to wait 30-60 seconds for the task to complete, and then refresh this page.
If the check mark does not appear, make sure that celery is configured correctly and is running. You can also manually trigger an update by running the management command
./manage.py lms saml --pull --settings=awson fullstack or./manage.py lms saml --pull --settings=devstackon devstack.For additional information about the data fetched from the IdP, on the Django administration console select SAML Provider Data, and then select the provider. The page that opens reports data fetched from the metadata source URL and the date and time it was fetched.
To verify that users can use the IdP for sign in, go to the sign in page for your LMS. The page should include the institutional sign in button.
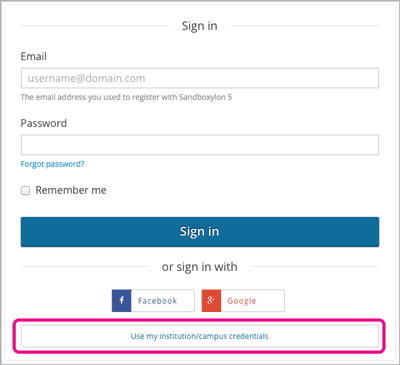
Select Use my institutional/campus credentials. The list of providers that appears should include the IdP that you enabled.