7.39. Write-Your-Own-Grader Problem
This chapter provides information about writing your own grader directly in a problem component. See the following sections for more information.
- Overview
- Create a Custom Python-Evaluated Input Problem Studio
- Script Tag Format
- Answer Tag Format
- Providing Partial Credit for Custom Python-Evaluated Input Problems
- Create a Randomized Custom Python-Evaluated Input Problem
7.39.1. Overview
In custom Python-evaluated input (also called “write-your-own-grader” problems), the grader uses a Python script that you create and embed in the problem to evaluate a learner’s response or provide hints. These problems can be any type. Numerical input and text input problems are the most common write-your-own-grader problems.
You can create a Python-evaluated input problem in answer tag format or script tag format.
Custom Python-evaluated input problems can include the following:
7.39.2. Create a Custom Python-Evaluated Input Problem Studio
- In the unit where you want to create the problem, click Problem under Add New Component, and then click the Advanced tab.
- Click Custom Python-Evaluated Input.
- In the component that appears, click Edit.
- In the component editor, edit the problem in answer tag format or script tag format.
- Click Save.
7.39.3. Script Tag Format
The script tag format encloses a Python script that contains a “check function”
in a <script> tag, and adds the cfn attribute of the
<customresponse> tag to reference that function. In the following example,
<customresponse> tags reference the test_add_to_ten and test_add
functions that are in the <script> tag.
<problem>

<script type="loncapa/python">

def test_add(expect, ans):
    try:
        a1=int(ans[0])
        a2=int(ans[1])
        return (a1+a2) == int(expect)
    except ValueError:
        return False

def test_add_to_ten(expect, ans):
    return test_add(10, ans)

</script>

<p>Enter two integers that sum to 10. </p>
<customresponse cfn="test_add_to_ten">
  <textline size="10"/><br/>
  <textline size="10"/>
</customresponse>

<p>Enter two integers that sum to 20: </p>
<customresponse cfn="test_add" expect="20">
  <textline size="40" correct_answer="11" label="Integer #1"/><br/>
  <textline size="40" correct_answer="9" label="Integer #2"/>
</customresponse>

<solution>
  <div class="detailed-solution">
    <p>Explanation</p>
    <p>Any set of integers on the line \(y = 10 - x\) and \(y = 20 - x\)
       satisfies these constraints.</p>
    <p>You can also add images within the solution clause, like so:</p>
    <img src="/static/images/placeholder-image.png"/>
  </div>
</solution>

</problem>
Important: Python honors indentation. Within the <script> tag, the
def check_func(expect, ans): line must have no indentation.
The following table explains the important attributes and values in the preceding example.
<script type="loncapa/python"> |
Indicates that the problem contains a Python script. |
<customresponse cfn="test_add_to_ten"> |
Indicates that the function test_add_to_ten is called when the
student checks the answers for this problem. |
<customresponse cfn="test_add" expect="20"> |
Indicates that the function test_add is called when the student
checks the answers for this problem and that the expected answer is
20. |
| <textline size=”10” correct_answer=”3”/> | This tag includes the size, correct_answer, and label
attributes. The correct_answer attribute is optional. |
The check function accepts two arguments:
expectis the value of theexpectattribute of<customresponse>. Ifexpectis not provided as an argument, the function must have another way to determine if the answer is correct.answeris either:- The value of the answer the student provided, if the problem only has one response field.
- An ordered list of answers the student provided, if the problem has multiple response fields.
The check function can return any of the following to indicate whether the student’s answer is correct:
True: Indicates that the student answered correctly for all response fields.False: Indicates that the student answered incorrectly. All response fields are marked as incorrect.A dictionary of the form:
{ 'ok': True, 'msg': 'Message' }If the dictionary’s value forokis set toTrue, all response fields are marked correct. If it is set toFalse, all response fields are marked incorrect. Themsgis displayed below all response fields, and it may contain XHTML markup. For information about providing partial credit for learners’ answers, see Providing Partial Credit for Custom Python-Evaluated Input Problems.A dictionary of the form
{ 'overall_message': 'Overall message',
    'input_list': [
        { 'ok': True, 'msg': 'Feedback for input 1'},
        { 'ok': False, 'msg': 'Feedback for input 2'},
        ... ] }
The last form is useful for responses that contain multiple response fields. It allows you to provide feedback for each response field individually, as well as a message that applies to the entire response.
The following example shows another checking function.
def check_func(expect, answer_given):
    check1 = (int(answer_given[0]) == 1)
    check2 = (int(answer_given[1]) == 2)
    check3 = (int(answer_given[2]) == 3)
    return {'overall_message': 'Overall message',
                'input_list': [
                    { 'ok': check1, 'msg': 'Feedback 1'},
                    { 'ok': check2, 'msg': 'Feedback 2'},
                    { 'ok': check3, 'msg': 'Feedback 3'} ] }
The function checks that the user entered 1 for the first input, 2 for
the second input, and 3 for the third input. It provides feedback messages
for each individual input, as well as a message displayed below the entire
problem.
7.39.3.1. Create a Custom Python-Evaluated Input Problem in Script Tag Format
To create a custom Python-evaluated input problem using a <script> tag:
- In the component editor, modify the example as needed.
- Click Save.
Problem Code:
<problem>
<p>This question has two parts.</p>
<script type="loncapa/python">
def test_add(expect, ans):
try:
a1=int(ans[0])
a2=int(ans[1])
return (a1+a2) == int(expect)
except ValueError:
return False
def test_add_to_ten(expect, ans):
return test_add(10, ans)
</script>
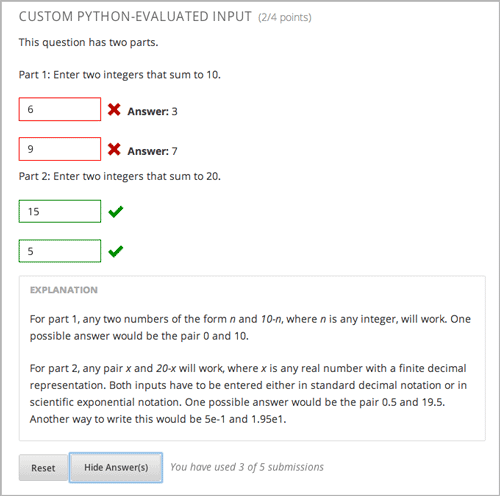
<p>Part 1: Enter two integers that sum to 10. </p>
<customresponse cfn="test_add_to_ten">
<textline size="10" correct_answer="3" label="Integer #1"/><br/>
<textline size="10" correct_answer="7" label="Integer #2"/>
</customresponse>
<p>Part 2: Enter two integers that sum to 20. </p>
<customresponse cfn="test_add" expect="20">
<textline size="10" label="Integer #1"/><br/>
<textline size="10" label="Integer #2"/>
</customresponse>
<solution>
<div class="detailed-solution">
<p>Explanation</p>
<p>For part 1, any two numbers of the form <i>n</i> and <i>10-n</i>,
where <i>n</i> is any integer, will work. One possible answer would
be the pair 0 and 10.</p>
<p>For part 2, any pair <i>x</i> and <i>20-x</i> will work, where <i>
x</i> is any real number with a finite decimal representation. Both
numbers have to be entered either in standard decimal notation or in
scientific exponential notation. One possible answer would be the
pair 0.5 and 19.5. Another way to write this would be 5e-1 and 1.95e1.</p>
</div>
</solution>
</problem>
Templates
The following template includes answers that appear when the student clicks Show Answer.
<problem>

<script type="loncapa/python">
def test_add(expect,ans):
  a1=float(ans[0])
  a2=float(ans[1])
  return (a1+a2)== float(expect)
</script>

<p>Problem text</p>
<customresponse cfn="test_add" expect="20">
        <textline size="10" correct_answer="11" label="Integer #1"/><br/>
        <textline size="10" correct_answer="9" label="Integer #2"/>
</customresponse>

    <solution>
        <div class="detailed-solution">
          <p>Solution or Explanation Heading</p>
          <p>Solution or explanation text</p>
        </div>
    </solution>
</problem>
The following template does not return answers when the student clicks Show Answer. If your problem doesn’t include answers for the student to see, make sure to set Show Answer to Never in the problem component.
<problem>

<script type="loncapa/python">
def test_add(expect,ans):
  a1=float(ans[0])
  a2=float(ans[1])
  return (a1+a2)== float(expect)
</script>

<p>Enter two real numbers that sum to 20: </p>
<customresponse cfn="test_add" expect="20">
        <textline size="10"  label="Integer #1"/><br/>
        <textline size="10"  label="Integer #2"/>
</customresponse>

    <solution>
        <div class="detailed-solution">
          <p>Solution or Explanation Heading</p>
          <p>Solution or explanation text</p>
        </div>
    </solution>
</problem>
7.39.4. Answer Tag Format
The answer tag format encloses the Python script in an <answer> tag,
instead of using a Python function with a <script> tag, as in the following
example.
<answer>
if answers[0] == expect:
    correct[0] = 'correct'
    overall_message = 'Good job!'
else:
    correct[0] = 'incorrect'
    messages[0] = 'This answer is incorrect'
    overall_message = 'Please try again'
</answer>
Important
Python honors indentation. Within the <answer> tag, you must begin your
script with no indentation.
The Python script interacts with these variables in the global context:
answers: An ordered list of answers the student provided. For example, if the student answered6,answers[0]would equal6.expect: The value of theexpectattribute of<customresponse>(if provided).correct: An ordered list of strings indicating whether the student answered the question correctly. Valid values are"correct","incorrect", and"unknown". You can set these values in the script.messages: An ordered list of messages that appear under each response field in the problem. You can use this to provide hints to users. For example, if you includemessages[0] = "The capital of California is Sacramento", that message appears under the first response field in the problem.overall_message: A message that appears below the entire problem. You can use this to provide a hint that applies to the entire problem rather than a particular response field.
7.39.4.1. Create a Custom Python-Evaluated Input Problem in Answer Tag Format
- In the component editor, modify the example as to use the``<answer>`` tag
instead of
<script>. You can copy the sample code below. - Click Save.
<problem>
    <p>What is the sum of 2 and 3?</p>

    <customresponse expect="5">
    <textline math="1" />
    </customresponse>

    <answer>
if answers[0] == expect:
    correct[0] = 'correct'
    overall_message = 'Good job!'
else:
    correct[0] = 'incorrect'
    messages[0] = 'This answer is incorrect'
    overall_message = 'Please try again'
    </answer>
</problem>
Important
Python honors indentation. Within the <answer> tag, you must begin your
script with no indentation.
7.39.5. Providing Partial Credit for Custom Python-Evaluated Input Problems
You can configure a custom Python-evaluated input problem that gives partial credit for learners’ answers.
The following example demonstrates a sample problem that allows partial credit. The learner’s score equals the answer divided by 100.
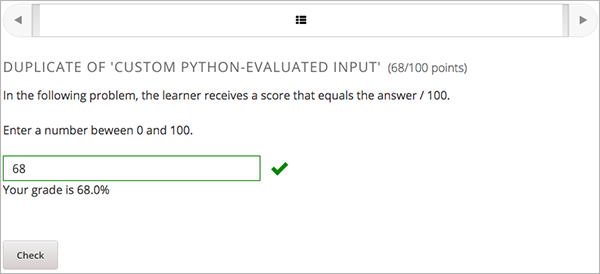
The following code demonstrates the configuration of this problem.
<problem>
<p>In the following problem, the learner receives a score that equals the
   answer / 100. If the learner's answer is greater tahn 100 or less than 0,
   the score equals 0.</p>

<script type="loncapa/python">

def give_partial_credit(expect, ans):
  ans = float(ans)
  if ans > 100 or ans <; 0:
      # Assign a score of zero if the answer is less than zero or over 100.
      ans = 0
  grade = ans/100
  return {
      'input_list': [
         { 'ok': True, 'msg': 'Your grade is ' + str(ans) + '%', 'grade_decimal':grade},
      ]
  }
</script>

<p>Enter a number beween 0 and 100.</p>
<customresponse cfn="give_partial_credit">
  <textline points="100" size="40" label="Ans1"/><br/>
</customresponse>
</problem>
In this example:
- The
pointsattribute of the<customresponse>tag specifies that the question is worth 100 points. - The function
give_partial_creditchecks that the answer is between 0 and 100, and if so divides the learner’s answer by 100 to determine the grade. - The
input_listthat is returned specifies that:- The answer is acceptable and can receive partial or full credit, with the
item
'ok': True. - The learner receives the message
Your grade isfollowed by the percent grade, with the item'msg': 'Your grade is ' + str(ans) + '%'. - The grade assigned is the learner’s answer divided by 100, with the item
'grade_decimal':grade.
- The answer is acceptable and can receive partial or full credit, with the
item
You can enhance and apply this example for your own problems in which you need to assign learners partial credit.
7.39.6. Create a Randomized Custom Python-Evaluated Input Problem
You can create a custom Python-evaluated input problem that randomizes variables in the Python code.
Note
In the problem settings, you must set the Randomization value to something other than Never to have Python variables randomized. See Randomization for more information.
The following example demonstrates using randomization with a Python-evaluated input problem.
Note
This example uses the method random.randint to generate random numbers.
You can use any standard Python library for this purpose.
<problem>
  <p>Some problems in the course will utilize randomized parameters.
     For such problems, after you check your answer you will have the option
     of resetting the question, which reconstructs the problem with a new
     set of parameters.</p>
<script type="loncapa/python">
x1 = random.randint(0, 100)
x2 = random.randint(0, 100)
y = x1+x2
</script>
<p>Let (x_1 = $x1) and (x_2 = $x2). What is the value of (x_1+x_2)?</p>
<numericalresponse answer="$y">
  <responseparam type="tolerance" default="0.01%" name="tol"
    description="Numerical Tolerance"/>
  <textline size="10"/>
</numericalresponse>
<solution>
  <p><b>Explanation:</b></p>
</solution>
</problem>