8.11. Drag and Drop Problem
Note
EdX offers full support for this problem type.
In drag and drop problems, learners respond to a question by dragging text or images to a specific location on a background image. This section explains how to use drag and drop problems in your course.
Note
This drag and drop problem type is intended as a replacement for an older drag and drop problem type. This drag and drop problem type includes significant improvements and you should use it for any new course development. For more information about the previous, deprecated drag and drop problem type, see Drag and Drop Problem (Deprecated).
8.11.1. Overview of Drag and Drop Problems
A drag and drop problem includes a background image and one or more draggable items that learners move into target zones on the background image. You can include as many draggable items and as many target zones as you need. You can include decoy items that do not have a target and you can include decoy targets that do not correspond to draggable items.
When learners view a drag and drop problem in the LMS, the problem includes a top section and a bottom section. Learners drag items from the top section on to the background image in the section below it.
The way that a learner selects, or grabs, an item depends on the type of browser that the learner uses. For example, a learner might click and hold on a draggable item with a mouse pointer to select it, drag the item to a target, and release the mouse pointer to drop the item on the target. A learner who accesses the problem on a mobile device with a touch screen might swipe an item from the top section into a target zone. A learner who uses a keyboard interface might use the navigation keys to select an item and then match it to a target zone.
Learners complete a drag and drop problem when each draggable item that matches a target zone is correctly placed on its zone. Draggable items can require that learners enter number input for problems.
Learners must match all items to their targets to complete a problem and receive any credit. If draggable items do not require number input, learners receive full credit for a drag and drop problem when it is complete. If draggable items require number input, learners receive partial credit for the items with correct input when the problem is complete.
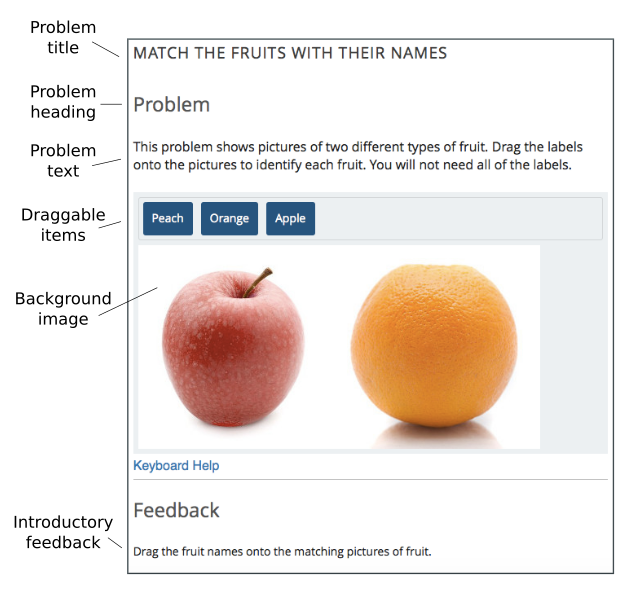
The following image shows an example drag and drop problem.
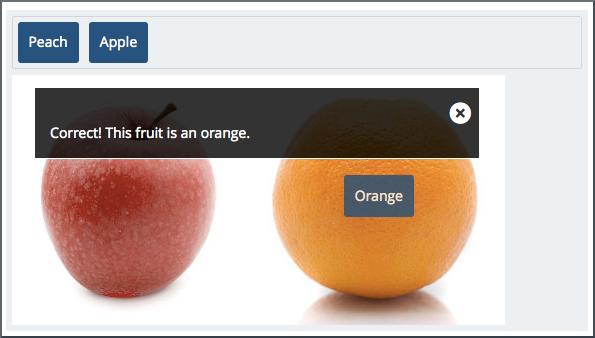
The following image shows the success feedback message that learners see when they match a draggable item with its target zone. Each draggable item has its own success feedback message.
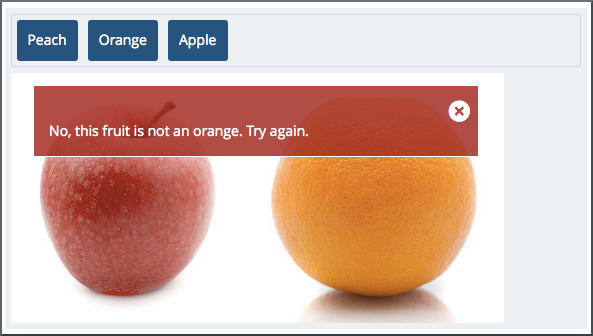
The following image shows the error feedback message that learners see when they match a draggable item with an incorrect target zone. Each draggable item has its own error feedback message.
The following image shows a completed drag and drop problem. The final feedback message informs the learner that the problem is complete.

8.11.1.1. Understanding Background Images
The background image for a drag and drop problem is the surface that learners drag items onto.
A target zone is a rectangular area on the background image. You can show or hide the borders of a zone for learners. You can add labels for zones or leave them unlabeled.
A background image must fit within the course screen. The LMS automatically scales images that are too wide. If you choose a background image that is extremely large, you should consider how it appears to learners after scaling. The width of the course screen depends on the device and browsing software that a learner uses.
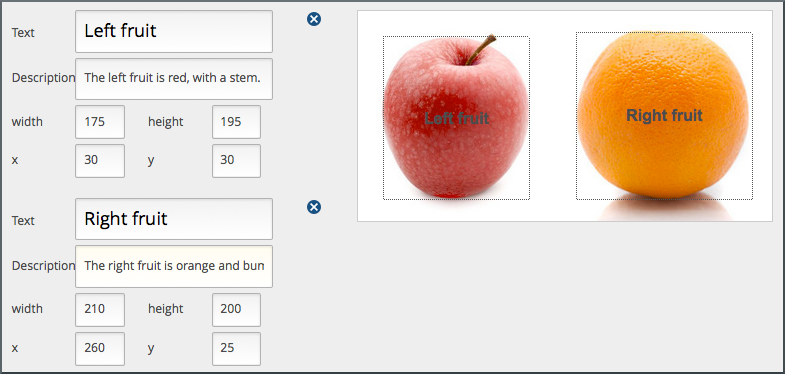
You define a target zone by specifying its width, height, horizontal offset
(x), and vertical offset (y). Each specification is in pixels. The
horizontal offset is the distance between the left side of the background image
and the left side of the target zone. The vertical offset is the distance
between the top of the background image and the top of the target zone.
The following image shows a background image and target zones in the drag and drop problem editing dialog box. For more information about editing drag and drop problems, see Creating a Drag and Drop Problem.
Note
The pixel coordinates that you use to specify the size and location of target zones are also used by common image editing software. You can open a background image in an image editing program to find the pixel coordinates of a target zone.
8.11.1.2. Understanding Draggable Items
A draggable item is a rectangle that contains either a label or an image. Learners grab draggable items from the top of a drag and drop problem and drag them to targets on the background image.
You can set the size of the rectangle for a draggable item as a percentage of the width of the problem. If you do not specify the size, the LMS sets it based on the length of the text in the label or the size of the image in it. You can set the background color and the label text color for the items in a problem.
Each draggable item can match one target zone on the background image. A draggable item can match none of the target zones.
Each item must have a text label to identify it in the drag and drop problem. If you include only a text label, that label appears in the draggable item. If you include both a text label and an image for an item, the image appears as its label.
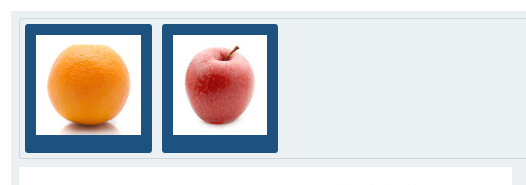
8.11.1.2.1. Using Image Draggable Items
The following image shows draggable items with images. For examples of items with text, see Overview of Drag and Drop Problems.
Images for draggable items have alternate image descriptions. The alternate description explains the image content in text. If a learner cannot access the visual image content, the text description helps that learner to complete the problem.
Images for draggable items must fit within the top section of the problem. The LMS automatically scales large images to fit. If you use a large image in a draggable item, you should consider how that image appears after scaling.
Note
If an image file is unavailable, or cannot be displayed, the LMS displays the text description as the button label.
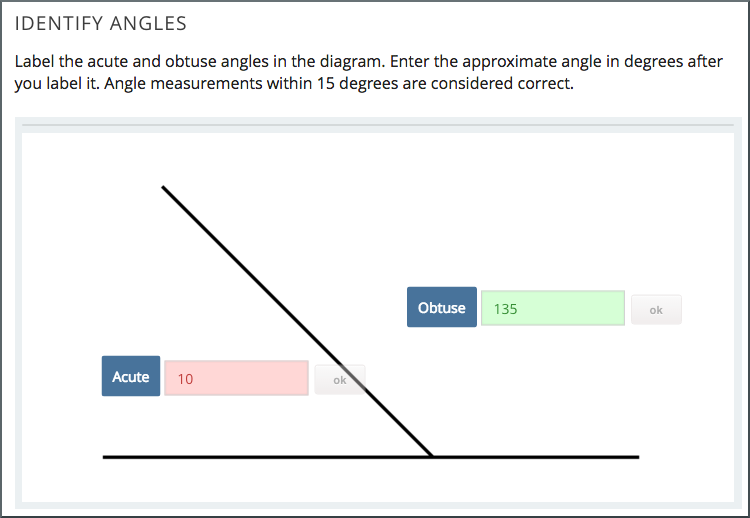
8.11.1.2.2. Using Number Input with Draggable Items
Draggable items can accept number input after they are correctly placed on matching target zones. You specify the number that learners must enter and an optional margin of error that will be accepted as correct. The margin of error is the range of values above or below the correct number that also qualify as correct.
For example, if the target value is 5 and the margin of error is 1,
6, 5, and 4 are correct entries. In that example, 3, 7, and
any other numbers are incorrect entries because they are outside of the margin
of error.
You can specify the target number and the acceptable margin of error using
whole numbers or fractional values to one decimal place. For example, the
target value can be 5 or 5.5. The target value cannot be 5.55.
The following image shows draggable items that accept number input after they are dragged to the correct target zone. The number entry for one item is correct and the number entry of the other item is incorrect.
8.11.2. Enabling Drag and Drop Problems
Before you can add drag and drop problems, you must enable the drag and drop problem type for your course.
To enable the drag and drop problem type, you add the "drag-and-drop-v2"
key to the Advanced Module List on the Advanced Settings page. (Be sure
to include the quotation marks around the key value.) For more information, see
Enable Additional Exercises and Tools.
After you enable the drag-and-drop-v2 problem type, Drag and Drop
appears in the Advanced menu of the Add New Component screen.
Note
By default, your course includes a Drag and Drop problem type in the
Problem > Advanced menu of the Add New Component screen. This is an
older drag and drop problem type that has been replaced by the drag-and-drop-v2 advanced module in the Advanced menu of the Add New
Component screen.
8.11.3. Creating a Drag and Drop Problem
You must enable the drag and drop problem type for your course before you can add a drag and drop problem. For more information, see Enabling Drag and Drop Problems.
To create a drag and drop problem, follow these steps.
In the unit where you want to create the problem, under Add New Component select Advanced.
From the list of advanced components, select Drag and Drop.
Studio adds the drag and drop problem to the unit.
Select Edit. The Editing dialog box opens.
Configure your drag and drop problem. For detailed information about individual controls in the Editing dialog box, see Understanding the Drag and Drop Editing Controls.
The Editing dialog box includes multiple screens. Configure each screen and select Continue. On the final screen, select Save to exit the configuration dialog box and save your changes.
In particular, configure the aspects of the drag and drop problem described below.
Edit the problem title, problem text, introductory feedback, and final feedback for the problem. For more information about how the text in these fields appears in a drag and drop problem, see Overview of Drag and Drop Problems.
Specify a background image in the Background URL field. Enter the URL of a file you have added to your course or the URL of an image on the web. For more information about working with course files, see Adding Files to a Course. For more information about background images, see Understanding Background Images.
Select Change background after you enter the URL for your background image.
If you specify the URL of an image on the web, make sure that you are legally authorized to use the image and that the image is available to learners around the world.
Remove the target zones for the example drag and drop problem. Select Add a zone to add each target zone for your problem. For more information about target zones, see Understanding Background Images.
Remove the draggable items for the example drag and drop problem. Select Add an item to add draggable items for your problem. Select a matching target zone for each item in the Zone field. Add a label, success feedback text, and error feedback text. For more information about how the text in these fields appears, see Overview of Drag and Drop Problems. For more information about draggable items, see Understanding Draggable Items.
8.11.4. Understanding the Drag and Drop Editing Controls
The following table explains the controls in the Editing dialog box.
| Control | Explanation |
|---|---|
| Problem title | The heading that appears above the drag and drop problem. For an example, see Overview of Drag and Drop Problems. |
| Show title | Controls whether the problem title appears above the problem in the LMS. |
| Maximum score | The total number of points that learners receive for completing the problem. If draggable items have number input, learners may receive partial credit for the item. If items do not have number input, learners receive the maximum score. For more information about scores and grading, see Establishing a Grading Policy For Your Course. |
| Problem text | Text that appears above the problem in the LMS. You can use this text to provide instructions or explain the problem. For an example, see Overview of Drag and Drop Problems. |
| Show “Problem” heading | Controls whether the word Problem appears above the problem text. |
| Introductory Feedback | The text that appears in the feedback section of the problem before a learner begins. |
| Final Feedback | The text that appears in the feedback section of the problem after a learner matches all items to their target zones. |
| Background URL | The URL of the image that contains target zones for the problem. The URL can be relative to a file you add to your course or to a file on the web. For more information, see Understanding Background Images. You must select Change background when you enter a new URL in this field. If you do not select Change background, the new value will not be saved when you save other changes in the Editing dialog box. |
| Background description | A description of the background image. This description is used by learners who cannot access the visual image. |
| Display label names on the image | Controls whether the text for target zones appears on the background image in the LMS. |
| Display zone borders on the image | Controls whether the outlines of target zones appear on the background image in the LMS. |
| Zone Text | A name for a target zone. You select the name of a target zone in the configuration for draggable items. |
| Zone Description | Text that describes a target zone. This description is available to learners who cannot access the target zone visually. |
| Zone width | The horizontal size of a target zone in pixels. |
| Zone height | The vertical size of a target zone in pixels. |
| Zone X | The horizontal distance between the left edge of the background image and the left edge of a target zone. |
| Zone Y | The vertical distance between the top edge of the background image and the top edge of a target zone. |
| Add a zone | Adds a set of controls for a new zone to the Editing dialog box. |
| Background color | The color that appears behind the text or image label of a draggable
item. You can specify the color using a hexidecimal color code
(including the # character) or any other valid CSS color
specification. For more information, see the W3C CSS color
specification. This is an optional configuration. If you do not set
the background color, the LMS will apply the default color to your
draggable items. |
| Text color | The color of the text label for a draggable item. You can specify the
color using a hexidecimal color code (including the # character) or
any other valid CSS color specification. For more information, see the
W3C CSS color specification. This is an optional configuration. If
you do not set the background color, the LMS will apply the default
color to your text. |
| Item Text | Controls the text that appears on the draggable item in the problem. |
| Item Zone | Controls the target zone that matches the draggable item. Learners must drag the item to the target zone that you select. |
| Item Image URL | (Optional) the URL of an image that appears on a draggable item. The image appears on the draggable item in the problem. The URL can be relative to a file you add to your course or to a file on the web. |
| Item Image description | Text that describes the image label for a draggable item. The description is used by learners who cannot access the visual image label. |
| Item Success Feedback | The text message that appears above the background image when a learner places a draggable item on its matching target zone. For an example, see Overview of Drag and Drop Problems. This is an optional configuration. If you do not enter a success feedback message, the LMS will not display one. |
| Item Error Feedback | The text message that appears above the background image when a learner places a draggable item on an incorrect matching target zone. For an example, see Overview of Drag and Drop Problems. This is an optional configuration. If you do not enter an error feedback message, the LMS will not display one. |
| Item Show advanced settings | Opens additional controls for configuring a draggable item. |
| Item Preferred width | The horizonal size of a draggable item as a percent of the problem width. The percent value must be a whole number between 0 and 100. |
| Item Optional numerical value | A number that learners must enter after they place a draggable item on the correct target zone. For more information, see Using Number Input with Draggable Items. |
| Item Margin ± | Controls the range of numbers that are accepted as the correct number input for a draggable item. For more information, see Using Number Input with Draggable Items. |
| Add an item | Adds a set of controls for a new draggable item to the Editing dialog box. |
8.11.5. Changing the Visual Style of a Drag and Drop Problem
You can change the visual appearance of drag and drop problems in your courses.
The Background color and Text color controls for the draggable items in a drag and drop problem set the appearance of items for an individual problem. You can choose colors for the background and text of items when you create or edit a drag and drop problem.
You can develop a Python programming language module and include a custom Cascading Style Sheet (CSS) file for drag and drop problems in your Open edX site. For more information, see Styling Drag and Drop Problems.