9.32. Peer Instruction Tool
Note
EdX offers full support for this tool.
The Peer Instruction learning system provides students with in class opportunities to discuss questions and arrive at a deeper understanding of concepts. The peer instruction tool emulates this classroom experience for the learners in an online course.
For more information about the Peer Instruction learning system, consult the resources of the Mazur Group or the Turn to Your Neighbor blog.
9.32.1. Assignment Overview
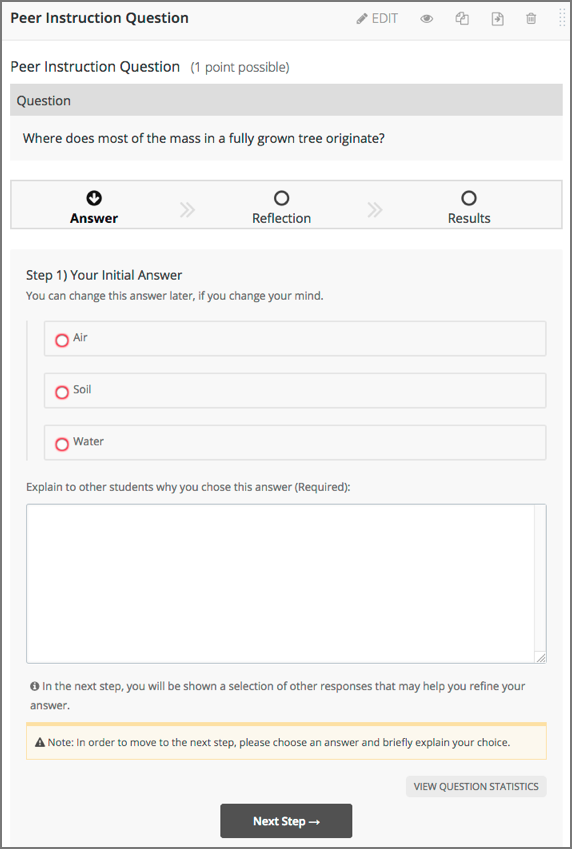
Assignments created with the peer instruction tool present learners with a multiple choice question, and then guide the learners through these stages of the exercise.
- An initial response, which includes both an answer choice and a written explanation for that choice.
- Review of responses submitted by several other course participants.
- A final response, which also includes an answer choice and revised explanation.
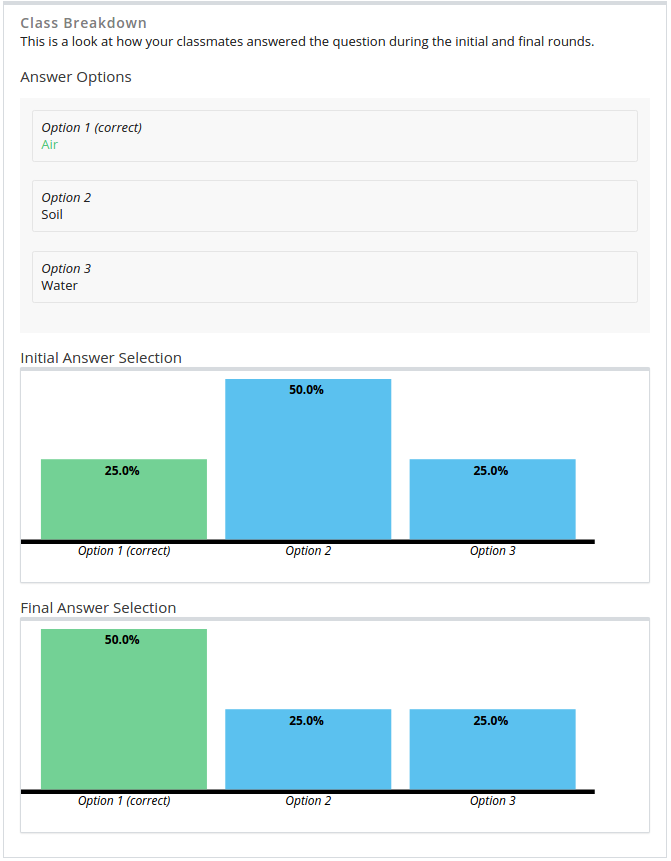
Learners also receive an explanation for the correct answer choice. After 10 learners complete the assignment, class breakdown histograms show the percentage of responding learners who selected each of the answer choices, both initially and after reviewing peer responses.
9.32.1.1. Designing an Online Peer Instruction Assignment
Before you use the peer instruction tool in Studio, you design the assignment. You prepare the assignment question and its answer choices in the same way that you would for classroom students. The question and the answer choices can include text, images, or both.
For your online learners, you also prepare the following additional elements for the exercise.
A text explanation of the correct answer choice.
An example text explanation for each answer choice.
These example explanations ensure that all learners, including the first few to attempt the assignment, have other responses to review in the second stage of the exercise. As the number of responses received from learners increases, the likelihood that your examples will be shown to any given learner decreases.
The number of responses for learners to review in the second stage of the exercise.
The logic for selecting the responses to show.
- The random algorithm presents the specified number of responses without regard to the associated answer choices. The responses shown to a learner might include explanations for each of the answer choices, or it might include several explanations for one choice and none for another choice.
- The simple algorithm includes an additional step to minimize repeated and missed responses for the different answer choices. Explanations are presented for as many different answer choices as possible for the number of responses specified.
After your design is complete, you use Studio to add the assignment to your course.
Note
You might consider including an HTML component before the peer instruction component to describe the workflow that learners will experience in this assessment type. You might also consider including a content-specific discussion component after the peer instruction component to give learners an opportunity to continue the conversation.
For more information about how learners experience peer instruction assignments, see learners:interactive_multiple_choice in the EdX Learner’s Guide or openlearners:interactive_multiple_choice in the Open edX Learner’s Guide.
9.32.1.2. Enable the Peer Instruction Tool
Before you can add a component to your course structure for a peer instruction assignment, you must enable the peer instruction tool for your course.
To enable the peer instruction tool in Studio, you add the "ubcpi" key to
the Advanced Module List on the Advanced Settings page. Be sure to
include quotation marks around the key value. For more information, see
Enabling Additional Exercises and Tools.
Note
This tool was developed and contributed to the edX platform by the University of British Columbia.
9.32.2. Adding a Peer Instruction Assignment in Studio
9.32.2.1. Upload Images (Optional)
If the question or an answer choice in an assignment includes an image, you upload the image file on the Files & Uploads page. The Studio URL for the image can then be added to the question or answer choice in the peer instruction component.
9.32.2.2. Add a Peer Instruction Component
After you enable the peer instruction tool for your course, you can add the component for a peer instruction assignment.
On the Course Outline page, locate the subsection where you want to add the assignment and add or open a unit.
Under Add New Component, select Advanced, and then select Peer Instruction. Studio adds the new component to the unit and uses a template to supply a sample question, answers, and so on.
Select Edit.
In the component editor, replace the default component display name with an identifying name. In the LMS, this name appears as a heading above the assignment.
Unique, descriptive display names can help you identify individual assignments quickly and accurately for analysis.
Select Save, or continue on to replace the template information with the details for this assignment.
9.32.2.3. Add the Assignment Details
Before you add the details of the assignment to a peer instruction component, you design the assignment by preparing a question, answer choices, and other required elements. If the question or any of the answer choices includes an image, you also upload the image file and obtain its Studio URL so that you can add it to the assignment.
To enter all of the assignment details into the component editor, follow these steps.
In the new component, select Edit.
For the assignment question, enter text, add an image, or both.
- To add text, enter the question that you want learners to consider in the Question Text field.
- To add an image, follow these steps.
- Select Add Image to Question. Additional fields appear.
- In the Image URL field, paste or enter the Studio URL from the Files & Uploads page.
- Specify the Image Position. If your question does not include text, Appears above and Appears below have the same result.
- Provide a description of the image. This description should provide enough detail so that learners who cannot see the image, and who rely on screen readers to complete your course, can understand the question.
Select a minimum and maximum length for the written explanations your learners supply for their answer choices.
You can change the supplied default values as needed to require explanations that are longer than 1 character, or limit explanations to less than 32,000 characters (approximately 12 pages).
Enter each answer choice. You can enter text, add an image, or both. For information on how to add an image, see step 2.
The template for this component has three sample answer choices.
- If your question has more than three answer choices, select Add New Answer and then enter the answer. You can include up to 10 answer choices.
- To delete an answer choice, select the X next to the text field for that answer.
Specify which of the answer choices is the correct answer. Alternatively, you can choose to not specify a correct answer by selecting “n/a”. You identify the correct answer choice by its assigned number: to indicate Answer 1 you select Option 1, for Answer 2 you select Option 2, and so on.
Enter a text explanation that describes why the specified answer choice is correct. This is optional if you have chosen to not specify a correct answer.
Configure how, and how many, peer responses to show to learners after they submit an initial response.
- To guide selection of the responses to show, select either Random or Simple. For more information, see Designing an Online Peer Instruction Assignment.
- Specify how many responses learners should be given to review. The default, #, shows learners the same number of responses as there are answer options.
Enter your example explanations. For each of the answer choices you enter in step 4, you must supply an example explanation. You identify each answer choice by its assigned number: to indicate Answer 1 you select Option 1, for Answer 2 you select Option 2, and so on.
The template for this component includes three example explanations.
- If your question has more than three answer choices, you select Add New Example, and then identify the answer choice and enter the example explanation for each of the other answer choices.
- To delete an example explanation, select the X next to the list of numbered choices.
Select Save.
If Save is not available, an edit check has detected incomplete or invalid information in the component editor. Review your entries to make sure that each field has an entry (as appropriate), and that you have provided an example explanation for each answer choice. For information about the error found, move your cursor over the question mark that appears next to Save.
9.32.3. Reviewing a Histogram of Learner Responses
When learners submit their final answer choices and revised explanations, the peer instruction tool displays the correct answer, if you have specified one, and its explanation (if applicable). The learner’s initial answer and response, and final answer and response, follow.
As soon as 10 learners complete the assignment, the peer instruction tool displays a pair of class breakdown histograms. These histograms show how frequently learners selected each of the options, before and after they reviewed the responses submitted by other class participants.