10.20. Image Mapped Input Problem
Note
EdX does not support this problem type.
In an image mapped input problem, also known as a “pointing on a picture” problem, students click inside a defined region in an image. You define this region by including coordinates in the body of the problem.
You can specify the following types of regions.
One rectangular region. For more information, see Specify a Rectangular Region.
Multiple rectangular regions. For more information, see Specify Multiple Rectangular Regions.
One non-rectangular region. For more information, see Specify an Irregular Region.
Note
When you create a problem that contains an image, you must include alt text for your image to make the image accessible. For more information about alt text, see Use Best Practices for Describing Images.
10.20.1. Create an Image Mapped Input Problem
To create an image mapped input problem, follow these steps.
10.20.1.1. Collect Image Information
To create an image mapped input problem, you need the following elements.
The height and width of the image in pixels.
Coordinate pairs that define the region or regions where you want learners to click.
To collect the information you need about your image, use an image editing tool such as Microsoft Paint.
Note
The coordinate pairs for all images start with (0,0) in the upper-left corner of the image and increase in value toward the lower-right corner, similar to the progression of reading English.
To specify a rectangular region, you need two coordinate pairs: the upper-left corner and the lower-right corner.
To specify more than one rectangle, you need the coordinate pairs for the upper-left and lower-right corners of each rectangle.
To specify an irregular region, you need three or more coordinate pairs. Studio creates the simplest possible shape based on these coordinate pairs. You can enter the coordinate pairs in any order.
For example, for a triangle, you need three coordinate pairs. For an octagon, you need eight coordinate pairs.
10.20.1.2. Create an Image Mapped Input Problem in Studio
In Studio, upload your image to the Files & Uploads page, and make a note of the file path for the image. For more information, see Adding Files to a Course.
In the unit where you want to create the problem, click Problem under Add New Component, and then click the Advanced tab.
Click Image Mapped Input.
In the component that appears, click Edit.
In the component editor, replace the example problem text with your own text.
In the
<imageinput>element, follow these steps.Replace the example file path in the
srcattribute with the file path for your image.Include alt text for your image to make the image accessible. For more information about alt text, see Use Best Practices for Describing Images.
Replace the example values for the
widthandheightattributes with the dimensions for your image.Modify the example
rectangleattribute to reflect the shape and size of the region that you want to specify. For more information, see Specify a Rectangular Region, Specify Multiple Rectangular Regions, or Specify an Irregular Region.
Click Save.
10.20.1.2.1. Specify a Rectangular Region
To specify a rectangular region, edit the rectangle attribute in the
<imageinput> element.
Specify the coordinate pair for the upper-left and lower-right corners of the rectangle, separating the x and y values with a comma.
Surround each coordinate pair with parentheses.
Use a hyphen to separate the coordinate pairs.
Surround the set of coordinate pairs with quotation marks (“).
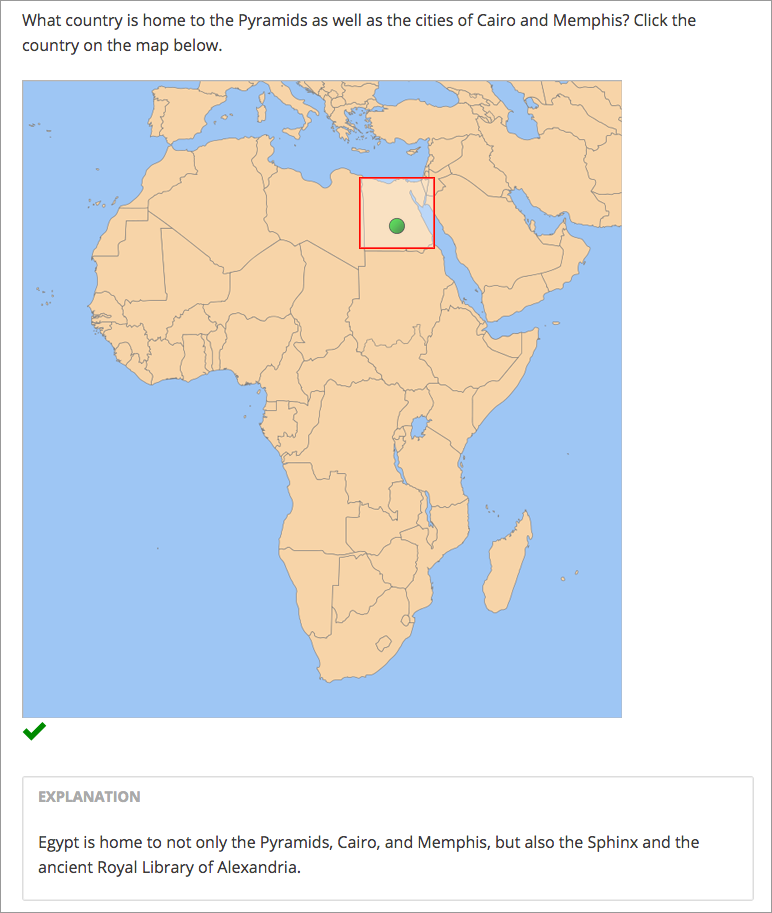
For example, the following rectangle attribute creates one rectangle from
two coordinate pairs:
rectangle="(338,98)-(412,168)"
Problem Code:
<problem>

 <p>What country is home to the Pyramids as well as the cities of
 Cairo and Memphis? Click the country on the map below.</p>

 <imageresponse>
   <imageinput src="/static/Africa.png" width="600" height="638"
 rectangle="(338,98)-(412,168)" alt="Map of Africa" />
 </imageresponse>

 <solution>
   <div class="detailed-solution">

     <p>Explanation</p>

     <p>Egypt is home to not only the Pyramids, Cairo, and Memphis, but also the
 Sphinx and the ancient Royal Library of Alexandria.</p>

   </div>
 </solution>

</problem>
10.20.1.2.2. Specify Multiple Rectangular Regions
You can specify more than one rectangular region in an image.
To specify multiple rectangular regions, edit the rectangle attribute in
the <imageinput> element.
Specify the coordinate pair for the upper-left and lower-right corners of each rectangle, separating the x and y values with a comma.
Surround each coordinate pair with parentheses.
Use a hyphen (-) to separate the coordinate pairs.
Separate each rectangle with a semicolon (;).
Surround the entire set of coordinates with quotation marks (“).
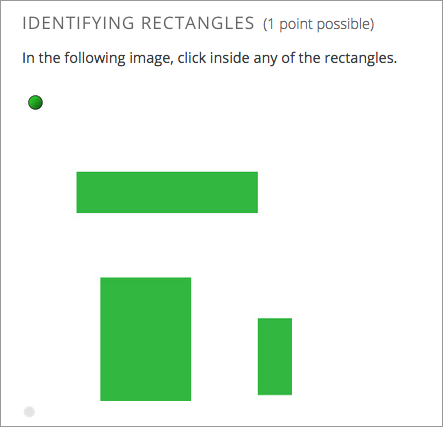
For example, the following rectangle attribute creates three rectangles:
rectangle="(62,94)-(262,137);(306,41)-(389,173);(89,211)-(187,410)"
Problem Code:
<problem>

 <p>In the following image, click inside any of the rectangles.</p>

   <imageresponse>

     <imageinput src="/static/imageresponse_multipleregions.png" width="450"
       height="450" rectangle="(62,94)-(262,137);(306,41)-(389,173);(89,211)-
       (187,410)" alt="Three rectangles on a white background" />

   </imageresponse>

</problem>
10.20.1.2.3. Specify an Irregular Region
You can specify one non-rectangular region.
To specify an irregular region, edit the rectangle attribute in the
<imageinput> element.
Change
rectangletoregion.Specify three or more coordinate points in any order.
Enter each coordinate pair in brackets ([]). Do not use parentheses.
Separate each set of points with a comma (,) and a space.
Enclose the whole list of coordinate points in brackets ([]).
Surround the outer brackets with quotation marks (“).
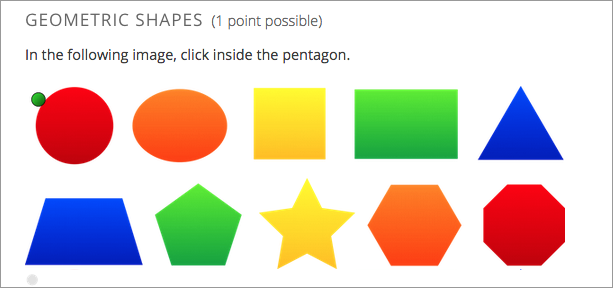
For example, the following regions attribute creates a pentagon.
regions="[[219,86], [305,192], [305,381], [139,381], [139,192]]"
Problem Code:
<problem>

 <p>In the following image, click inside the pentagon.</p>

 <imageresponse>

   <imageinput src="/static/imageresponse_irregularregions.jpg" width="600"
   height="204" regions="[[219,86], [305,192], [305,381], [139,381],
   [139,192]]" alt ="A series of 10 shapes including a circle, triangle,
   trapezoid, pentagon, star, and octagon" />

 </imageresponse>

</problem>
10.20.2. Image Mapped Input Problem XML
10.20.2.1. Template
<problem>

  <p>Problem text</p>

      <imageresponse>

       <imageinput src="IMAGE FILE PATH" width="NUMBER" height="NUMBER"
       rectangle="(X-AXIS,Y-AXIS)-(X-AXIS,Y-AXIS)" alt="DESCRIPTION OF
       IMAGE" />

      </imageresponse>

</problem>