Building and Running an Open edX Course: Palm Release
  • 1. General Information
    • 1.1. Read Me
    • 1.2. Other edX Resources
      • 1.2.1. Resources for edx.org Learners
      • 1.2.2. The edX Partner Portal
      • 1.2.3. The Open edX Portal
      • 1.2.4. System Status
      • 1.2.5. Resources for edx.org Course Teams
      • 1.2.6. Resources for Researchers
      • 1.2.7. Resources for Developers
      • 1.2.8. Resources for Open edX
    • 1.3. edX Browser Support
  • 2. Getting Started
    • 2.1. Getting Started with Studio
      • 2.1.1. What Is Studio?
      • 2.1.2. What Is the LMS?
  • 3. Exploring Your Dashboard and Profile
    • 3.1. Accessing Your Courses from the Dashboard
      • 3.1.1. Sharing Your Courses on Social Media
    • 3.2. Adding Profile Information
      • 3.2.1. Add or Update a Limited Profile
      • 3.2.2. Add or Update a Full Profile
      • 3.2.3. Add Links to Your Personal Social Media Accounts
      • 3.2.4. View Another Learner’s Profile
    • 3.3. Updating Course-Specific Settings
      • 3.3.1. Change a Course Email Preference
  • 4. Reaching As Many Learners As Possible
    • 4.1. Designing Your Course For a Mobile Experience
      • 4.1.1. Testing Your Course For Mobile Devices
  • 5. Accessibility Best Practices Guidance for Content Providers
    • 5.1. What Is The edX Accessibility Best Practices Guidance Based On?
    • 5.2. Supporting Learners with Diverse Needs
      • 5.2.1. Who Are Our Learners?
      • 5.2.2. Removing Barriers to Learning
    • 5.3. Accessibility Best Practices for Developing Course Content
      • 5.3.1. Make Sure Your Course Content is Perceivable
      • 5.3.2. Make Sure Your Course Content is Understandable
      • 5.3.3. Use Best Practices for Describing Images
      • 5.3.4. Create Accessible Course Materials
      • 5.3.5. Use Best Practices for Mathematical Content
      • 5.3.6. Use Best Practices for Custom Content Types
      • 5.3.7. Create Accessible Media
      • 5.3.8. Use Best Practices for HTML Markup
      • 5.3.9. Apply Universal Design for Learning
  • 6. Setting Up a Course
    • 6.1. Planning Course Information
      • 6.1.1. Course Title and Number
      • 6.1.2. Images and Videos for a Course or Program
      • 6.1.3. Course Description
      • 6.1.4. Additional Course Information
    • 6.2. Planning Course Run Information
      • 6.2.1. Planning Course Staff
      • 6.2.2. Scheduling a Course Run
      • 6.2.3. Additional Course Run Information
    • 6.3. Creating a Course
      • 6.3.1. Adding Course Team Members in Studio
      • 6.3.2. Creating a New Course in Studio
      • 6.3.3. Set the Course Run Schedule and Pacing in Studio
      • 6.3.4. Specifying Prerequisite Courses and Exams
      • 6.3.5. Creating a Course About Page in Studio
      • 6.3.6. Setting Up Certificates in Studio
      • 6.3.7. Course Search
      • 6.3.8. Creating a Custom Course
  • 7. Developing Your Course
    • 7.1. Getting Started with Course Content Development
      • 7.1.1. Understanding Course Building Blocks
      • 7.1.2. Creating New Course Content
      • 7.1.3. Making Course Content Visible to Students
      • 7.1.4. Making Course Content Searchable
      • 7.1.5. Revising Content
    • 7.2. Developing Your Course Outline
      • 7.2.1. Open the Course Outline
      • 7.2.2. Understanding a Course Outline
      • 7.2.3. Navigate the Course Outline
      • 7.2.4. Add Content in the Course Outline
      • 7.2.5. Modify Settings for Objects in the Course Outline
      • 7.2.6. Publish Content from the Course Outline
      • 7.2.7. Reorganize the Course Outline
      • 7.2.8. Delete Content in the Course Outline
    • 7.3. Developing Course Sections
      • 7.3.1. What Is a Section?
      • 7.3.2. Viewing Sections in the Outline
      • 7.3.3. Sections and Visibility to Learners
      • 7.3.4. Release Statuses of Sections
      • 7.3.5. Create a Section
      • 7.3.6. Change a Section Name
      • 7.3.7. Set a Section Release Date
      • 7.3.8. Set Section Highlights for Highlight Emails
      • 7.3.9. Publish All Units in a Section
      • 7.3.10. Hide a Section from Learners
      • 7.3.11. Delete a Section
    • 7.4. Developing Course Subsections
      • 7.4.1. What Is a Subsection?
      • 7.4.2. Viewing Subsections in the Outline
      • 7.4.3. Subsections and Visibility to Learners
      • 7.4.4. Release Statuses of Subsections
      • 7.4.5. Create a Subsection
      • 7.4.6. Change a Subsection Name
      • 7.4.7. Set a Subsection Release Date
      • 7.4.8. Set the Assignment Type and Due Date for a Subsection
      • 7.4.9. Set Problem Results Visibility
      • 7.4.10. Publish All Units in a Subsection
      • 7.4.11. Hiding a Subsection from Learners
      • 7.4.12. Delete a Subsection
    • 7.5. Developing Course Units
      • 7.5.1. What Is a Unit?
      • 7.5.2. Viewing Units in the Outline
      • 7.5.3. Viewing the Unit Page
      • 7.5.4. Viewing Units as a Learner
      • 7.5.5. The Unit Workflow
      • 7.5.6. Unit Publishing Status and Visibility to Learners
      • 7.5.7. Unit Publishing Statuses
      • 7.5.8. Create a Unit
      • 7.5.9. Edit a Unit
      • 7.5.10. Set Access Restrictions For a Unit
      • 7.5.11. Preview a Unit
      • 7.5.12. Publish a Unit
      • 7.5.13. Discard Changes to a Unit
      • 7.5.14. View a Published Unit
      • 7.5.15. Hide a Unit from Learners
      • 7.5.16. Delete a Unit
    • 7.6. Developing Course Components
      • 7.6.1. What is a Component?
      • 7.6.2. Add a Component
      • 7.6.3. Edit a Component
      • 7.6.4. Set Access Restrictions for a Component
      • 7.6.5. Duplicate a Component
      • 7.6.6. Delete a Component
      • 7.6.7. Reorganizing Components
      • 7.6.8. Components that Contain Other Components
    • 7.7. Controlling Content Visibility and Access
      • 7.7.1. Release Dates
      • 7.7.2. Unit Publishing Status
      • 7.7.3. Visibility Settings
      • 7.7.4. Access Settings
      • 7.7.5. Prerequisite Course Subsections
    • 7.8. Course Licensing
      • 7.8.1. License Options
      • 7.8.2. Set Course Content Licensing in Studio
      • 7.8.3. Set Video Licensing
      • 7.8.4. Learners’ View of Licenses
    • 7.9. Testing Your Course Content
      • 7.9.1. Viewing Published and Released Content
      • 7.9.2. Previewing Draft Content
      • 7.9.3. Viewing Course Content Based on Roles
  • 8. Adding Course Components
    • 8.1. Working with Text Components
      • 8.1.1. Text Component Overview
      • 8.1.2. Options for Editing Text Components
      • 8.1.3. Create a Text Component
      • 8.1.4. Add a Link in a Text Component
      • 8.1.5. Add an Image to a Text Component
    • 8.2. Working with Video Components
    • 8.3. Working with Discussion Components
      • 8.3.1. Overview
      • 8.3.2. Create a Discussion Component
      • 8.3.3. A Learner’s View of the Discussion
    • 8.4. Working with Problem Components
      • 8.4.1. Adding a Problem
      • 8.4.2. The Learner View of a Problem
      • 8.4.3. Editing a Problem in Studio
      • 8.4.4. Defining Settings for Problem Components
      • 8.4.5. The Advanced Editor
      • 8.4.6. Advanced Editor Features
      • 8.4.7. Problem Randomization
      • 8.4.8. Modifying a Released Problem
    • 8.5. Working with Content Libraries
      • 8.5.1. Content Libraries Overview
      • 8.5.2. Create a New Library
      • 8.5.3. Edit a Library
      • 8.5.4. Add Components to a Library
      • 8.5.5. View the Contents of a Library
      • 8.5.6. Edit Components in a Library
      • 8.5.7. Delete a Library
      • 8.5.8. Give Other Users Access to Your Library
      • 8.5.9. Exporting and Importing a Library
  • 9. Creating and Adding Video Content
    • 9.1. Video Process Overview
    • 9.2. Preparing a Video
      • 9.2.1. Set Up a Hosting Service
      • 9.2.2. Create a Video
      • 9.2.3. Obtain a Video Transcript
    • 9.3. Upload a Video
    • 9.4. Adding a Video to a Course
      • 9.4.1. Add a Video
    • 9.5. Specifying Additional Video Options
      • 9.5.1. Enable Video and Transcript Downloads
      • 9.5.2. Set Video Settings
    • 9.6. Specifying Transcript Options
      • 9.6.1. Add a Transcript
      • 9.6.2. Edit a Video Transcript
      • 9.6.3. Add a Supplemental Downloadable Transcript
    • 9.7. Troubleshooting Video Problems
  • 10. Adding Exercises and Tools
    • 10.1. Problems, Exercises, and Tools
      • 10.1.1. Levels of Support
      • 10.1.2. Enhancing Your Course with Additional Exercises and Tools
      • 10.1.3. Core Problem Types
      • 10.1.4. Additional Exercises and Tools
      • 10.1.5. Analyzing Learner Performance on Problems
      • 10.1.6. Mobile-Ready Problem Types
      • 10.1.7. Adding Unsupported Problem Types and Exercises
    • 10.2. Enabling Additional Exercises and Tools
      • 10.2.1. Enable an Exercise or Tool for Your Course
    • 10.3. Annotation Problem
      • 10.3.1. Enable Annotation Problems
      • 10.3.2. Create an Annotation Problem
    • 10.4. Calculator Tool
      • 10.4.1. Overview
      • 10.4.2. Enable the Calculator Tool
    • 10.5. Chemical Equation Problem
      • 10.5.1. Create a Chemical Equation Problem
      • 10.5.2. Chemical Equation Problem XML
    • 10.6. Circuit Schematic Builder Problem
      • 10.6.1. Create a Circuit Schematic Builder Problem
    • 10.7. Completion Tool
      • 10.7.1. Overview
      • 10.7.2. Enable the Completion Tool
      • 10.7.3. Add a Completion Component
    • 10.8. Conditional Module
      • 10.8.1. Format description
      • 10.8.2. Examples
    • 10.9. Custom JavaScript Display and Grading Problem
      • 10.9.1. Create a Custom JavaScript Display and Grading Problem
      • 10.9.2. JavaScript Input Problem XML
    • 10.10. Custom Python-evaluated Input Problem (Write-Your-Own-Grader)
      • 10.10.1. Overview
      • 10.10.2. Create a Custom Python-Evaluated Input Problem in Studio
      • 10.10.3. Script Tag Format
    • 10.11. Drag and Drop Problem
      • 10.11.1. Overview of Drag and Drop Problems
      • 10.11.2. Creating a Drag and Drop Problem
      • 10.11.3. Understanding the Drag and Drop Editing Controls
      • 10.11.4. Changing the Visual Style of a Drag and Drop Problem
    • 10.12. Drag and Drop Problem (Deprecated)
      • 10.12.1. Adding a Drag and Drop Problem
      • 10.12.2. Drag and Drop Problem XML
      • 10.12.3. Targets on Draggables
      • 10.12.4. Correct answer format
      • 10.12.5. Grading logic
    • 10.13. Dropdown Problem
      • 10.13.1. Overview
      • 10.13.2. Adding a Dropdown Problem
      • 10.13.3. Editing Dropdown Problems using the Advanced Editor
      • 10.13.4. Dropdown Problem OLX Reference
    • 10.14. External Grader
      • 10.14.1. External Grader Workflow
      • 10.14.2. External Grader Example
      • 10.14.3. External Grader Problem Requirements
      • 10.14.4. Create an External Grader Problem in Studio
    • 10.15. Full Screen Image Tool
      • 10.15.1. The Learner View of a Full Screen Image
      • 10.15.2. Create a Full Screen Image
    • 10.16. Gene Explorer Tool
      • 10.16.1. Gene Explorer Code
    • 10.17. Google Calendar Tool
      • 10.17.1. Overview
      • 10.17.2. Embedding a Google Calendar in Your Course
      • 10.17.3. Editing Google Calendars
    • 10.18. Google Drive Files Tool
      • 10.18.1. Overview
      • 10.18.2. Embedding a Google Drive File in Your Course
      • 10.18.3. Editing Google Drive Files
    • 10.19. Iframe Tool
      • 10.19.1. Create an IFrame Tool
    • 10.20. Image Mapped Input Problem
      • 10.20.1. Create an Image Mapped Input Problem
      • 10.20.2. Image Mapped Input Problem XML
    • 10.21. LTI Component
      • 10.21.1. Overview
      • 10.21.2. Enabling LTI Components for a Course
      • 10.21.3. Setting up an LTI 1.1 component
      • 10.21.4. Setting up an LTI 1.3 component
      • 10.21.5. Enabling and using LTI Advantage features
      • 10.21.6. LTI Component Settings
    • 10.22. Math Expression Input Problems
      • 10.22.1. Overview
      • 10.22.2. Adding a Math Expression Input Problem
      • 10.22.3. Math Expression Input Problem OLX Reference
    • 10.23. MathJax for Mathematics
      • 10.23.1. Adding MathJax to Text Components
      • 10.23.2. Adding MathJax to Problem Components
    • 10.24. Multi-select Problem
      • 10.24.1. Overview
      • 10.24.2. Adding a Multi-select Problem
      • 10.24.3. Editing Multi-select Problems using the Advanced Editor
      • 10.24.4. Multi-select Problem OLX Reference
    • 10.25. Notes Tool
    • 10.26. Numerical Input Problem
      • 10.26.1. Overview
      • 10.26.2. Adding a Numerical Input Problem
      • 10.26.3. Editing Numerical Input Problems using the Advanced Editor
      • 10.26.4. Numerical Input Problem OLX Reference
    • 10.27. Open Response Assessments
      • 10.27.1. Introduction to Open Response Assessments
      • 10.27.2. Create an Open Response Assessment Assignment
      • 10.27.3. Managing Open Response Assessment Assignments
      • 10.27.4. Staff Grading for Open Response Assignments
      • 10.27.5. Accessing Metrics for ORA Assignments
    • 10.28. Oppia Exploration Tool
      • 10.28.1. Overview
      • 10.28.2. Enable the Oppia Exploration Tool
      • 10.28.3. Add an Oppia Exploration in Studio
    • 10.29. Peer Instruction Tool
      • 10.29.1. Assignment Overview
      • 10.29.2. Adding a Peer Instruction Assignment in Studio
      • 10.29.3. Reviewing a Histogram of Learner Responses
    • 10.30. Periodic Table Tool
      • 10.30.1. Create the Periodic Table Tool
    • 10.31. Poll Tool
      • 10.31.1. Overview
      • 10.31.2. Enable the Poll Tool
      • 10.31.3. Add a Poll in edX Studio
      • 10.31.4. Add a Poll in OLX
      • 10.31.5. Editing Published Polls
      • 10.31.6. View Poll Results
    • 10.32. Poll Tool for OLX
      • 10.32.1. Terminology
      • 10.32.2. Create a Poll
      • 10.32.3. Format description
      • 10.32.4. Example
    • 10.33. Problem with Adaptive Hint
      • 10.33.1. Create a Problem with an Adaptive Hint
      • 10.33.2. Problem with Adaptive Hint XML
    • 10.34. Problem Written in LaTeX
      • 10.34.1. Create a Problem Written in LaTeX
    • 10.35. Protex Protein Builder Tool
      • 10.35.1. Create the Protein Builder Tool
      • 10.35.2. Protein Builder Tool Code
    • 10.36. Qualtrics Survey Tool
      • 10.36.1. Add a Qualtrics Survey to Your Course
      • 10.36.2. View Survey Responses
    • 10.37. Randomized Content Blocks
      • 10.37.1. Use Components from Libraries in a Course
      • 10.37.2. Enable Content Libraries
      • 10.37.3. View the Matching Components in a Randomized Content Block
      • 10.37.4. Editing Components in Randomized Content Blocks
      • 10.37.5. Getting the Latest Version of Library Content
      • 10.37.6. Preview the Randomized Content in Student View
      • 10.37.7. View a Specific Student’s Assigned Problems from a Randomized Content Block
      • 10.37.8. Adjust Grades for a Problem from a Randomized Content Block
    • 10.38. Recommender Tool
      • 10.38.1. Overview
      • 10.38.2. Enable the Recommender Tool
      • 10.38.3. Add a Recommender
    • 10.39. Single Select Problem
      • 10.39.1. Overview
      • 10.39.2. Adding a Single Select Problem
      • 10.39.3. Editing Single Select Problems using the Advanced Editor
      • 10.39.4. Single Select Problem OLX Reference
    • 10.40. Single Select and Numerical Input Problem
      • 10.40.1. Create a Single Select and Numerical Input Problem
      • 10.40.2. Single Select and Numerical Input Problem Code
    • 10.41. Staff Graded Assignment
      • 10.41.1. Enable Staff Assignment
      • 10.41.2. Create a Staff Graded Assignment
    • 10.42. Survey Tool
      • 10.42.1. Overview
      • 10.42.2. Enable the Survey Tool
      • 10.42.3. Add a Survey in edX Studio
      • 10.42.4. Add a Survey in OLX
      • 10.42.5. Editing Published Surveys
      • 10.42.6. View Survey Results
    • 10.43. Text Input Problem
      • 10.43.1. Overview
      • 10.43.2. Adding a Text Input Problem
      • 10.43.3. Editing Text Input Problems using the Advanced Editor
      • 10.43.4. Text Input Problem XML Reference
    • 10.44. Word Cloud Tool
      • 10.44.1. Enable the Word Cloud Tool
      • 10.44.2. Create a Word Cloud
    • 10.45. Zooming Image Tool
      • 10.45.1. Components of a Zooming Image Tool
      • 10.45.2. Create a Zooming Image Tool
  • 11. Adding Course Assets
    • 11.1. Adding Files to a Course
      • 11.1.1. The Files & Uploads Page
      • 11.1.2. File Size
      • 11.1.3. Upload Files
      • 11.1.4. Find an Uploaded File
      • 11.1.5. Sort Files
      • 11.1.6. Filter Files
      • 11.1.7. Use an Uploaded File Inside or Outside the Course
      • 11.1.8. Lock a File
      • 11.1.9. Delete a File
    • 11.2. Adding Course Updates and Handouts
      • 11.2.1. Add a Course Update
      • 11.2.2. Add a Course Handout
    • 11.3. Managing the Pages in Your Course
      • 11.3.1. Working with the Default Pages
      • 11.3.2. Enabling Additional Applications & Resources
      • 11.3.3. Configuring Applications & Resources
      • 11.3.4. Reordering and Deleting Custom Pages
    • 11.4. Textbooks
      • 11.4.1. Add a Textbook
      • 11.4.2. Delete a Textbook
      • 11.4.3. Delete a Chapter
    • 11.5. Using the Course Wiki
      • 11.5.1. About the Course Wiki
      • 11.5.2. Managing the Course Wiki
      • 11.5.3. Showing or Hiding the Wiki
      • 11.5.4. Controlling Access to the Wiki
      • 11.5.5. Setting Permissions for Wiki Articles
      • 11.5.6. Seeding the Wiki
      • 11.5.7. Adding a Wiki Article
      • 11.5.8. Editing a Wiki Article
      • 11.5.9. Searching for Wiki Articles
      • 11.5.10. Managing Versions of Wiki Articles
      • 11.5.11. Locking a Wiki Article
      • 11.5.12. Deleting a Wiki Article
  • 12. Using Enhanced Capabilities In Your Course
    • 12.1. Including Learner Cohorts
      • 12.1.1. Using Cohorts in Your Courses
      • 12.1.2. Enabling and Configuring the Cohorts Feature
      • 12.1.3. Creating Cohort-Specific Course Content
      • 12.1.4. Setting up Discussions in Courses with Cohorts
    • 12.2. Offering Different Content to Different Learner Groups
      • 12.2.1. Offering Different Content to Learners Based on Their Enrollment Track
      • 12.2.2. Offering Different Content to Learners Based on Cohort
    • 12.3. Including Teams
      • 12.3.1. Using Teams in Your Courses
      • 12.3.2. The Learner’s Experience of Teams
      • 12.3.3. Managing Team Discussions
    • 12.4. Creating Content Experiments
      • 12.4.1. Overview of Content Experiments
      • 12.4.2. Configure Your Course for Content Experiments
      • 12.4.3. Add Content Experiments to Your Course
      • 12.4.4. Test Content Experiments
    • 12.5. Offering Timed Exams
      • 12.5.1. Overview
      • 12.5.2. Enable Timed Exams
      • 12.5.3. Set a Subsection to be Timed
      • 12.5.4. Grant Learners More Time for a Timed or Proctored Exam
      • 12.5.5. Resuming an Exam in an Error State
      • 12.5.6. Allow Learners to Retake a Timed or Proctored Exam
      • 12.5.7. Hide a Timed Exam After Its Due Date
    • 12.6. Using Open edX as an LTI Tool Provider
      • 12.6.1. Reusing Course Content with LTI
      • 12.6.2. Preparing to Reuse Course Content
      • 12.6.3. Determining Content Addresses
      • 12.6.4. Grading Remote Content
      • 12.6.5. Example: edX as an LTI Provider to Canvas
      • 12.6.6. Example: edX as an LTI Provider to Blackboard
  • 13. Proctored Exams
    • 13.1. Proctored Exam Overview
    • 13.2. Preparing Learners for Proctored Exams
      • 13.2.1. The Learner Experience of Proctored Exams
      • 13.2.2. Practice Proctored Exams
    • 13.3. Creating Proctored Exams
      • 13.3.1. Enable Proctored Exams
      • 13.3.2. Create a Proctored Exam or Practice Proctored Exam
      • 13.3.3. Specify Exam Rules and Exceptions
      • 13.3.4. Allow Opting Out of Proctored Exams
      • 13.3.5. Check Proctoring Results
    • 13.4. Online Proctoring Rules for Learners
      • 13.4.1. Learner Rules for Online Proctored Exams
  • 14. Establishing a Grading Policy For Your Course
    • 14.1. Set the Grade Range
      • 14.1.1. Grade Ranges and Certificates
    • 14.2. Set the Grace Period
    • 14.3. Configure the Assignment Types
      • 14.3.1. Assignment Type Fields
    • 14.4. Graded Subsections
    • 14.5. The Learner View of Grades
  • 15. Releasing Your Course
    • 15.1. Beta Testing a Course
      • 15.1.1. Overview
      • 15.1.2. The Beta Testing Process
      • 15.1.3. The Beta Testing Role
      • 15.1.4. What to Test
      • 15.1.5. How Beta Testers See Course Content
      • 15.1.6. Adding Beta Testers
      • 15.1.7. Reporting Issues During a Course
    • 15.2. Course Launching Activities
      • 15.2.1. Course Launch Checklist in Studio
      • 15.2.2. Course Launch Checklist Timeline
    • 15.3. Exporting and Importing a Course
      • 15.3.1. Export a Course
      • 15.3.2. Course Outline Terminology in Exported Files
      • 15.3.3. Import a Course
      • 15.3.4. Work with the .tar.gz File
  • 16. Managing a Running Course
    • 16.1. Course Information
      • 16.1.1. View Basic Course Information
    • 16.2. Automatic Email Messages from the Open edX Platform
      • 16.2.1. Automatic Email Message Text
    • 16.3. Bulk Email Messages from the Course Team
      • 16.3.1. Message Addressing
      • 16.3.2. Composing Email Messages
      • 16.3.3. Send an Email Message to Course Participants
      • 16.3.4. Send a Scheduled Email Message to Course Participants
      • 16.3.5. Use Keywords in Messages
      • 16.3.6. Message Workflow States
      • 16.3.7. Review Sent Messages
      • 16.3.8. Email Task History Report
      • 16.3.9. Example Messages to Learners
    • 16.4. Enrollment
      • 16.4.1. Registration and Enrollment
      • 16.4.2. Options for Enrolling Learners in a Course
      • 16.4.3. Enroll Learners in a Course
      • 16.4.4. Report Learners Not Yet Enrolled
      • 16.4.5. Unenroll Learners from a Course
    • 16.5. Staff Debug Info
  • 17. Managing Discussions
    • 17.1. Creating Course Discussions
      • 17.1.1. Configuring Edx Discussions
      • 17.1.2. Create Course-Wide Discussion Topics
      • 17.1.3. Create Content-Specific Discussion Topics
      • 17.1.4. Understanding When Learners Can See Discussion Topics
      • 17.1.5. Allowing Learners to Make Anonymous Discussion Posts
      • 17.1.6. Discussions in the edX Mobile App
    • 17.2. Running Course Discussions
      • 17.2.1. Understanding the Elements of a Discussion
      • 17.2.2. Using Naming Conventions for Discussion Topics
      • 17.2.3. Seeding Discussion Topics
      • 17.2.4. Minimizing Thread Proliferation
      • 17.2.5. Closing Discussions
    • 17.3. About Divided Discussion Topics
      • 17.3.1. What Are Divided Discussions?
      • 17.3.2. Setting Up Divided Discussions
      • 17.3.3. Divide All Content-Specific Discussion Topics
      • 17.3.4. Divide Course-Wide Discussion Topics
    • 17.4. Managing Divided Discussion Topics
      • 17.4.1. Overview
      • 17.4.2. Identifying Who Can Read a Post
      • 17.4.3. Choosing the Visibility of a Post
      • 17.4.4. Viewing the Posts of a Group
    • 17.5. Moderating Discussions
      • 17.5.1. About Discussion Moderation Roles
      • 17.5.2. Assigning Discussion Moderation Roles
      • 17.5.3. Provide Guidelines for Learners
      • 17.5.4. Develop a Positive Discussion Culture
      • 17.5.5. Find Questions and Discussions
      • 17.5.6. Edit Messages
      • 17.5.7. Delete Messages
      • 17.5.8. Respond to Reports of Misuse
      • 17.5.9. View Profile Information for Discussion Participants
      • 17.5.10. Block Users
    • 17.6. Guidance for Discussion Moderators
      • 17.6.1. Responsibilities
      • 17.6.2. Qualities of Good Discussion Moderators
      • 17.6.3. Best Practices for Discussion Moderation
      • 17.6.4. Guidelines for Specific Types of Posts
  • 18. Managing Learner Progress and Grades
    • 18.1. Learner Data
      • 18.1.1. Guidance for Working with Personal Information
      • 18.1.2. Accessing Learner Data
      • 18.1.3. Accessing Anonymized Learner IDs
    • 18.2. Answer Data
      • 18.2.1. Learner Answer Submissions
      • 18.2.2. Student Answer Distribution
    • 18.3. Learner Grades and Grading
      • 18.3.1. Review How Grading Is Configured for Your Course
      • 18.3.2. Generate a Grade Report for All Learners in a Course
      • 18.3.3. Generate a Problem Grade Report for All Learners in a Course
      • 18.3.4. Review Learner Grades on the Instructor Dashboard
      • 18.3.5. Override Learner Subsection Scores in Bulk
      • 18.3.6. Per-Learner Interventions Report
      • 18.3.7. Check the Progress of a Specific Learner
      • 18.3.8. Grant Due Date Extensions for a Specific Learner
      • 18.3.9. Adjust Grades for One or All Learners
    • 18.4. Obtaining Certificate Data
      • 18.4.1. Access Certificate Data
      • 18.4.2. Columns in the Certificate Report
    • 18.5. Ending a Course
      • 18.5.1. Sending a Farewell Message
      • 18.5.2. Assigning Final Grades
      • 18.5.3. Issuing Certificates
  • 19. Re-running Your Course
    • 19.1. Re-running a Course
      • 19.1.1. Data Duplicated When You Re-Run a Course
      • 19.1.2. Re-Run a Course
      • 19.1.3. Update the New Course
  • 20. Glossary
    • 20.1. A
    • 20.2. C
    • 20.3. D
    • 20.4. E
    • 20.5. F
    • 20.6. G
    • 20.7. H
    • 20.8. I
    • 20.9. K
    • 20.10. L
    • 20.11. M
    • 20.12. N
    • 20.13. O
    • 20.14. P
    • 20.15. Q
    • 20.16. R
    • 20.17. S
    • 20.18. T
    • 20.19. U
    • 20.20. V
    • 20.21. W
    • 20.22. XYZ
 
Building and Running an Open edX Course: Palm Release
  • Table of Contents »
  • 10.13. Dropdown Problem
  • Get Help orGive Doc Feedback Edit on GitHub

10.13. Dropdown Problem

Note

EdX offers full support for this problem type.

The dropdown problem type is a simple problem type that can be added to any course. Dropdown problems include a question or prompt and several answer options with a single correct answer. By adding hints, feedback, or both, you can give learners guidance and help when they work on a problem.

  • Overview

    • Example Dropdown Problem

  • Adding a Dropdown Problem

    • Adding Feedback

    • Adding Hints

  • Editing Dropdown Problems using the Advanced Editor

    • Adding Feedback

    • Adding Hints

  • Dropdown Problem OLX Reference

    • Template

    • Elements

For more information about the simple problem types, see Working with Problem Components.

10.13.1. Overview

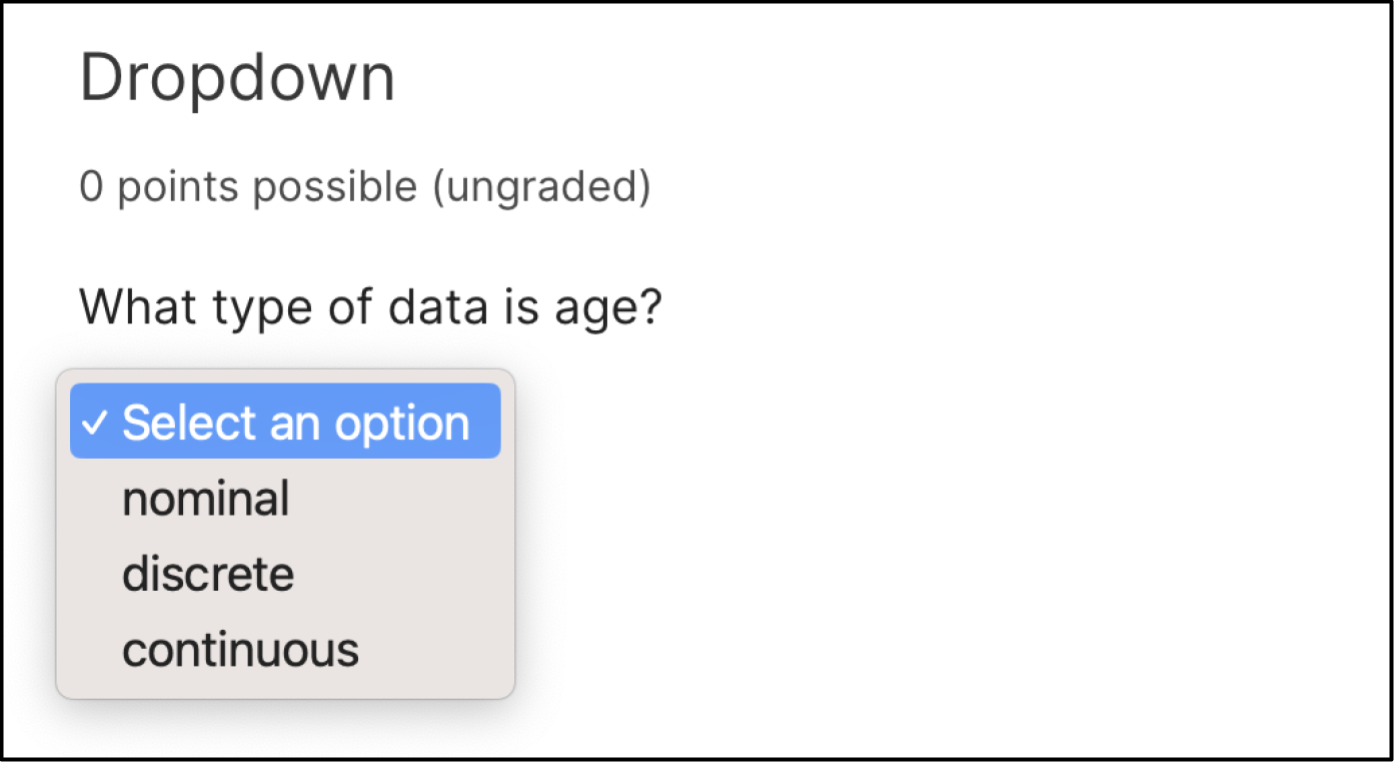
In dropdown problems, learners select one answer from a list of answer options. Unlike single select problems, where the answer choices are always visible directly below the question, the answer options for dropdown problems do not appear until the learner selects the dropdown arrow.

Dropdown problems can only have one correct answer per question, we recommend adding a “Both B & C” answer where multiple selections could be correct.

10.13.1.1. Example Dropdown Problem

In the LMS, learners select a single answer option to complete a dropdown problem. An example of a dropdown problem from the learner’s perspective follows.

A problem component that contains three answer choices.

10.13.2. Adding a Dropdown Problem

You add dropdown problems in Studio by selecting the Problem component. In the problem editor, select the Dropdown option. Fill in the fields on this screen to create your problem.

An example dropdown problem in the problem editor with number indicators labeling the various features.

Creating a dropdown problem is as simple as:

  1. Editing the Display Name. Click the pen symbol to edit.

  2. Filling in the Question field.

  3. Filling in the Explanation field. When this is shown to learners is based on the selection in the Show answer panel on the right.

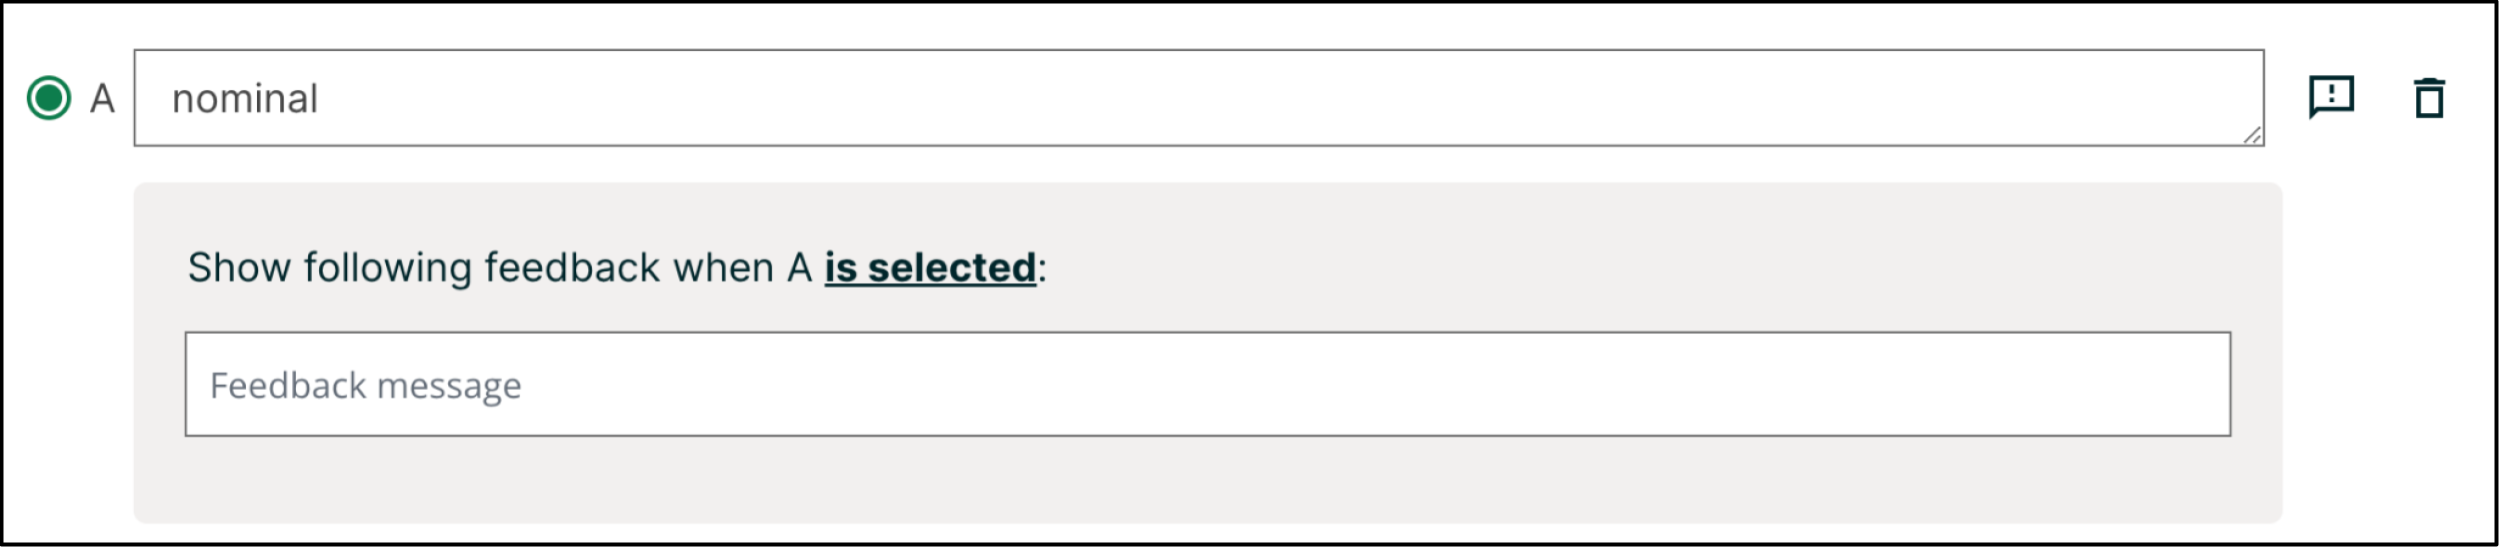
  4. Filling in the Answer fields. Select the correct answer by ticking off the radio button. Additional answers can be added by clicking the Add answer button. Answers can be deleted by clicking the trash can icon. Feedback can be provided for each answer. More information on feedback can be found in the following section.

  5. Selecting and filling in any desired settings on the right.

If you have any questions on the specifics of using the simple editor, please check out The Simple Editor and Defining Settings for Problem Components.

10.13.2.1. Adding Feedback

For an overview of feedback in problems, see Adding Feedback and Hints to a Problem. You can add feedback for each of the answer options you provide in the problem. Use the following guidelines when providing feedback.

  • Use feedback for the incorrect answers to target common misconceptions and mistakes.

  • Ensure feedback provides some guidance to the learner about how to arrive at the correct answer.

  • Use feedback for the correct answer to reinforce why the answer is correct. Because learners are able to guess, ensure that feedback provides a reason why the answer is correct for learners who might have selected that answer by chance.

An example of an expanded feedback section for dropdown problems showing the 'is selected' feedback field.

10.13.2.2. Adding Hints

You can add hints to a dropdown problem. For an overview of hints in problems, see Adding Feedback and Hints to a Problem.

In the settings panels on the right of the editor, you’ll find a Hints panel.

An example of the hints settings panel.

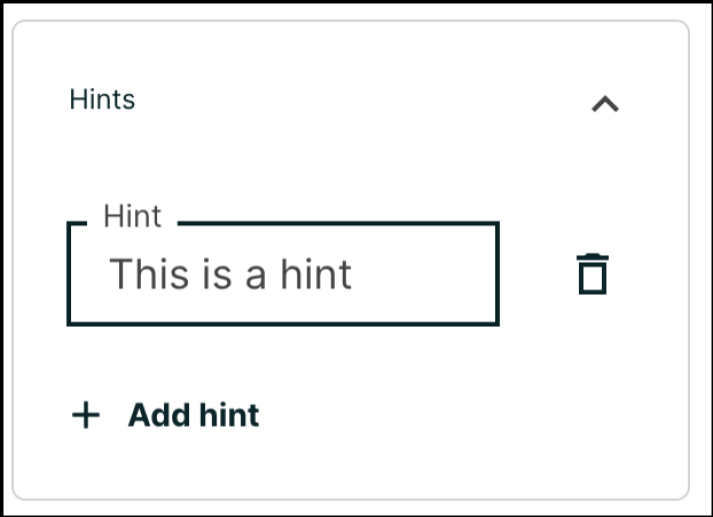
Click the Add hint button to add a new hint text field. To delete any hints you’ve added, click the trash can icon next to its respective hint field.

Note

You can configure any number of hints. The learner views one hint at a time and views the next one by selecting Hint again.

10.13.3. Editing Dropdown Problems using the Advanced Editor

If the simple editor is not enough to meet your needs, you can switch over to the advanced editor. In the setting panels on the right of the editor, click Show advanced settings, then scroll down and click Switch to advanced editor.

You can use the advanced editor to identify the elements of a dropdown problem with OLX. For more information, see Dropdown Problem OLX Reference. To format equations, you can use MathJax. For more information, see MathJax for Mathematics.

You can see the OLX for the example problem from the Overview section below.

<problem>
  <optionresponse>
    <label>What type of data is age?</label>
    <optioninput options="('Nominal','Discrete','Continuous')"
    correct="Continuous"></optioninput>
  </optionresponse>
</problem>

Note

You can begin work on the problem in the simple editor, and then switch to the advanced editor. However, after you save any advanced OLX changes you make in the advanced editor, you may not be able to cannot switch back to the simple editor.

10.13.3.1. Adding Feedback

In the advanced editor, you configure feedback with the following syntax.

<option correct="False">Option Label
  <optionhint>Feedback for when a learner selects this incorrect answer.</optionhint>
</option>

For example, the following problem has feedback for each answer.

<problem>
  <optionresponse>
    <label>A/an ________ is an example of a vegetable.</label>
    <optioninput>
      <option correct="False">apple
        <optionhint>An apple is the fertilized ovary that comes from an
        apple tree and contains seeds classifying it as a fruit.</optionhint>
      </option>
      <option correct="False">pumpkin
        <optionhint>A pumpkin is the fertilized ovary of a squash plant and
        contains seeds classifying it as a fruit.</optionhint>
      </option>
      <option correct="True">potato
        <optionhint>A potato is an edible part of a plant in tuber form and
        is classified as a vegetable.</optionhint>
      </option>
      <option correct="False">tomato
        <optionhint>Many people mistakenly think a tomato is a vegetable.
        However, because a tomato is the fertilized ovary of a tomato plant
        and contains seeds it is classified as a fruit.</optionhint>
      </option>
    </optioninput>
  </optionresponse>
</problem>

10.13.3.1.1. Customizing Feedback Labels

By default, the feedback labels shown to learners are Correct and Incorrect. If you do not define feedback labels, learners see these terms when they submit an answer, as in the following example.

Incorrect: A pumpkin is the fertilized ovary of a squash plant and contains
seeds classifying it as a fruit.

You can configure the problem to override the default labels. For example, you can configure a custom label for a specific wrong answer.

Not Quite: Many people mistakenly think a tomato is a vegetable. However,
because a tomato is the fertilized ovary of a tomato plant and contains seeds
it is classified as a fruit.

In the advanced editor, you configure custom feedback labels with the following syntax.

<choice correct="true or false">Answer
  <choicehint label="Custom Label">Feedback for learners who select this
  answer.</choicehint>
</choice>

For example, the feedback for the following answer option is configured to use a custom label.

<choice correct="false">tomato
  <choicehint label="Not Quite">Many people mistakenly think a tomato is a
  vegetable. However, because a tomato is the fertilized ovary of a tomato
  plant and contains seeds, it is a fruit.</choicehint>
</choice>

Note

The default labels Correct and Incorrect display in the learner’s requested language. If you provide custom labels, they display as you define them to all learners. They are not translated into different languages.

10.13.3.2. Adding Hints

In the advanced editor, you add the <demandhint> element immediately before the closing </problem> tag, and then configure each hint using the <hint> element.

<problem>
.
.
.
<demandhint>
  <hint>Hint 1</hint>
  <hint>Hint 2</hint>
  <hint>Hint 3</hint>
</demandhint>
</problem>

For example, the following OLX for a single select problem shows two hints.

<problem>
  <multiplechoiceresponse>
  .
  .
  .
  </multiplechoiceresponse>
  <demandhint>
    <hint>A fruit is the fertilized ovary from a flower.</hint>
    <hint>A fruit contains seeds of the plant.</hint>
  </demandhint>
</problem>

10.13.4. Dropdown Problem OLX Reference

10.13.4.1. Template

<problem>
  <optionresponse>
    <label>Question or prompt text</label>
    <description>Optional information about how to answer the question</description>
    <option correct="False">Option Label
      <optionhint>Feedback for when learner selects this answer.</optionhint>
    </option>
    <option correct="True">Option Label
      <optionhint>Feedback for when learner selects this answer.</optionhint>
    </option>
    <solution>
      <div class="detailed-solution">
        <p>Explanation or Solution Header</p>
        <p>Explanation or solution text</p>
      </div>
    </solution>
  </optionresponse>
  <demandhint>
    <hint>Hint 1</hint>
    <hint>Hint 2</hint>
    <hint>Hint 3</hint>
  </demandhint>
</problem>

10.13.4.2. Elements

For dropdown problems, the <problem> element can include this hierarchy of child elements.

<optionresponse>
    <label>
    <description>
    <optioninput>
          <option>
              <optionhint>
    <solution>
<demandhint>
    <hint>

In addition, standard HTML tags can be used to format text.

10.13.4.2.1. <optionresponse>

Required. Indicates that the problem is a dropdown problem.

10.13.4.2.1.1. Attributes

None.

10.13.4.2.1.2. Children
  • <label>

  • <description>

  • <optioninput>

  • <solution>

10.13.4.2.2. <label>

Required. Identifies the question or prompt. You can include HTML tags within this element.

10.13.4.2.2.1. Attributes

None.

10.13.4.2.2.2. Children

None.

10.13.4.2.3. <description>

Optional. Provides clarifying information about how to answer the question. You can include HTML tags within this element.

10.13.4.2.3.1. Attributes

None.

10.13.4.2.3.2. Children

None.

10.13.4.2.4. <optioninput>

Required. Designates an answer option.

10.13.4.2.4.1. Attributes

Attribute

Description

options

Either this attribute or a set of <option> child elements for <optioninput> is required. Accepts a comma separated list of values in the following format.

options="('Answer1','Answer2','Answer3')"

correct

Used if the options attribute is set. Required. Indicates which of the answer options is correct.

10.13.4.2.4.2. Children
  • <option>

  • <optionhint>

10.13.4.2.5. <option>

Designates an answer option. Either a set of <option> child elements or the options attribute for <optioninput> is required.

10.13.4.2.5.1. Attributes

Attribute

Description

correct

Required. Indicates whether the answer option is correct or incorrect. When set to "true", the choice is a correct answer. At least one required. When set to "false", the choice is an incorrect answer.

If the <option> element is used, <optionhint> is a child of <option>.

10.13.4.2.6. <optionhint>

Optional. Specifies feedback for the answer.

10.13.4.2.6.1. Attributes

None.

10.13.4.2.6.2. Children

None.

10.13.4.2.7. <solution>

Optional. Identifies the explanation or solution for the problem, or for one of the questions in a problem that contains more than one question.

This element contains an HTML division <div>. The division contains one or more paragraphs <p> of explanatory text.

10.13.4.2.8. <demandhint>

Optional. Specifies hints for the learner. For problems that include multiple questions, the hints apply to the entire problem.

10.13.4.2.8.1. Attributes

None.

10.13.4.2.8.2. Children

<hint>

10.13.4.2.9. <hint>

Required. Specifies additional information that learners can access if needed.

10.13.4.2.9.1. Attributes

None.

10.13.4.2.9.2. Children

None.

Next Previous

Copyright © 2023, edX Inc.
Creative Commons License
These works by edX Inc. are licensed under a Creative Commons Attribution-ShareAlike 4.0 International License.