11.3. Managing the Pages in Your Course
This topic describes the pages, or tabs, that the LMS includes for your course by default, how you can modify them, and how you can add more pages to your course.
11.3.1. Working with the Default Pages
By default, every new course has the following pages.
Course
Discussion
Wiki
Progress
In the LMS, learners see these options in the navigation bar at the top of every page.

In addition, if you enable the notes tool for your course, the system adds a Notes page. The system also adds a page for each textbook that you add to the course. Note that in Studio, all of your textbooks appear in one group, but in the LMS each one appears as a separate page.
As a course team member with the Staff or Admin role, you also see the Instructor option in the navigation bar. Learners do not see the Instructor option.
To customize your course, you can make the following changes to the pages that the system adds by default.
You can change the order in which the pages are presented, with the exception that the Course pages is always presented in the first position.
If you do not want to use the Wiki or Progress page in your course, you can hide one or both of them.
If you want to change the name of a page that appears for a textbook, you can change the name that you entered for the textbook.
You can also add custom pages.
11.3.2. Adding Custom Pages
You can customize your course by adding pages. Each page that you add appears in the navigation bar for your course. When you add a page, you also add its content using an HTML editor.
The following example shows the navigation bar for a course that has added custom pages named Syllabus and Extra Reading.

When you add a page, you can specify whether it and its content are visible only to course team members who have the Admin or Staff role, or to all enrolled learners as well as the course team. For more information about assigning course team roles, see Planning Course Staff.
11.3.2.1. Add a Custom Page
If you add a custom page to a course after its start date, and have specified that the page should be visible to learners, the page is visible in the LMS as soon as you save your work. As a best practice, be sure the following aspects of your page design are ready before you add a page in Studio.
The content for the page, which can include HTML markup.
The name of the page.
The audience for the page (everyone, or course team members with the Admin or Staff roles only).
To add a custom page and its content to your course, follow these steps.
In Studio, from the Content menu select Pages. A list of the pages that appear in the navigation bar for your course appears.
Select Add a New Page. The system adds a page named Empty to the end of the list.
In the row for the new page, select Edit. The visual editor opens.
Enter the content for your page.
To add HTML tags to your content, select HTML to open the raw HTML editor. For more information about entering content, see Options for Editing HTML Components.
Note
If you copy text from another source and paste it into the visual editor, be sure to proofread the result carefully. Some applications automatically change quotation marks and apostrophes from the “straight” version to the “smart” or “curly” version. The raw HTML editor requires “straight” quotation marks and apostrophes.
To rename the page, select Settings, and then enter a Display Name. The display name is the label that course participants use in the course navigation bar.
To hide the page from learners, select Settings, and then select
truefor Hide Page from Learners. By default, pages are visible to learners.Select Save.
The new page is immediately available to the specified audience if the course has started.
11.3.3. Hiding or Showing the Wiki or Progress Pages
By default, your course includes a Wiki page and a Progress page. For more information about how you can use these pages in a course, see Using the Course Wiki or Check the Progress of a Specific Learner.
As part of your course design, you can decide whether you want learners to have access to one or both of these pages. While you cannot delete these pages completely, you can hide them so that they do not appear in the navigation bar in the LMS. If you change your mind, you can show the pages again.
Note
The information on the Progress page can be motivating for learners, particularly in courses that include graded subsections, but also for courses that include only ungraded exercises. Before choosing to hide the Progress page for your course, consider the possible effect on learner engagement.
As a best practice, you should avoid changing the visibility of these pages after your course starts. For example, your course includes the Wiki page when it starts. A learner adds a page to the course wiki, and adds a browser bookmark to that page. If you later hide the Wiki page, the learner’s browser bookmark will continue to provide access to the entire course wiki.
11.3.3.1. Hide or Show the Wiki or Progress Pages
If you hide or show a page after the course start date, note that the visibility of the page in the LMS changes immediately.
To hide or show the Wiki or Progress pages, follow these steps.
In Studio, from the Content menu select Pages.
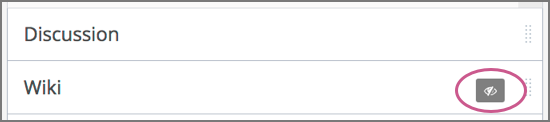
On the list of pages, each page that you can hide includes a Show/hide page icon.

Select the Show/hide page icon to hide a page. The icon changes to indicate that the page is hidden, as shown in this example.
Select the Show/hide page icon again to make the page visible.
11.3.4. Reorder the Pages
You can reorder the pages in your course in the same way that you reorganize the course outline: you drag a page to different location in the list of pages and drop it there.
Note
You cannot change the order of the Home or Course pages, which are always presented in the first and second positions.
If you change the order of the pages after the course start date, note that the change immediately affects the sequence of the options on the navigation bar in the LMS.
To reorder the pages, follow these steps.
In Studio, from the Content menu select Pages.
On the list of pages, each page that you can move includes a Drag to reorder icon.
Move your pointer over the Drag to reorder icon for the page. Your pointer changes to a four-headed arrow.
Click and drag the page to the new location, and then release.
11.3.5. Delete a Custom Page
You can delete any of the custom pages that were previously added to the course.
You cannot delete any of the default pages. However, you can hide the Wiki and the Progress pages.
To delete a page that appears for a textbook, you delete the textbook.
If you delete a page after the course start date, note that the visibility of the page in the LMS changes immediately.
To delete a custom page, follow these steps.
In Studio, from the Content menu select Pages.
On the list of pages, each page that you can delete includes a Delete icon.
Select the Delete icon, and then confirm the deletion.