10.21. LTI Component
Note
EdX offers full support for this tool.
You can integrate remote learning tools, such as applications and textbooks, into your course with the learning tools interoperability (LTI) component. The LTI component is based on the IMS Global Learning Tools Interoperability version 1.1.1 specifications.
Before you make tools from an external site available through your course, be sure to review the tools to ensure that they are accessible to people with disabilities. For example, in addition to testing the LTI components that you add to your course, you can ask third party providers to confirm that a tool is accessible, and, if available, contact your on campus accessibility support services for additional guidance. For more information, see Accessibility Best Practices for Developing Course Content.
10.21.1. Overview
You can use an LTI component in several ways.
You can add remote LTI tools that display content only, and that do not require a learner response. An example is a digital copy of a textbook in a format other than PDF.
You can add remote LTI tools that do require a learner response. A remote LTI tool provider grades the responses.
You can use the LTI component as a placeholder for synchronizing with a remote grading system.
For example, the following LTI component integrates a Cerego tool that learners interact with into the LMS for a course.
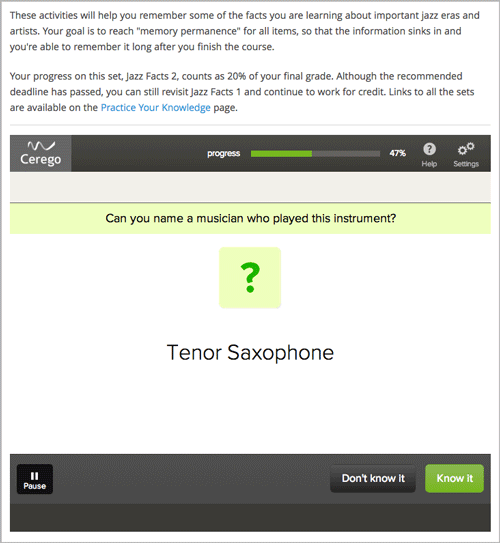
When you add an LTI component to your course, the edX Learning Management System (LMS) is the LTI tool consumer, and the external tool or content is the LTI tool provider.
Be sure to review all supplemental materials to ensure that they are accessible before making them available through your course. For more information, see Accessibility Best Practices for Developing Course Content.
You can also integrate content from a course into a remote learning management system such as Canvas or Blackboard.
For more information about how to use Studio as an LTI tool provider, see Using Open edX as an LTI Tool Provider.
10.21.2. LTI Authentication Information
Some LTI tools require users to provide authentication credentials. If the LTI tool you are including in your course requires authentication, you must add an LTI passport for that tool to your course configuration.
An LTI passport is a string of text that contains the authentication key and shared secret for one LTI tool. A passport also contains the LTI ID for the tool. When you add an LTI component to your course, assign it a matching LTI ID so that it can use the LTI passport that it requires.
For more information about creating and registering LTI passports, see the following sections.
10.21.2.1. Creating an LTI Passport String
Each LTI passport includes three component text strings that are separated by colon characters. The component strings are: the LTI ID, the client key, and the client secret.
The LTI ID is a value that you create to refer to the remote LTI tool provider. You should create an LTI ID that you can remember easily.
The LTI ID can contain uppercase and lowercase alphanumeric characters, as well as underscore characters (_). It can be any length. For example, you can create an LTI ID that is as simple as
test_lti_id, or your LTI ID can be a string of numbers and letters such asid_21441orbook_lti_provider_from_new_york.The client key is a sequence of characters that you obtain from the LTI tool provider. The client key is used for authentication and can contain any number of characters. For example, your client key might be
b289378-f88d-2929-ctools.school.edu.The client secret is a sequence of characters that you obtain from the LTI tool provider. The client secret is used for authentication and can contain any number of characters. For example, your client secret can be something as simple as
secret, or it might be a string of numbers and letters such as23746387264oryt4984yr8.
To create an LTI passport, combine the LTI ID, client key, and client secret in the following format (be sure to include the colons).
{your_lti_id}:{client_key}:{client_secret}
The following example LTI passports show the format of the passport string.
test_lti_id:b289378-f88d-2929-ctools.school.edu:secret
id_21441:b289378-f88d-2929-ctools.school.edu:23746387264
book_lti_provider_from_new_york:b289378-f88d-2929-ctools.company.com:yt4984yr
8
10.21.2.2. Adding an LTI Passport to the Course Configuration
To add an LTI passport for an LTI tool to the configuration for your course, follow these steps.
From the Studio Settings menu, select Advanced Settings.
In the LTI Passports field, place your cursor between the brackets.
Enter the LTI passport string surrounded by quotation marks.
The following example shows an LTI passport string.
"test_lti_id:b289378-f88d-2929-ctools.umich.edu:secret"For more information about creating your key, see LTI Authentication Information.
If you use more than one LTI provider in your course, separate each LTI passport string with commas. Make sure to surround each entry with quotation marks. The following example shows multiple LTI passports in the LTI Passports field.
[
  "test_lti_id:b289378-f88d-2929-ctools.umich.edu:secret",
  "id_21441:b289378-f88d-2929-ctools.school.edu:23746387264",
  "book_lti_provider_from_new_york:b289378-f88d-2929-ctools.company.com:yt4984yr8"
]
Select Save Changes.
The page refreshes automatically, reformats your entry in the LTI Passports field, and displays a notification that your changes have been saved.
10.21.3. Enabling LTI Components for a Course
Before you can add LTI components to your course, you must enable the LTI tool in Studio.
To enable the LTI tool in Studio, add the "lti_consumer" module to the
Advanced Module List on the Advanced Settings page. For more
information, see Enabling Additional Exercises and Tools.
Note
The lti_consumer module replaces a previous version of the LTI component.
The name of the module for the previous LTI component is lti and it may
appear in the Advanced Module List for older courses.
The lti_consumer module includes all of the functionality of the previous
LTI component and it should be used for all new courses. Courses that include
the previous LTI component will continue to work correctly, even if the
lti module is no longer present in the Advanced Module List.
10.21.4. Adding an LTI Component to a Course Unit
To add an LTI component to a course unit, follow these steps.
If the LTI tool requires authentication, register the key and shared secret for the LTI tool in the configuration for your course. For more information about registering authentication credentials, see LTI Authentication Information.
Edit the unit in which you want to add the remote LTI tool and select Advanced from the Add New Component section. Select LTI Consumer.
If the Advanced component type is not available, make sure you have enabled LTI components. To do this, see Enabling LTI Components for a Course.
Select Edit in the component that appears.
Configure the LTI component in the component editor. For more information about each setting, see LTI Component Settings.
Select Save.
To test an LTI component, use the Preview feature or view the live version in the LMS. For more information, see Testing Your Course Content.
10.21.5. LTI Component Settings
Setting |
Description |
|---|---|
Display Name |
Specifies the name of the component. This name appears as a heading above the problem. Unique, descriptive display names help you identify problems quickly and accurately for analysis. |
LTI Application Information |
The description of the remote LTI application. If the application requires a username or email address, use this field to inform learners that their information will be forwarded to the external application. |
LTI ID |
Specifies the LTI ID for the remote LTI tool provider. This value must match the LTI ID that you entered as part of the LTI passport string for the LTI tool. For more information about LTI passports, see LTI Authentication Information. |
LTI URL |
Specifies the URL of the remote LTI tool that this component launches. |
Custom Parameters |
Sends additional parameters that are required by the remote LTI tool. The parameters that you send depend on the specific LTI tool you are using. Supply a key and value for each custom parameter. The key is an identifier for the parameter. Use the following format.
For example, an LTI tool that displays an e-book might accept a ["page=144"]
|
LTI Launch Target |
Controls the way that the course page will open and display the remote LTI tool. Options are:
|
Button Text |
Enter a custom label for the button that opens the external LTI tool. |
Inline Height |
Specifies the on-screen height of the LTI tool in pixels. This setting is only applied if the LTI Launch Target is set to Inline. |
Modal Height |
Specifies the on-screen height of the LTI content window as a percentage of the visible web browser window height. Enter the percentage in whole numbers. This setting is only applied if the LTI Launch Target control is set to Modal. |
Modal Width |
Specifies the on-screen width of the LTI content window as a percentage of the web browser window width. Enter the percentage in whole numbers. This setting is only applied if the LTI Launch Target control is set to Modal. |
Scored |
Indicates whether the LTI component receives a numerical score from the remote LTI tool provider. By default, this value is set to False. |
Weight |
Specifies the number of points possible for a problem. By default, if a remote LTI tool provider grades the problem, the problem is worth one point, and a learner’s score can be any value between zero and one. This setting is only applied if Scored is set to True. For more information about problem weights and computing point scores, see Problem Weight. |
Hide External Tool |
Controls whether the LTI component will display the remote LTI tool on the course page. Set the value to True to prevent the course page from displaying the remote LTI tool. For example, you might use an LTI component to synchronize with a remote grading system. In that situation, the LTI component should not appear on the course page. Set the value to False to display the remote LTI tool and allow learners to interact with it. |
Accept grades past deadline |
Specifies whether third party systems are allowed to post grades after the deadline. By default, this value is set to True. |
Request user’s email |
Sends the learner’s email address to the remote LTI tool. An LTI component will only send learners’ email addresses if the LTI Launch Target control is set to New Window. When the new window launches, the learners are warned that if they continue, their email address will be shared with the LTI provider. By default, this setting is not available in Studio. To make this setting available, a system administrator must enable the setting in the Django administration console. |
Request user’s username |
Sends the learner’s username to the remote LTI tool. This is the username that the learner used to register for the course. An LTI component will only send learners’ usernames if the LTI Launch Target control is set to New Window. When the new window launches, the learners are warned that if they continue, their username will be shared with the LTI provider. By default, this setting is not available in Studio. To make this setting available in Studio, a system administrator must enable the setting in the Django administration console. |