12.3.1. Using Teams in Your Courses
This section provides information about setting up teams in your courses.
For information about managing teams in your courses, see the following topics.
12.3.1.1. Teams Overview
Using teams in your course is an effective way for learners to interact and collaborate on small group projects or activities. You define topics that learners choose from; learners choose a topic they are interested in, and either join a team or create their own team within that topic. Each learner can belong to only one team.
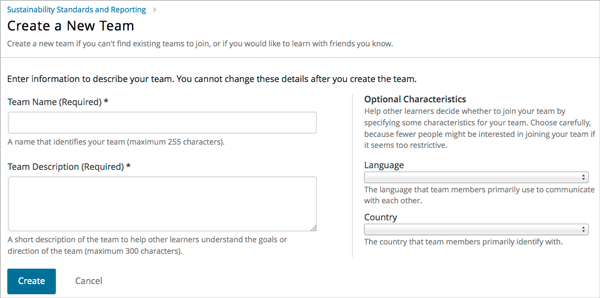
When learners create a new team, they add names and descriptions to identify their team. They can also optionally specify a primary communication language and a primary country that members identify with. Team characteristics might serve as the basis for attracting new members, resulting in small groups of learners with similar interests and goals who will work together on projects or activities within the same topic area.
Teams are most effective when learners have a clear reason for joining a team, and a clear outcome to achieve with fellow team members. For example, you might create an assignment that consists of a group project or activity, with a choice of topics, and ask learners to join teams within the topic of their choice to complete the assignment. Team members can use discussions within the team to communicate and collaborate on the assignment. If you want only to provide a way for learners to connect socially, consider using discussions within the course rather than teams. For more information about using discussions, see Running Course Discussions.
12.3.1.2. Enable and Configure Teams
To enable and configure teams in your course, modify the Teams Configuration policy key on the Advanced Settings page so that the key includes team topic names and the maximum team size.
Note
The Teams page in the LMS becomes available only after you have specified at least one team topic.
Note
EdX recommends that you do not delete topics once your course is running, and if learners might have already joined teams within topics. If you delete a topic from the Teams Configuration policy key, that topic is no longer visible in the LMS, and learners will not be able to leave teams associated with the deleted topic.
In Studio, from the Settings menu, select Advanced Settings, then locate the Teams Configuration policy key.
By default, you see a set of curly braces ({}). You define topics and the maximum team size inside this set of braces.
To specify the maximum team size for teams in your course, enter the
max_team_sizeparameter in double quotation marks, followed by a colon, then a positive integer value representing the maximum number of team members allowed. For example, to set the maximum number of learners per team in your course to 5, your entry would look like this example."max_team_size": 5To specify topics within which teams can be created, add entries under
"topics". For each topic, provide a description, name, and ID as shown in the example.Make sure that you enclose all of the sets of topic values within a set of square brackets, with a comma after the closing square bracket.
Note
If you create more than one topic, make sure that you add a comma after the closing curly brace of each topic that has another topic following it. The syntax that you use must match the example syntax exactly. Missing or incorrect indentation, curly braces, brackets, or punctuation marks cause errors.
Note
For topic IDs, you can use only alphanumeric characters and the underscore, hyphen, and period characters.
{
 "topics": [
     {
         "name": "Sustainability in Corporations",
         "description": "Description for Sustainability in Corporations",
         "id": "Sustain_Corporations"
     },
     {
         "name": "Water Conservation Projects",
         "description": "Description for Water Conservation",
         "id": "Water_Conservation"
     },
     {
         "name": "Sustainability Standards and Reporting",
         "description": "Description for Sustainability Standards",
         "id": "Standards_Reporting"
     }
 ],
 "max_team_size": 5
}
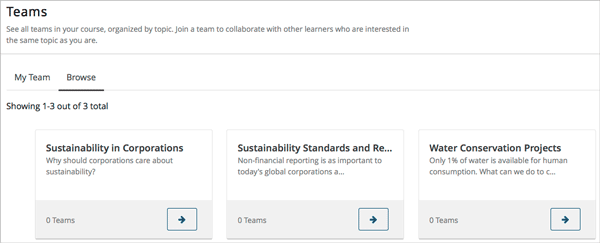
The topics you have created appear on the Teams page in the LMS when learners browse teams by topic. The Teams page is not visible until you have created at least one topic.

12.3.1.3. Create a Team
Although learners in your course can create their own teams, you can seed each topic with a few teams to give learners some ideas for their own teams.
Course team members who have the Staff, Admin, Discussion Admin, or Discussion Moderator role can create new teams within topics. Community TAs and learners in the course can also create teams, although learners can create a new team only if they do not already belong to one.
To create a team, follow these steps.
From the Teams page in the LMS, select Browse, then select the topic in which you want to create a team.
At the bottom of the list of teams within the topic, select the create a new team in this topic link.

On the Create a New Team page, add a name and description for the team.
In the description, include details about the proposed project or activity to help learners to decide whether they want to join this team.

Optionally, add some characteristics for your team. You can specify a language that members would primarily use to communicate with each other, and a country that members would primarily identify with. Keep in mind that if your team details make the team membership seem too selective, learners might be discouraged from joining.
When you have finished entering details for the team, select Create.
Your new team is added to the list of teams under your selected topic.
12.3.1.4. Search for a Team
Use the search field to find a team within a topic.
Note
Partial words are not supported for searching teams.
To get a list of teams whose names, descriptions, or characteristics match your search keywords, follow these steps.
From the Teams page in the LMS, select Browse, then select the topic in which you want to find a team.
In the search field, enter one or more keywords to search for, then press Enter or select the search icon.
Teams within the topic that match your search are displayed.
To clear the existing search term, select the X next to the search field, or select all the text within the field and enter text to replace it.
12.3.1.5. Edit a Team
Course team members who have the Staff, Admin, Discussion Admin, or Discussion Moderator role can edit any of a team’s details, including removing members from a team. Community TAs can also edit teams. For more details about removing team members, see Remove a Learner from a Team.
To edit a team’s details, follow these steps.
Note
Before making significant changes to a team, communicate with team members so that they are aware of the changes and their impacts.
In the LMS, select the Teams tab.
On the Teams page, select Browse to show all topics.
Select the arrow button for the topic to show all teams in that topic.
Locate the team that you want to edit. To find the team, you can search using keywords or sort teams by last activity or open slots.
Select View for the team that you want to edit.
Select Edit Team.
Make your changes, then select Update. The team’s details are updated.
12.3.1.6. Remove a Learner from a Team
Course team members who have the Staff, Admin, Discussion Admin, or Discussion Moderator role can remove members from a team. Community TAs can also remove learners from a team. You might want to remove a learner from a team and make the spot on the team available to other learners if, for example, a learner joined a team but is not participating, or if a learner has unenrolled from the course without leaving the team.
Note
Before making significant changes to a team, communicate with team members so that they are aware of the changes you will make, and their impacts.
To remove a learner from a team, follow these steps.
In the LMS, select the Teams tab.
On the Teams page, select Browse to show all topics.
Select the arrow button for the topic to show all teams in that topic.
Locate the team that you want to edit. To find the team, you can search using keywords or sort teams by last activity or open slots.
Select View for the team from which you want to remove a learner.
Select Edit Team.
On the Instructor Tools bar, select Edit Membership.

On the team’s Membership page, select Remove next to the name of the learner who you want to remove from the team.
In the confirmation message, select Remove.
The team member you removed no longer appears on the Membership page.
Repeat steps 8 and 9 to remove additional members.
The team members you removed no longer appear on the Membership page, and the count of team members is updated wherever it appears on team pages.
12.3.1.7. Delete a Team
Course team members who have the Staff, Admin, Discussion Admin, or Discussion Moderator role can delete teams. Community TAs can also delete teams. you might need to manage the teams in your course, including deleting teams that remain empty or where members are experiencing abusive situations.
When you delete a team, all learners are removed from the team membership. Neither learners nor course team members can access discussions from deleted teams.
Note
Deleting a team removes it permanently from the course, and cannot be undone.
To delete a team, follow these steps.
In the LMS, select the Teams tab.
On the Teams page, select Browse to show all topics.
Select the arrow button for the topic to show all teams in that topic.
Locate the team that you want to delete. To find the team, you can search using keywords or sort teams by last activity or open slots.
Select View for the team that you want to delete, then select Edit Team.
On the Instructor Tools bar, select Delete Team.

In the confirmation message, select Delete.
You return to the topic page, where you receive a confirmation that the team has been successfully deleted. The team no longer appears in the teams list within its topic. Learners who were previously members of this team no longer belong to a team.