10.24. Molecule Viewer Tool
Note
EdX does not support this tool.
Studio offers two tools that you can use in discussions of molecules.
- With the molecule viewer tool, you can create three-dimensional representations of molecules for students to view.
- With the molecule editor problem type, you can allow students to draw their own molecules. For more information about this tool, see Molecule Editor Tool.
Both tools use JSmol, a JavaScript-based molecular viewer from Jmol. (You don’t need to download this tool; Studio uses it automatically.) For more information about JSmol, see JSmol.
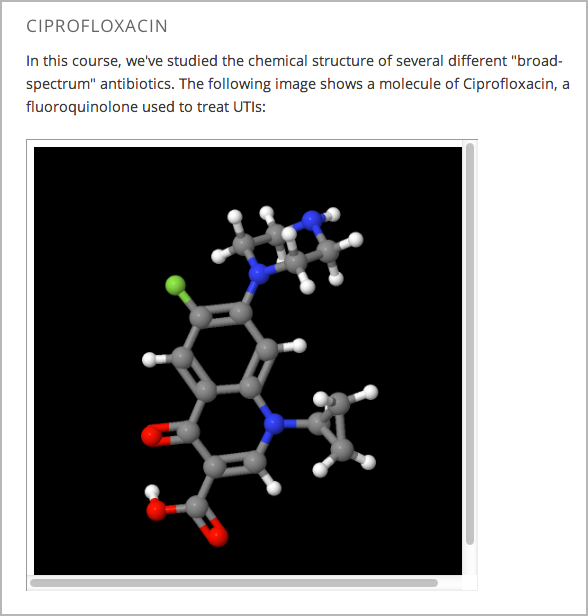
The following image shows the molecule viewer tool in a course.
Note
To create a molecule viewer tool, you must have permission to upload files to a third-party file hosting site such as Amazon Web Services Simple Storage Service (AWS S3). When you create the molecule viewer, you’ll upload a folder that contains a large number of files to the file hosting site.
10.24.1. Create the Molecule Viewer Tool
Creating a molecule viewer tool has several steps.
- Download files from the BioTopics website and from edX.
- Move or edit some of the files that you downloaded.
- Upload a folder that contains all of the files that you downloaded and edited to your own file hosting site.
- Create an HTML component that contains an
iframeelement in Studio. The iframe references the files that you upload to the file hosting site.
10.24.1.1. Download Files from BioTopics and edX
Create or download a .mol file for the molecule that you want to show. You can download a variety of .mol files from the BioTopics website. Save the file in a place where you can easily find it.
Download the MoleculeViewerFiles.zip file from edX.
Unzip the MoleculeViewerFiles.zip file that you downloaded.
When you unzip the file, it contains a MoleculeViewerFiles folder with the following folders and files.
- data (folder)
- j2s (folder)
- js (folder)
- MoleculeViewer.html (file)
10.24.1.2. Move the .mol File and Edit the MoleculeViewer.html File
Move the .mol file that you downloaded from BioTopics into the data folder that you downloaded from edX.
Edit the MoleculeViewer.html file:
In a text editor, open the MoleculeViewer.html file.
In line 19 of the MoleculeViewer.html file, change Example.mol to the name of your .mol file. For example, if you downloaded the Glucose.mol file, line 19 in your file will look like the following:
script: "set antialiasDisplay; background black; load data/Glucose.mol;"
Save the MoleculeViewer.html file.
10.24.1.3. Upload Files to a Hosting Site
Make sure that your MoleculeViewerFiles folder contains the following folders and files.
- data (folder): Earlier, you added a .mol file to this folder.
- j2s (folder)
- js (folder)
- MoleculeViewer.html (file): Earlier, you changed line 19 in this file.
Upload the entire MoleculeViewerFiles folder to your file hosting site.
Note
Because this folder contains many files, uploading the folder may take several minutes, even over a fast connection.
10.24.1.4. Create a Component in Studio
In Studio, open the unit where you want to add the molecule viewer.
Under Add New Component, select HTML, and then select IFrame Tool.
In the component editor that opens, replace the existing content with your own text.
In the toolbar, select HTML.
In the HTML Source Code box, enter the following line in the place where you want the molecule viewer to appear.
<p><iframe name="moleculeiframe" src="https://path_to_folder/MoleculeViewerFiles/MoleculeViewer.html" width="500" height="500"></iframe></p>Replace
path_to_folderwith the URL of your file hosting site. The revised line might look like this example.<p><iframe name="moleculeiframe" src="https://myfiles.example.com/MoleculeViewerFiles/MoleculeViewer.html" width="500" height="500"></iframe></p>Select OK to close the HTML Source Code box, and then select Save.
Select Preview to see your component as a student would see it.