9.6. Specifying Additional Transcript Options
9.6.1. Edit a Video Transcript
If you want to edit an existing .srt video transcript, follow these steps.
- In Studio, open the video component for the video.
- For an .srt transcript, locate Default Timed Transcript, and then select Download Transcript for Editing.
- After the file downloads, open a text editor and make any changes that you want.
- Select Upload New Transcript to upload the edited file.
9.6.2. Add a Supplemental Downloadable Transcript
Note
You can also use this procedure to upload a different kind of handout for learners to download, such as an image or a chart.
By default, a .txt file is created when you upload an .srt file, and learners can download either the .srt or .txt transcript when you allow transcript downloads. For more information about allowing transcript downloads, see Enable Video and Transcript Downloads.
In addition, you can provide a downloadable transcript in a format such as .pdf. To do this, you upload the additional transcript in the video player as a handout. Learners see an option to download the handout below the video.
To add another downloadable transcript, follow these steps.
- Create or obtain your transcript as a .pdf or in another format.
- In the video component, select Advanced.
- Locate Upload Handout, and then select Upload.
- In the Upload File dialog box, select Choose File.
- In the dialog box, select the file on your computer, and then select Open.
- In the Upload File dialog box, select Upload.
9.6.3. Add a Transcript in Another Language
You can provide transcripts for your video in more than one language. To do this, you work with a third-party service to obtain an .srt transcript file for each language, and then associate the .srt file with the video in Studio.
Before you add a transcript file, make sure that each file has a unique name. If you use the same transcript name more than once, only the most recently added transcript will appear for every video component that is set up to use a transcript with that name. To avoid this problem, a best practice is to name additional transcript files by appending the transcript’s language to the video file name.
For example, you have two videos, named video1.mp4 and video2.mp4, and their original transcripts are named video1.srt and video2.srt. When you add Hindi transcripts for these videos, you name them video1_hi.srt and video2_hi.srt. When you add Spanish transcripts for the videos, you name them video1_es.srt and video2_es.srt.
To add a transcript to a video component, follow these steps.
- After you obtain the .srt files for additional languages, open the video component for the video.
- On the Advanced tab, scroll down to Transcript Languages, and then select Add.
- Select the language for the transcript that you want to add.
- Select Upload, browse to the .srt file for the transcript in that language, and then select Open.
- In the Upload translation dialog box, select Upload.
- Repeat steps 2 - 5 for any additional languages.
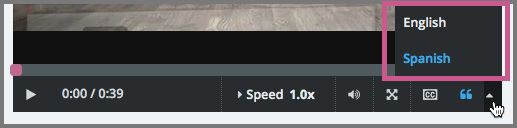
When your learners view the video, they can select the Language menu to select a language.