14.4. Manage Course Fees
If your course has a fee, users with an appropriate course role can manage the fees for your course in the LMS by selecting Instructor and then E-Commerce. On this instructor dashboard page, you set the price for each seat in the course, create and manage coupon codes and enrollment codes, and download reports about financial transactions.
Before you can manage your course fees, you must configure your Open edX environment to support paid courses.
For more information, see the following sections.
14.4.1. Configure the Course
Configuring your Open edX environment to support paid courses has several steps.
14.4.1.1. Obtain a Merchant Account with CyberSource
Currently, Open edX only supports payment through CyberSource. To allow users to submit payment for your course, you must obtain a merchant account with CyberSource. For more information, see the CyberSource website.
When you obtain a merchant account with CyberSource, CyberSource provides you with the following information. You will add this information to one of the .json files in your Open edX environment.
- An access key.
- A profile ID.
- A purchase endpoint URL.
- A secret key.
14.4.1.2. Add Configuration Code
To enable users to pay for your course, you must add the following configuration code in your Open edX environment.
Add the following code to the lms.env.json file.
...
"FEATURES": {
...
"ENABLE_SHOPPING_CART": true,
"ENABLE_PAID_COURSE_REGISTRATION": true,
...
}
....
Add the following code to the lms.auth.json file.
...
    "CC_PROCESSOR": {
        "CyberSource2": {
            "ACCESS_KEY": "{access key provided by CyberSource}",
            "PROFILE_ID": "{profile ID provided by CyberSource}",
            "PURCHASE_ENDPOINT": "{purchase endpoint URL provided by CyberSource}",
            "SECRET_KEY": "{secret key provided by CyberSource}"
        }
    },
    "CC_PROCESSOR_NAME": "CyberSource2",
...
14.4.1.3. Add a Course Mode in Django
To manage course fees, you must add a mode for the course in the Django administration website for your Open edX instance.
For more information about course modes, also called enrollment tracks, see enrollment track.
- Make sure that you have “superuser” rights on your Open edX production stack. For more information, see Managing the Full Stack.
- Access the Django administration website for your instance of Open edX. To
do this, go to
https://<host name of your Open edX instance>/adminand sign in. For example, this might behttps://edge.edx.org/admin. - On the Django Administration page, select Course Modes in the Site Administration list.
- In the upper right corner of the page, select Add course mode.
- On the Add course mode page, complete the form.
- Course id: Enter the course ID for this course in the
{org}/{course}/{run}format. This ID must exactly match the course ID that you set in Studio. For example, the course ID may beedX/DemoX/2015_T2.- Mode slug: Set this to
honor.- Mode display name: Enter the mode name that you want learners to see. For example, you could enter “Honor Code”.
- Min price: Enter the price of a single seat in the course.
- Currency: Leave the default value (
usd) or enter the ISO code for another currency, such assarfor Saudi Riyal.- Expiration Date and Time: (optional) The expiration date for the course. EdX recommends that you leave these fields blank.
- Description: (optional) A description of the course.
- SKU: (optional) A SKU number for the course.
- At the bottom of the page, select Save.
14.4.1.4. Assign Admin Roles
To manage fees, coupon codes, and enrollment codes for a course, you give users one of these administrative roles.
- The Finance Admin role creates and manages discounts and enrollment codes. This role also cancels and resubmits invoices.
- The Sales Admin role creates and manages coupon codes and enrollment codes, but cannot cancel or resubmit invoices.
To give a user the Finance Admin or Sales Admin role, follow these steps.
Note
A user can have both the Finance Admin and Sales Admin roles.
Access the Django administration website for your instance of Open edX. To do this, go to
https://<host name of your Open edX instance>/adminand sign in. For example, this might behttps://edge.edx.org/admin.If you have problems signing in this way, you can also sign in to your edX instance from
https://<host name of your Open edX instance>/. After you sign in to edX, addadminafter your Open edX instance host name in your browser’s address bar. Make sure to include a slash (/) between the host name and the word “admin”.On the Django Administration page, locate Student in the Site Administration list, and then select Course access roles.
In the upper right corner of the page, select Add course access role.
On the Add course access role page, complete the form.
- User: The username of the user who needs the Sales Admin or Finance Admin role.
- Course id: Enter the course ID for this course in the
{org}/{course}/{run}format. This ID must exactly match the course ID that you set in Studio. For example, the course ID may beedX/DemoX/2015_T2.- Role: Select finance_admin or sales_admin.
To add another role for the user, repeat steps 3-4.
When a user has the Sales Admin or Finance Admin role, in the LMS that user can select Instructor and then see an E-Commerce page on the instructor dashboard. The E-Commerce page includes the following sections. Users with the Finance Admin role can access all sections. Users with the Sales Admin role can access all sections except the Course Seat Purchases section.
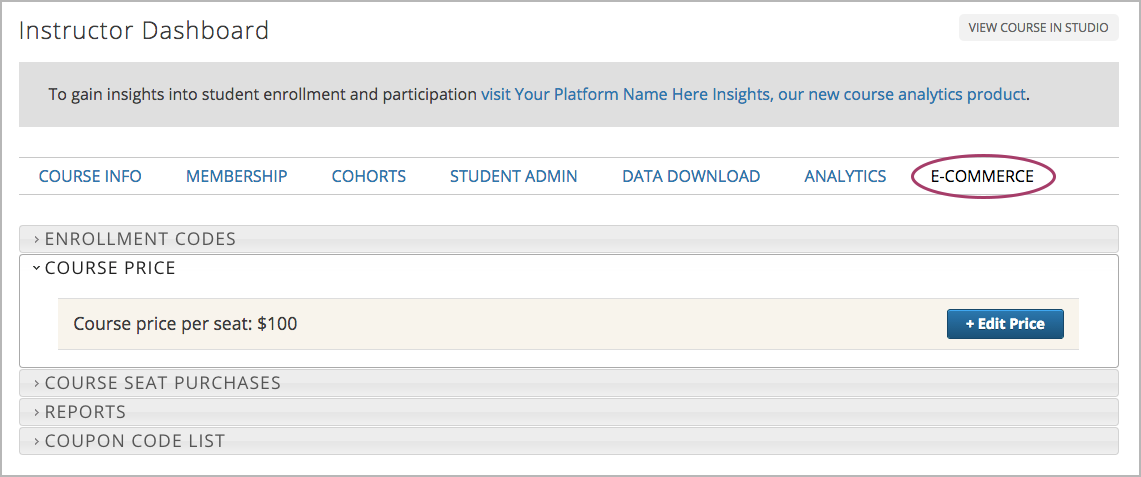
14.4.2. Set the Price of the Course
You set the price of an individual seat in the course on the E-Commerce page on the instructor dashboard. To see the E-Commerce page, you must have either the Sales Admin or Finance Admin role. For information, see Assign Admin Roles.
To set the price for each course seat, follow these steps.
- In the LMS, select Instructor.
- Select E-Commerce, and then select the Course Price section.
- At the side of the page, select Edit Price.
- In the Set Course Price dialog box, enter the price of each seat in the course. Do not enter a currency symbol.
- In the Currency list, select the currency that you want.
- Select Set Price.
14.4.3. Create and Manage Coupon Codes
You can create coupon codes to give learners a discount on the price of the course. To create and manage coupon codes, you must have either the Sales Admin or Finance Admin role. For information, see Assign Admin Roles.
Learners enter the coupon code when they enroll in and pay for the course. Unlimited learners can use the same coupon code. Optionally, you can set an expiration date for coupon codes.
You can see all the coupon codes for your course in the Coupon Code List section of the E-Commerce page on the instructor dashboard. You can also see information such as the discount amount and the number that have been used.
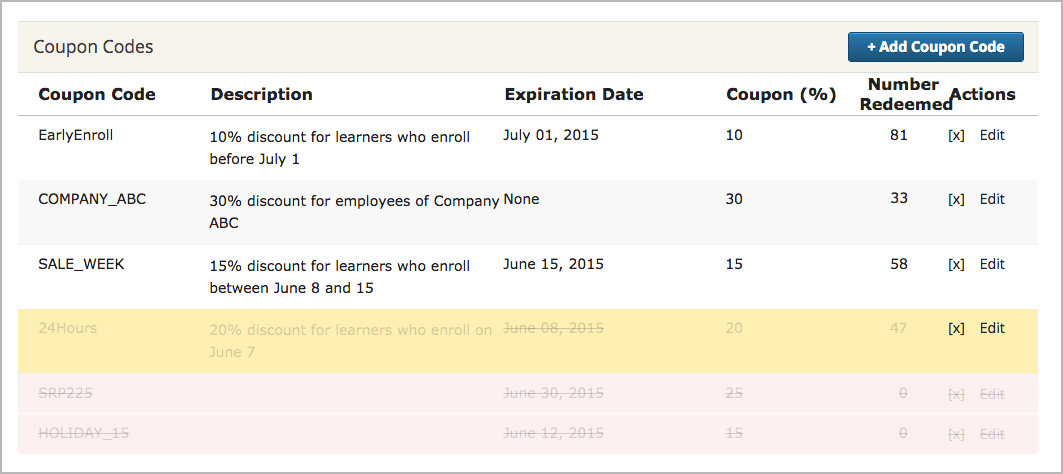
Active coupon codes appear in the order in which they were created. Deleted and expired coupon codes appear at the end of the list.
14.4.3.1. Create Coupon Codes
You create coupon codes from the E-Commerce page on the Instructor Dashboard. To see the E-Commerce page, you must have either the Sales Admin or Finance Admin role. For information, see Assign Admin Roles.
Your coupon code can be any combination of uppercase and lowercase letters numbers, and special characters. For example, your coupon code could be Holiday_10, MYDISCOUNT, or ZYX321.
Note
The coupon code must have 16 or fewer characters.
To create coupon codes, follow these steps.
- In the LMS, select Instructor.
- Select E-Commerce, and then select the Coupon Code List section.
- On the right side of the page, select Add Coupon Code.
- In the Add Coupon Code dialog box, enter your information in the Code and Discount Percentage fields.
- (optional) In the Description field, enter a description for your coupon code.
- (optional) Select Expiration Date, and then select a date from the calendar that opens.
- Select Add Coupon Code.
14.4.3.2. View Coupon Code Information
To see information about a particular coupon code, follow these steps.
In the LMS, select Instructor.
Select E-Commerce, and then select the Coupon Code List section.
In the Coupon Codes list, locate the coupon code that you want to see.
The Coupon Codes list has the following information.
- Code: The name of the code.
- Description: A brief description of the code, if the creator entered one.
- Expiration Date: The date the coupon code expires.
- Number Redeemed: The number of times the coupon code has been used.
- Actions: Actions you can take. You can select
[x]to delete the coupon code, or select Edit to edit the coupon code.
14.4.3.3. Edit or Delete Coupon Codes
You edit or delete coupon codes on the E-Commerce page on the Instructor Dashboard. To see the E-Commerce page, you must have either the Sales Admin or Finance Admin role. For information, see Assign Admin Roles.
Note
You can only edit the description of a coupon code. You cannot edit the code, discount percentage, course ID, or expiration date.
In the LMS, select Instructor.
Select E-Commerce, and then select the Coupon Code List section.
In the Coupon Codes list, locate the coupon code that you want to edit or delete.
To edit the coupon code, select Edit in the Actions column, edit the description of the coupon code in the Edit Coupon Code dialog box, and then select Update Coupon Code.
To delete the coupon code, select the
[x]in the Actions column. The coupon code moves to the end of the list and appears crossed out with a light red background.
14.4.4. Create and Manage Enrollment Codes
If an organization wants to purchase enrollment for multiple seats in your course at one time, you can create enrollment codes for the organization. The purchasing organization then distributes these codes to its learners. Each enrollment code has an associated URL that learners use to enroll in the course directly. Learners do not have to pay any additional fees.
Unlike coupon codes, which are valid for multiple learners, each enrollment code is valid for only one learner.
14.4.4.1. Create Enrollment Codes
You create enrollment codes on the E-Commerce page on the Instructor Dashboard. To see the E-Commerce page, you must have either the Sales Admin or Finance Admin role. For information, see Assign Admin Roles.
- In the LMS, select Instructor, and then select E-Commerce.
- In the Enrollment Codes section, select Create Enrollment Codes.
- When the Create Enrollment Codes form opens, complete the form. The
following fields are required.
- Organization name
- Organization contact
- Organization contact email
- Organization billing address
- Invoice recipient
- Number of seats
- Price per seat
- At the bottom of the form, select Create Enrollment Codes.
When you select Create Enrollment Codes, the system automatically creates a comma-separated values (.csv) file and downloads the .csv file to your computer. In addition to information about your course and the transaction, such as the invoice number, the .csv file contains course enrollment codes and URLs. Each enrollment code has a separate URL, and only one learner can use each enrollment code.
The system also sends a confirmation email to the purchasing organization. The email instructs the purchasing organization to distribute enrollment codes to learners and includes a template that the organization can use. The email has two attachments: an invoice and a .csv file. The .csv file contains only the enrollment codes and their associated URLs. It does not contain additional information about your course or the transaction.
14.4.4.1.1. Change the Default Email
When you create enrollment codes, the system automatically sends a confirmation email message to the purchasing organization. You can change the default confirmation message according to your organization.
To change the default email, follow these steps.
- In your Open edX repository, go to the edx- platform/lms/templates/emails folder.
- In a text editor, open the following three files.
- registration_codes_sale_email.txt: The confirmation email to send to the purchasing organization. This email can include a sample message that the purchasing organization can use to distribute enrollment codes to individual learners.
- registration_codes_sale_invoice_attachment.txt: The invoice for the purchasing organization. The invoice can include payment instructions.
- order_confirmation_email.txt: The confirmation email to send to the purchasing organization.
- Make any changes that you want to make, and then save your changes.
14.4.4.2. Manage Enrollment Codes and Invoices
Both sales admins and finance admins can cancel an enrollment code, restore an enrollment code, or mark an enrollment code as unused. In addition, finance admins can cancel and resubmit the invoices that accompany enrollment codes.
14.4.4.2.1. Manage Enrollment Codes
You manage individual enrollment codes in the Enrollment Codes section of the E-Commerce page. To see the E-Commerce page, you must have either the Sales Admin or Finance Admin role. For information, see Assign Admin Roles.
In the Enrollment Codes section, you can perform the following transactions.
- Cancel enrollment codes.
- Restore enrollment codes.
- Mark enrollment codes as unused.
To cancel, restore, or mark an enrollment code as unused, follow these steps.
In the LMS, select Instructor.
Select E-Commerce, and then select the Enrollment Codes section.
Under Cancel, restore, or mark an enrollment code as unused, select Change Enrollment Code Status.
In the Enrollment Code Status dialog box, enter an enrollment code in the Enrollment Code field, and then select Find Enrollment Code.
When the status for the enrollment code appears Find Enrollment Code, you can see the possible actions for that enrollment code under Actions. Select the action that you want to take.

Note
After you cancel an enrollment code, the learner who used that enrollment code is no longer enrolled in the course and cannot see any course content.
14.4.4.2.2. Manage Invoices
You cancel and resubmit invoices for enrollment codes or course seat purchases in the Course Seat Purchases section of the E-Commerce page. To see the Course Seat Purchases section of the E-Commerce page, you must have the Finance Admin role. For information, see Assign Admin Roles.
To cancel or resubmit an invoice, follow these steps.
- Locate the number of the invoice that you want to cancel or resubmit. You can download a list of all the invoices for the course by selecting Download All Invoices.
- In the LMS, select Instructor.
- Select E-Commerce, and then select the Course Seat Purchases section.
- Select the action that you want to complete.
- To cancel an invoice, enter the invoice number in the Invoice Number field, and then select Cancel Invoice.
- To resubmit an invoice, enter the invoice number in the Invoice Number field, and then select Resubmit Invoice. You can find the invoice number in the .csv file that the system creates and downloads to your computer when you create enrollment codes.
Note
After you cancel an invoice, learners who have used any of the enrollment codes on the invoice are no longer enrolled in the course and cannot see any course content.
14.4.5. View Enrollment Code and Credit Card Sales Information
Both sales admins and finance admins can download reports about enrollment codes. In addition, finance admins can see and download information about invoices and credit card sales.
14.4.5.1. Download Enrollment Code Reports
You download enrollment code reports in the Enrollment Codes section of the E-Commerce page. To see the E-Commerce page, you must have either the Sales Admin or Finance Admin role. For information, see Assign Admin Roles.
To help you keep track of the enrollment codes that have been issued for your course, you can download .csv files that contain enrollment code reports. The reports contain data such as the following information.
- A list of the enrollment codes.
- The organization that purchased the enrollment codes.
- The name and e-mail address of the person who purchased the codes.
- The date a specific enrollment code was used.
- The user ID of the learner who used a specific code.
You can download the following reports.
- All enrollment codes that have been purchased for the course.
- The enrollment codes for the course that remain unused.
- The enrollment codes for the course that have been used.
To download an enrollment code report, select the E-Commerce page on the instructor dashboard, and then select the report that you want in the Enrollment Codes section. If you enter an organization name in the Company Name field, the report contains the enrollment codes for only that organization.
14.4.5.2. Download Invoice and Credit Card Sales Information
To see information about financial transactions, including a list of enrollment code invoices and detailed credit card purchase information, you can download .csv files in the Course Seat Purchases section of the E-Commerce page. To see the Course Seat Purchases section of the E-Commerce page, you must have the Finance Admin role. For information, see Assign Admin Roles.
To see financial transaction information, follow these steps.
- In the LMS, select Instructor.
- Select E-Commerce, and then select the Course Seat Purchases section.
- Select the action that you want to complete.
- View the total dollar amount that the course has received for all credit card transactions.
- To download a .csv file of all the invoices for enrollment codes, select Download All Invoices. This .csv file contains information such as the invoice number, the company that purchased the enrollment codes, the number of enrollment codes purchased, and the number of enrollment codes that have been used.
- To download a .csv file of all credit card purchases, select Download Credit Card Purchases. This .csv file contains information such as the order ID number, the username of the purchaser, the company that the purchaser is affiliated with (if any), and the date and time of the purchase.