17.2. Running Course Discussions#
On an ongoing basis, the members of your discussion team run the course discussion by adding posts and responses, marking answers as correct, and guiding learner messages into pertinent threads. The information and suggested techniques in this section can help you to make discussions in your course successful.
For information about moderating discussions, see Moderating Discussions and Guidance for Discussion Moderators.
17.2.1. Understanding the Elements of a Discussion#
Learners and the course team use course discussions to share ideas, exchange views, consider different viewpoints, and ask questions. In course discussions there are three hierarchical levels of interaction.
A post is the first level of interaction. A post opens a new subject. Posts can be made as questions, to solicit a concrete answer, or as discussions, to start a conversation. When participants add a post, they must choose an existing topic to associate it with, and decide whether to add it as a Question or as a Discussion.
A response is the second level of interaction. A response is a reply made directly to a post to provide a solution or continue the conversation.
A comment is the third level of interaction. A comment is often a clarification or side note made to a specific response, rather than to the post as a whole.
The dialog created by a post, its responses, and the comments on those responses is sometimes called a thread. Discussion threads are saved as part of the course history.
For information about participating in discussions, see the Participating in Course Discussions section in the Open edX Learner’s Guide. Consider referring learners in your courses to that section, which describes the structure and features of course discussions, and provides useful information to help learners make the most of their participation in course discussions.
17.2.2. Using Naming Conventions for Discussion Topics#
To identify certain types of messages and make them easier to find, you can define a set of standard tags to include in the subject of a post or in the body of a response or comment. Examples follow.
Use “[OFFICIAL]” at the start of announcements about course details or changes.
Provide information about corrections in course assignments with a subject that begins “[CORRECTION]” or “[ERRORS]”.
Ask learners to use “[STAFF]” in the subject of each post that needs the attention of a course team member.
Both the discussion team and your learners can use tags like these to search the discussions more effectively.
When a post is created its type must be selected: either “question” or “discussion”. Members of the discussion team should be thoughtful when selecting the type for their posts, and encourage learners to do the same. For more information, see Find Questions and Discussions.
17.2.3. Seeding Discussion Topics#
To help learners learn how to get the most out of course discussions, and find the best discussion topic to use for their questions and conversations, you can seed discussion topics in course-wide discussion topics before the course starts.
Some examples follow.
In the “General” topic (which is included in every course by default), add an [INTRO] post to initiate a thread for learner and course team introductions.
For each course-wide discussion topic that you create, add an initial post to describe the way you intend that discussion to be used. In addition to providing guidance, these initial messages can act as models for learners to follow when they create their own posts.
EdX strongly recommends that you do not create seed posts in content-specific discussion topics before the course starts or before the containing unit is released. The category and subcategory names for content-specific discussion topics are subject to the release visibility of their containing unit, and are not visible until the unit is released. For more details, see Understanding When Learners Can See Discussion Topics.
17.2.4. Minimizing Thread Proliferation#
To encourage longer, threaded discussions rather than many similar, separate posts, the discussion team can use the following techniques. However, be aware that very long threads (with more than 200 responses and comments) can be difficult to read, and might result in an unsatisfactory experience in the discussion.
Note
You can only pin or close posts and mark questions as answered when you work in a web browser. You cannot complete these activities when you work in the edX mobile app.
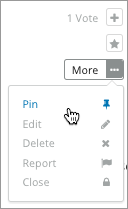
Pin posts. Pinning a post makes it appear at the top of the list of posts in the discussion navigation pane on the Discussion page. As a result, it is more likely that learners will see and respond to pinned posts. You can write your own post and then pin it, or pin a post by any author. Select the “More” icon and then Pin.
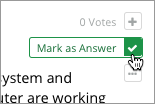
Mark responses as answered or endorsed. Depending on whether a post is a question or a discussion, you use the same option to mark a response either as the answer to the posted question, or to endorse a response. Marking a question as answered makes it easier for learners to find answers to already asked questions, rather than ask the same question again. Endorsing a response confirms that it adds value to a discussion.
To mark a response as answered or endorsed, select the “check mark” icon. You cannot mark your own responses as answers or as endorsed.
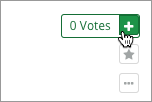
Vote for posts or responses. Learners can sort discussions by posts with the most votes, so posts and responses with many votes are more likely to be read and responded to. Select the “plus” icon for the response. You cannot vote for your own posts.
Close posts. You can respond to a redundant post by (optionally) pasting in a link to the post that you prefer learners to contribute to, and prevent further interaction by closing the post. Select the “More” icon and then Close.
Provide post/response/comment guidelines. In a pinned course-wide topic, you can provide learners with guidelines for participating in discussions, including when to start a new thread by adding a post instead of responding to an existing post, or commenting on a response.
17.2.5. Closing Discussions#
You can close the discussions for your course so that learners cannot add messages to topics. Course discussions can be closed temporarily, such as during an exam period, or permanently, such as when a course ends.
Note
When you close discussions, make sure you communicate with learners in your course to let them know why they cannot contribute to discussions, and the dates that discussions are affected. You can post a course update to the Course page as well as add a pinned information post to a course-wide discussion topic.
When you close the discussions for a course, all discussion topics in course units and all course-wide topics are affected.
Existing discussion contributions remain viewable.
Learners cannot add posts, respond to posts, or comment on responses. However, learners can continue to vote on existing threads, follow threads, or report messages for misuse.
Course team members who have any of the Staff, Admin, Discussion Admin, Discussion Moderator, Community TA, or Group Community TA roles are not affected when you close the discussions for a course. Users with these roles can continue to add to discussions.
17.2.5.1. Specify When Discussions Are Closed#
Note
You can only close discussions when you work in a web browser. You cannot close discussions when you work in an edX mobile app.
To define when discussions are closed to new contributions and when they reopen, follow these steps.
1. Navigate to edx discussion configuration page (see Configuring Edx Discussions).
Scroll down to Discussion Blackout Dates field.
Create a new blackout date range by clicking on Add blackout date range.
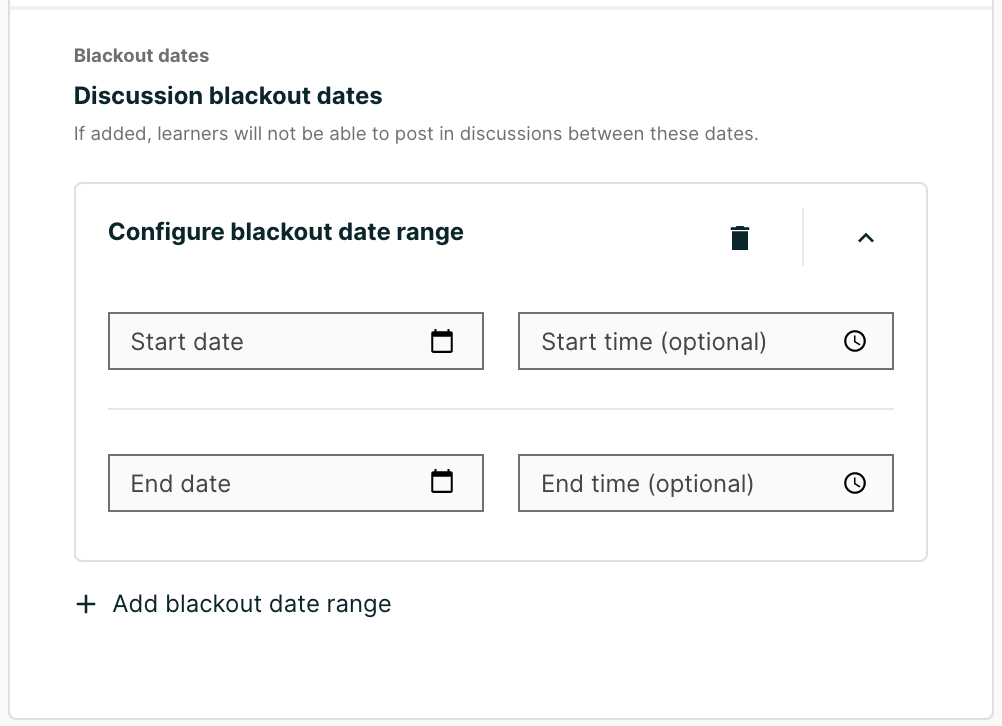
Add start and end dates and times in the format specified.
Note
The dates and times that you enter are in Coordinated Universal Time (UTC), not in your local time zone. You might want to verify that you have specified the times that you intend by using a time zone converter.
Note
To close the course discussions permanently, specify an end date and time far in the future.
You can add more than one blackout date ranges using step 3 and 4 above.
Select Save Changes.