6.2.2. Scheduling a Course Run#
Scheduling, which includes start and end dates as well as whether the course is self-paced or instructor-paced, changes with every course run.
After you determine scheduling for your course run, you enter this information in Studio before the course run begins. For more information, see Creating a Course About Page in Studio.
6.2.2.1. Guidelines for Start and End Dates#
The start and end dates you set for your course are important for prospective and current learners. Current learners see your course start or end date on their dashboards. You should consider your course dates carefully.
6.2.2.1.1. Course Start Date and Time#
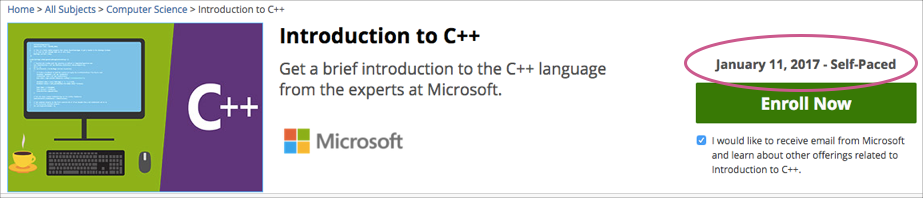
The course start date and time specify when learners can access published course content. By default, the course start date and time are set to 01/01/2030 at 00:00 UTC to ensure that your course does not start before you intend it to.
The following guidelines can help you determine a course start date.
Start on a Tuesday, Wednesday, or Thursday.
Avoid major public holidays.
Specify a month, day, and year. If you are unsure of the exact date, specify a day that is close to the estimated start date. For example, if your course will start near the end of March, specify March 31.
Set the start time of your course early in the day, generally 00:00 Coordinated Universal Time (UTC) or earlier. Learners often expect the course to be available on the start date in their own time zones and try to access course content during the day. If you do not specify a start time for your course, the course starts at 00:00 UTC.
Although learners cannot access any part of your course before the course start date, course team members who are enrolled in the course and who have the staff, admin, or beta tester role can see published content in the course before the course start date. For information about testing your course content before the course start date, see Beta Testing a Course.
Note
You can set a different advertised start date for your course. You might do this if the exact start date is uncertain. For example, you could advertise the start date as “Coming Soon”. For more information, see Advertise a Different Start Date.
6.2.2.1.2. Course End Date and Time#
The course end date and time specify when learners can no longer earn credit toward certificates. Learners can continue to complete available coursework, but cannot earn credit after the course ends. Learners who have earned certificates can view the certificates soon after the course end date.
In self-paced courses, course teams can make certain course components unavailable based on the course end date. For example, course teams can make a final exam unavailable after the end date for a self-paced course. For more details, see Hide a Subsection Based on Date.
Important
If you do not set a course end date, learners cannot access earned certificates.
6.2.2.1.3. Enrollment Start Date and Time#
As soon as enrollment starts, prospective learners can see your course in the course catalog, view the course About page, and enroll in the course.
The enrollment start date and time specify when learners can start to enroll in the course. Ensure that the enrollment start date is early enough to allow learners to both enroll in and prepare for the course.
6.2.2.1.4. Enrollment End Date and Time#
The enrollment end date and time specify when learners can no longer enroll in the course. Ensure that the enrollment end date is late enough to allow learners adequate time to enroll. The enrollment end date cannot be later than the course end date.
6.2.2.1.5. The Learner’s View of Course Start and End Dates#
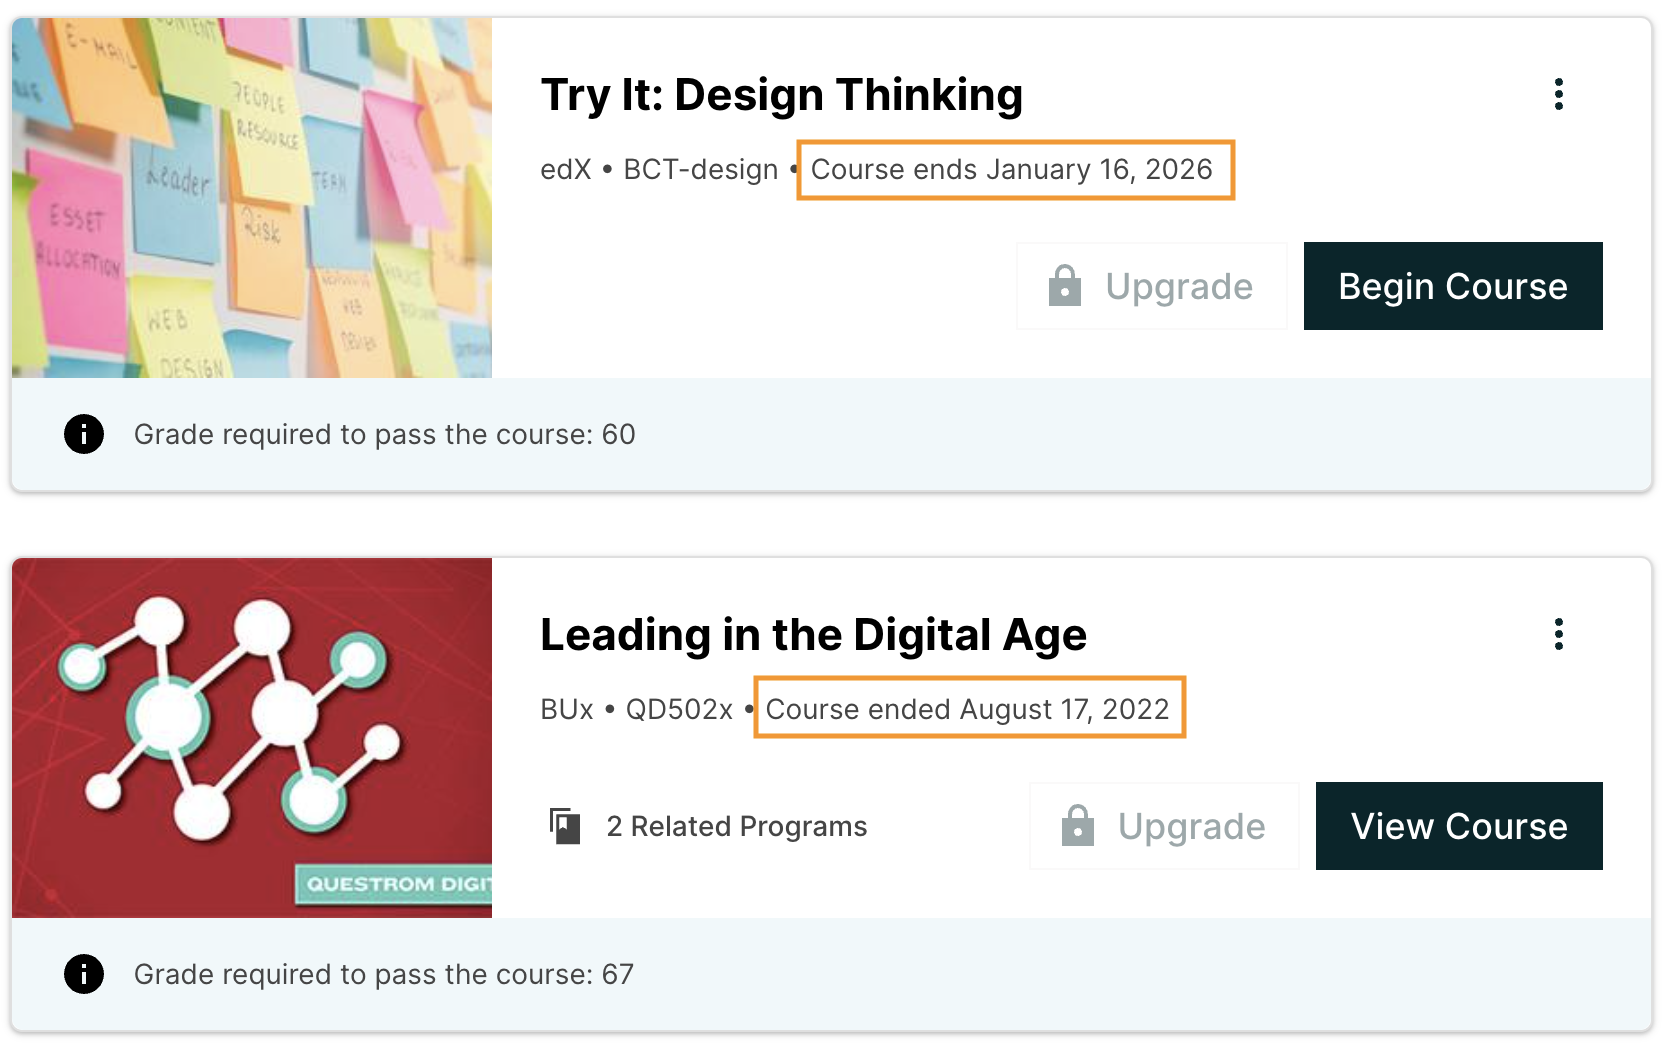
When learners browse courses, the start date for each course is visible in the course catalog and in the course’s About page.

To find the URL of your course’s About page in Studio, select Settings, and then select Schedule & Details.
After learners enroll in courses, the courses appear on their course dashboards. To access the dashboard, learners select their usernames and then select Dashboard. For a course that is in progress or has not yet started, the start date is visible. For a course that has ended, the course end date is visible.
6.2.2.2. Course Pacing#
This topic describes the difference between instructor-paced and self-paced courses.
6.2.2.2.1. Overview of Course Pacing#
When you create an edX course, you can set the schedule of the course, including due dates for assignments or exams, or you can allow learners to work at their own pace. Courses that follow a schedule that you set are known as instructor- paced courses. Courses that offer suggested due dates for assignment or exams based on the learner’s enrollment date and the expected course duration are known as self-paced courses. These courses offer learners flexibility to modify the assignment dates as needed.
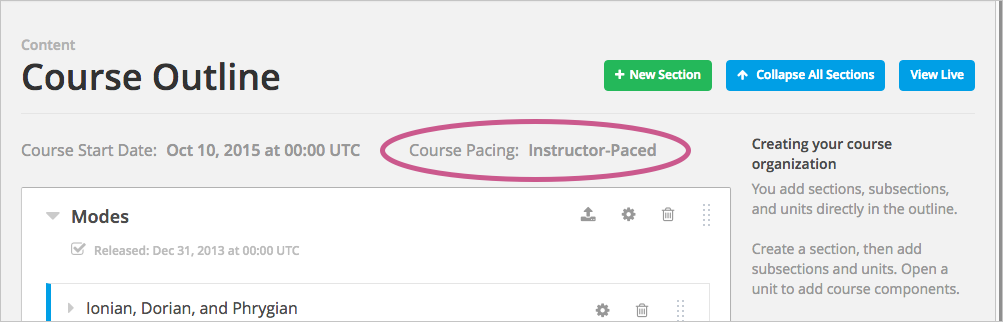
An indicator for the pacing for your course appears on the Course Outline page. By default, courses are instructor-paced.
Note
You cannot change the course pacing after the course start date has passed.
6.2.2.2.2. Instructor-Paced and Self-Paced Courses#
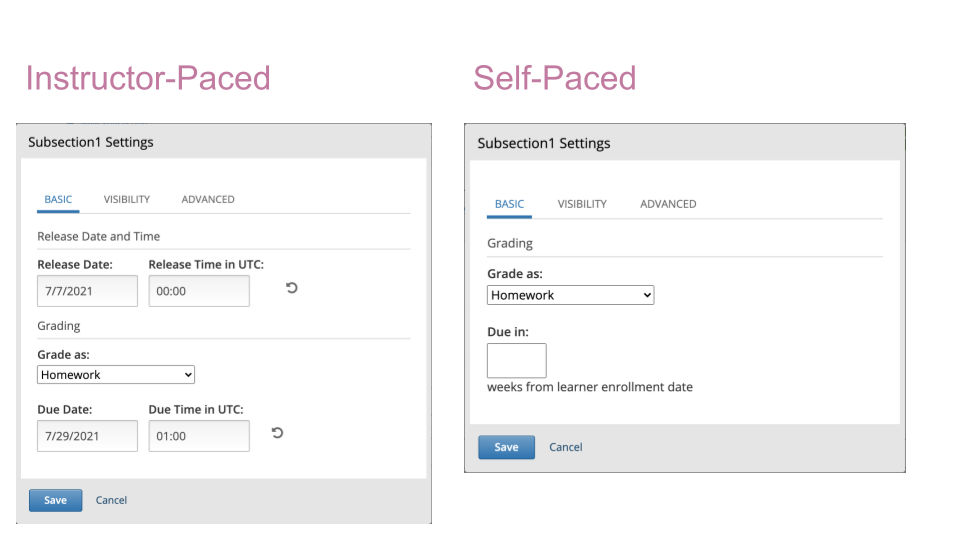
Instructor-paced courses progress at the pace that the course author sets. You set release dates for content and due dates for assignments, and assignment due dates are visible in the LMS. Learners cannot access course content before its release date, and learners must complete assignments by their due dates.
In self-paced courses, learners can access all course materials when the course begins, and assignment due dates follow a Personalized Learning Schedule (PLS) by default. You do not have the option to set release dates for course content. Learners can complete course material at any time before the course end date.
Note
If you set due dates for assignments or exams in an instructor-led course and later change the course to be self-paced, Studio stores the due dates that you previously set. If you change the course back to instructor- paced later, Studio restores the due dates.
Personalized Learning Schedule (PLS) is a feature in self-paced courses that creates a personalized schedule for learners by assigning suggested due dates to graded assignments.
A learner’s PLS is based on their enrollment date and can have two types of pacing:
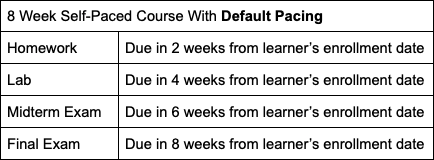
PLS’ default pacing automatically assigns due dates to graded subsections evenly throughout the course duration based on the total number of sections in the course.
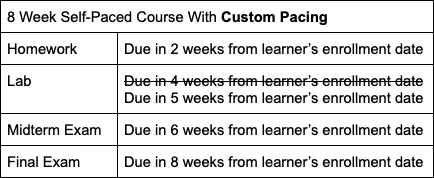
PLS’ custom pacing allows course authors to assign due dates to graded subsections manually throughout the course duration.
For example, if there are 4 sections, each of which has a graded assignment, in an 8-week course, default pacing would assign due dates for every 2 weeks.
Custom pacing allows for other relative due dates, such as setting an assignment to be due in 5 weeks instead of the 2 week interval.
Now, Personalized Learning Schedule can be adapted to have:
Default pacing
Custom pacing
A mix of default and custom pacing, where the user sets custom pacing to some, but not all, graded assignments in a course. The rest of the assignments that are not set have default pacing applied to them.
6.2.2.2.3. Setting Custom Pacing in Personalized Learning Schedules#
Once you have created a graded assignment in your self-paced course, the assignment is eligible to be included in a learner’s Personalized Learning Schedule (PLS), and it will automatically inherit default pacing. Follow these steps to override the course’s default pacing, and enable custom pacing:
Click on the subsection’s configuration setting

Type the number of weeks you would like the assignment to be due in starting from the learner’s enrollment date. (Note: Leaving this field empty will cause the assignment to inherit default pacing)
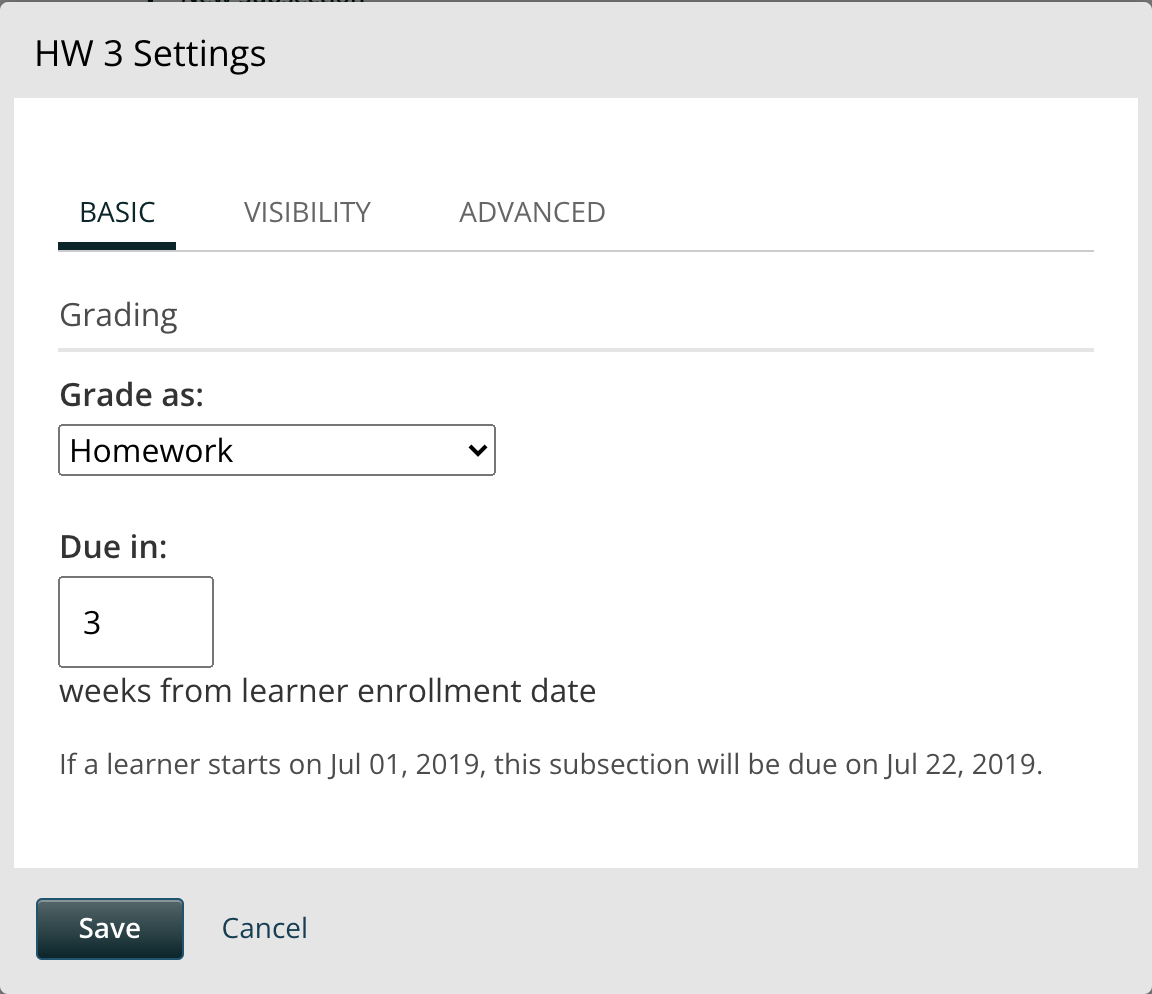
Click “Save”
The relative due date you saved will now be published for all enrolled learners.