12.6. Offering Timed Exams#
This topic describes how to add and manage timed exams in your course.
12.6.1. Overview#
You can configure a subsection in your course so that learners have a set amount of time to complete and submit all problems in that subsection.
Although you can configure an ungraded subsection to be timed, typically you set a time limit on graded subsections, such as for mid-term or final exams.
When learners take a timed exam, a timer on the exam page counts down and provides alerts as the time limit approaches. When no time remains, learners can no longer access additional exam content, or submit additional responses to the subsection. All problems that were completed are graded. No points are awarded for unsubmitted problems.
Course teams can grant individual learners more time to complete problems in the subsection, but only if learners request additional time before starting a timed exam.
Note
Learners cannot complete timed exams using the edX mobile app.
To better understand the learner’s experience of timed exams, see learners:taking_timed_exams in the edX Learner’s Guide or Taking a Timed Exam in the Open edX Learner’s Guide.
Timed exams are different from proctored exams. While both types of exams have a time limit, learners are monitored only during proctored exams.
12.6.2. Enable Timed Exams#
Timed exams are automatically enabled in your course. If you want to disable timed exams, you should go to each subsection that is set to be a “timed” exam, and set it to “none”.
Note
The Enable Timed Exams field is now deprecated in the Advanced Settings page. If you want to access the field, you’ll need to click on the “Show Deprecated Settings” button on the Advanced Settings page.
12.6.3. Set a Subsection to be Timed#
Ensure that you have enabled timed exams in the course. Then follow these steps.
Add and develop a subsection as you would any other subsection.
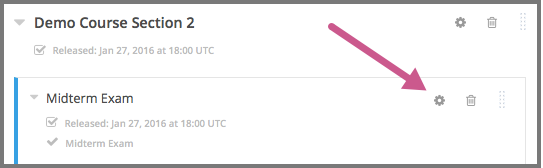
Select the Configure icon for the subsection.
The Settings dialog box opens to the Basic tab.
In the Grading section, set the assignment type and due date for the subsection.
Select the Advanced tab.
In the Set as a Special Exam section, select Timed.
If your course has the proctored exam feature enabled, the Advanced tab also shows options for proctored and practice proctored exams.
In the Time Allotted field, enter the length of time that you want learners to have to complete the problems in the subsection. Enter the time as HH:MM, where HH is hours and MM is minutes.
Select Save.
12.6.4. Grant Learners More Time for a Timed or Proctored Exam#
Note
The course grace period setting does not apply to timed or proctored exams. For more information about the grace period setting, see Set the Grace Period.
From the instructor dashboard, a course team member can grant learners extra time to complete a timed or proctored exam.
View the live version of your course.
Select Instructor, and then select Special Exams.
Expand Allowance Section.
Select Add Allowance.
The Add a New Allowance dialog box opens.
For Username or Email, enter all the learners’ emails/usernames seperated by a comma that you wish to add an exception for.
For Select Exam Type, select the type of exams you want to add extra time for, either proctored or timed exams.
For Select Exams, click on the desired exams you want extra time for.
For Allowance Type, select either Additional Time or Time Multiplier
If you selected Additional Time, enter the number of extra minutes that you want to grant to the learner.
Note
You must enter a whole number greater than 0.
#. Otherwise if you selected Time Multiplier, enter the multiplier for how much total time you want the learners to have. For example for an exam of 30 minutes, a multiplier of 1.5 will give 15 extra minutes to each learner.
Note
You must enter a number greater than 1.
Select Create Allowance.
For proctored exams, the reviewer takes the special allowance for extra time into account when the proctoring service reviews the learner’s proctored exam results.
12.6.5. Resuming an Exam in an Error State#
If a learner encounters an error while taking a timed or proctored exam, you can allow them to resume the exam with their answers and time remaining saved.
Note
This option is only available if a learner’s exam attempt is in an Error state. This can be seen by following the directions below.
Note
Onboarding and practice exams can be self-service reset by the learner. See Checking Your Onboarding Status and Resetting Your Onboarding Exam in the edX Help Center.
To allow a learner to resume a timed or proctored exam attempt, follow these steps.
View the live version of your course.
Select Instructor, and then select Special Exam.
Expand Student Special Exam Attempts. A list of timed and proctored exam attempts appears.
Search for the learner’s username to locate their exam attempts.
In the Exam Name column, locate the name of the specific exam for which you are resuming the learner’s exam attempt.
In the Actions column, click the gear icon (⚙) and select Resume. A message displays asking you to confirm that you want to resume the learner’s exam attempt.
Select OK. The learner’s exam attempt status will change from Error to Ready to Resume, and they will be able to access the exam again.
12.6.6. Allow Learners to Retake a Timed or Proctored Exam#
If a learner needs to retake a timed exam, you can clear their exam attempt and allow them to retake the exam.
Warning
Clearing an exam attempt removes all learner answers in an exam. This action cannot be undone.
To clear a timed or proctored exam attempt, follow these steps.
View the live version of your course.
Select Instructor, and then select Special Exam.
Expand Student Special Exam Attempts. A list of timed and proctored exam attempts appears.
Search for the learner’s username to locate their exam attempts.
In the Exam Name column, locate the name of the specific exam for which you are cleaning the learner’s exam attempt.
In the Actions column, select Reset. A message displays asking you to confirm that you want to remove the learner’s exam attempt.
Note
If the learner’s exam attempt is in an error state, there will be a gear icon (⚙) in place of the Reset button. Click this icon in order to display the Reset and Resume options. For more information on resuming an exam attempt, see Resuming an Exam in an Error State.
Select OK. The learner’s exam attempt is removed from the list.
12.6.7. Hide a Timed Exam After Its Due Date#
Timed exams are hidden from learners after they complete and submit their exams, but are available again for viewing after the exam due date has passed. You can configure a timed exam to remain hidden even after the exam due date has passed.
When you keep a timed exam hidden after its due date, learners cannot see the content of the exam, but the grades that they received on the exam are not affected, and their scores for the exam remain visible on the Progress page.
Note
This setting applies only to timed exams. It has no effect on other types of special exams, including proctored or practice exams.
In Studio, select the Configure icon for the timed exam (subsection) that you want to configure.
The Settings dialog box opens to the Basic tab.
Select the Visibility tab.
In the Subsection Visibility section, select Hide content after due date.
Select Save.