5.1. Creating a New Course
5.1.1. Overview
This chapter describes how to create and set up your course:
Another way to create a course is to re-run an existing course. See Re-running a Course.
You can also Export a Course and Import a Course through Studio. You can do this when you need to edit the course in XML.
5.1.2. Create a New Course
- Log in to Studio.
- Click New Course.
- Enter course information as needed and click Create.
Note
Enter new course information carefully. This information becomes part of the URL for your course. To change the URL after the course is created, you must contact edX through the Help site (http://help.edge.edx.org). Additionally, because this information becomes part of your course URL, the total number of characters in the following four fields must be 65 or fewer.
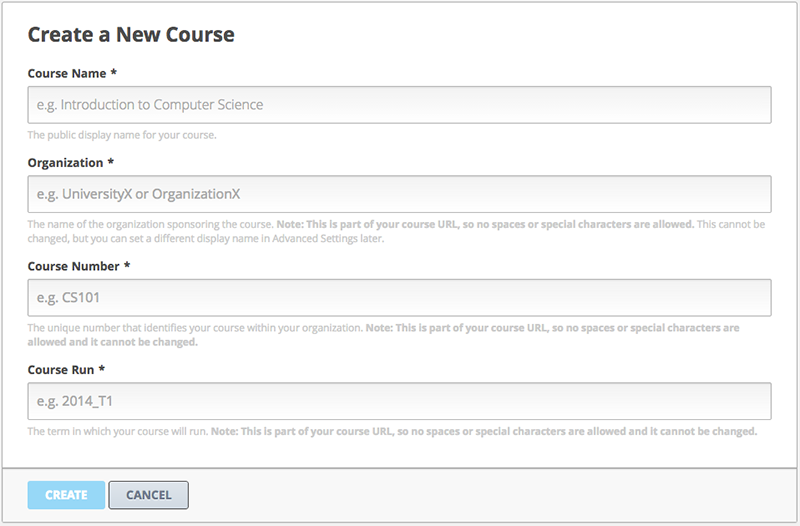
- For Course Name, enter the title of your course. For example, the name may be “Sets, Maps, and Symmetry Groups”. Use title capitalization for the course title.
- For Organization, enter the identifier for your university. For example, enter HarvardX or MITx. Do not include spaces or special characters.
- Click Save.
The page refreshes to show the empty Outline for your new course. The course
identifier appears in the browser address bar as the final part of the URL in
the format {key type}:{org}+{course}+{run}. For example,
course-v1:edX+DemoX+Demo_2014.
Note
This course ID format applies to all courses created after January 14, 2015. Older courses can have course IDs in the format
{org}/{course}/{run}. For example,MITx/6.002x/2012_Fall.
5.1.3. Edit Your Course
After you create a course, the course opens in Studio automatically and you can begin editing.
When you return to Studio later, the Studio My Courses dashboard page lists the courses that you create along with any courses for which you have course staff privileges.

To open a course, click the course name. The Studio Course Outline page appears.
5.1.4. Use the Course Checklist
You can use a Course Checklist within Studio to help you work through the tasks of building a course.
Categories of tasks in the Course Checklist include:
- Getting Started with Studio
- Draft a Rough Course Outline
- Explore edX’s Support Tools
- Draft Your Course About Page
From the Tools menu, select Checklists.
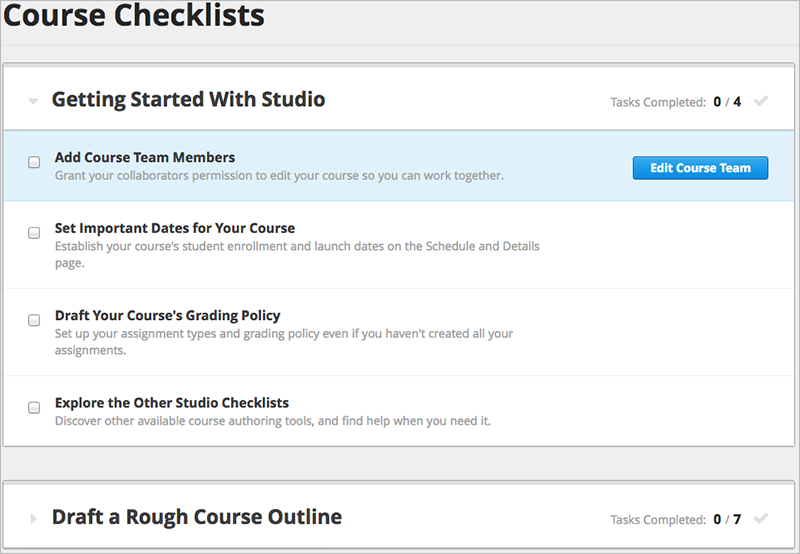
As shown above for the Add Course Team Members task, if you hover over a task, a button is displayed that takes you to the page to complete that task.
You can expand and collapse sections of this page as needed.
You can check tasks as you complete them. Studio saves your changes automatically. Other course staff can see your changes.
5.1.5. Add Course Team Members
Course team members are users who help you build your course.
Only a team member with Admin access can add or remove course team members, or grant Admin access to other team members.
Other course team members can edit the course and perform all tasks except adding and removing other new team members and granting Admin access.
Note
Any course team member can delete content created by other team members.
All course team members must be registered with Studio and have an active account.
To add a course team member:
- Ensure you have Admin access.
- Ensure that the new team member has registered with Studio.
- From the Settings menu, select Course Team.
- Click Add a New Team Member.
- Enter the new team member’s email address, then click ADD USER.
You can also assign privileged roles to users when you work in the LMS. Regardless of where the role is assigned, these administrative team members can work on your course in both the LMS and in Studio. For more information on assigning roles while you run your course, see Staffing.