12.2. Enrollment
Course authors and instructors can enroll students in a course, see how many people are enrolled, and, when necessary, unenroll students on the Instructor Dashboard.
Students can enroll themselves in a course during its defined enrollment
period. For a www.edx.org course, enrollment is publicly available to
anyone who registers an edX account. For other courses, such as those on
edge.edx.org, enrollment is limited to students who know the course URL
and students you explicitly enroll.
- Registration and Enrollment
- Enroll Students in a Course
- View an Enrollment Count
- Unenroll Students from a Course
Data about course enrollment is also available from edX Insights. You access Insights from the Instructor Dashboard for your live course: after you click Instructor, click the link in the banner at the top of each page. For more information, see Using edX Insights.
12.2.1. Registration and Enrollment
Before a student can enroll in a course, he or she must:
- Register a user account, which includes supplying a valid email address, on
www.edx.org,edge.edx.org, or your implementation of the edX platform. Each platform requires a separate user account. - Activate the registered account by following the emailed instructions.
As long as the course Enrollment End Date has not passed, students who
have registered and activated user accounts can enroll themselves in
www.edx.org courses, or can enroll in other courses if they know the URL.
For a more detailed description of this process from a student’s point of
view, see Sample Student Login Guide.
Course authors and instructors, however, can enroll students in a course either before or after the students register their user accounts.
To work on a course, all course staff members must also have registered and activated user accounts and be enrolled in the course.
12.2.2. Enroll Students in a Course
You enroll students, and other course staff members, in your course by supplying their email addresses. After the Enrollment End Date for a course students can no longer enroll themselves; however, you can still explicitly enroll students.
When you enroll people in a course you have these options:
Auto Enroll. When you choose this option, the people who you enroll do not need to complete an explicit course enrollment step. Of the list of email addresses that you supply, those that correspond to a registered user account are immediately enrolled in the course, and your course displays on the Current Courses dashboard for those users on log in. Email addresses on the list that do not match a registered user account are enrolled as soon as that account is registered and activated.
If you do not select Auto Enroll, the people who you enroll must also actively locate your course and enroll themselves in it. These students see the course on their dashboards after they have done so.
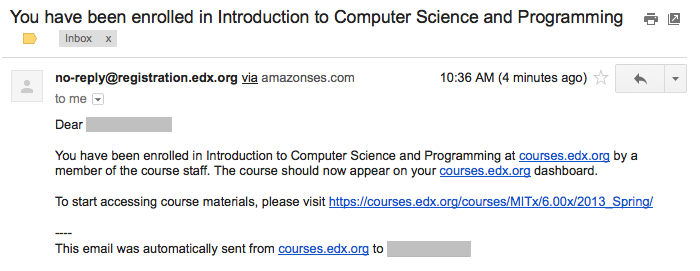
Notify students by email. When you choose this option, an email message is automatically sent to each of the email addresses that you supply. The message includes the name of the course and, for students who are not already enrolled, a reminder to use that same email address to enroll.
An example of the email message that a student received when this option was selected during enrollment follows. In this example, the student already had a registered and activated edx.org account, and both Auto Enroll and Notify students by email were selected.
To enroll students or staff members:
- View the live version of your course.
- Click Instructor, then click Membership.
- In the Batch Enrollment section of the page, enter the username or email address of the student, or enter multiple names or addresses separated by commas or new lines.
You can copy and paste data from a CSV file of email addresses. However, note that this feature is better suited to courses with smaller enrollments, rather than courses with massive enrollments.
- To streamline the course enrollment process, leave Auto Enroll selected.
- To send students an email message, leave Notify students by email selected.
- Click Enroll.
12.2.3. View an Enrollment Count
After you create a course, you can access the total number of people who are enrolled in it. When you view an enrollment count, note that:
In addition to students, the enrollment count includes the course author, course team members, instructors, and course staff. (To work with a course in Studio or the LMS, you must be enrolled in that course.)
Students can unenroll from courses, and course authors and instructors can unenroll students when necessary.
Note: The enrollment count displays the number of currently enrolled students and course team staff. It is not a historical count of everyone who has ever enrolled in the course.
The total number of current enrollees is shown as the sum of the number of people who selected each of the certification tracks (verified, audit, or honor) that are available for your course.
To view the enrollment count for a course:
- View the live version of your course.
- Click Instructor, then click Course Info if necessary.
The Enrollment Information section of the page that opens shows the number of people who are currently enrolled in your course and in each of the certification tracks.
You can also view or download a list of the people who are enrolled in the course. See Student Data.
12.2.4. Unenroll Students from a Course
You can remove students from a course by unenrolling them. To prevent students from re-enrolling, course enrollment must also be closed. You use Studio to set the Enrollment End Date for the course to a date in the past. See Set Important Dates for Your Course.
Note: Unenrollment does not delete data for a student. An unenrolled student’s state remains in the database and is reinstated if the student does re-enroll.
To unenroll students, you supply the email addresses of enrolled students.
- View the live version of your course.
- Click Membership.
- In the Batch Enrollment section of the page, enter a username or an email address, or multiple names or addresses separated by commas or new lines.
- To send students an email message, leave Notify students by email selected.
Note
The Auto Enroll option has no effect when you click Unenroll.
- Click Unenroll. The course is no longer listed on the students’ Current Courses dashboards, and the students can no longer contribute to discussions or the wiki or access the courseware.