10.2. Enabling and Configuring the Cohorts Feature
To support cohorts in your course, you select a strategy for assigning your students to cohorts: automated assignment, manual assignment, or a hybrid approach. See Options for Assigning Students to Cohorts. You also decide whether course-wide and content-specific discussion topics should be divided by cohort or unified for all students.
After you select a strategy, you complete these configuration steps (as applicable):
- Enable cohorts.
- Determine the method you want to use to assign students to cohorts:
- Optionally, identify the discussion topics that you want to be divided by cohort.
- If you want course-wide discussion topics to be divided by cohort, you need to complete some configuration tasks.
- In contrast, if you want content-specific discussion topics to be divided by cohort, you do not need to take any action. Instead, you need to complete some configuration tasks only if you want content-specific discussion topics to be unified.
You complete these procedures in Studio and on the Instructor Dashboard. For an optimal student experience, you should make sure that configuration of the cohort feature is as complete as possible prior to the start date of your course.
If you need to make changes to the way you have configured the cohort feature while your course is running, please see Altering Cohort Configuration in a Running Course.
10.2.1. Enabling the Cohort Feature
- Open the course in Studio.
- Select Settings, then Advanced Settings.
- In the Cohort Configuration field, place your cursor between the supplied pair of braces.
- Type
"cohorted": true. - Click Save Changes. Studio reformats the name:value pair you just entered to indent it on a new line.

You can then implement the automated assignment strategy, implement the manual assignment strategy, or both.
For a report that includes the cohort assignment for every enrolled student, review the student profile information for your course. See Download or View Student Data.
10.2.2. Implementing the Automated Assignment Strategy
To implement automated assignment of students to cohorts, you define auto cohorts in the Cohort Configuration advanced setting field.
You complete this procedure if you are using either the automated or hybrid assignment strategy for your course. For more information, see Automated Assignment: Making MOOC Discussions Manageable or Hybrid Assignment: Accommodating Small Groups Within a Course.
10.2.2.1. Define Auto Cohorts
Before you define your auto cohorts, note that students can see the name of the cohort that they are assigned to. The message “This post is visible only to {cohort name}” appears with each post in discussion topics that are divided by cohort. See Read the Cohort Indicator in Posts.
Note
You cannot delete cohorts or change their names. If you need to make changes to the way you have configured cohorts feature while your course is running, please see Altering Cohort Configuration in a Running Course.
Open the course in Studio.
Select Settings, then Advanced Settings.
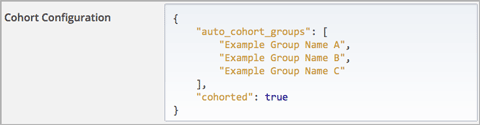
In the Cohort Configuration field, place your cursor after the opening brace character (
{) and press Enter.On the new line, you define the
"auto_cohort_groups":policy key, followed by one or more cohort names enclosed by square brackets ([ ]). You can define a set of auto cohorts or just one.To define a set of cohorts, you type each cohort name on a new line, enclose it within quotation marks (
" "), and separate the quoted name values with commas. For example:"auto_cohort_groups": [ "Example Cohort Name A", "Example Cohort Name B", "Example Cohort Name C" ]
- Type a comma after the closing square bracket character (
],). You must include a comma to separate each of the policy keys that you define. - Click Save Changes. Studio resequences and reformats your entry. Scroll back to the Cohort Configuration field to verify that your entry was saved as you expect. Entries that do not contain all of the required punctuation characters revert to the previous value when you save, and no warning is presented.
Any student who is not already assigned to a cohort will be randomly assigned to one of the auto cohorts when she visits any of the course discussion topics.
10.2.3. Implementing the Manual Assignment Strategy
To implement manual assignment of students to cohorts, you define manual cohorts and then assign students to them.
You complete these procedures if you are using either the manual or hybrid assignment strategy for your course. For more information, see Manual Assignment: Grouping by Common Characteristics or Hybrid Assignment: Accommodating Small Groups Within a Course.
You must enable the cohort feature for your course before you can complete these procedures.
10.2.3.1. Define Manual Cohorts
Before you define your manual cohorts, note that students can see the name of the cohort they are assigned to. The message “This post is visible only to {cohort name}” appears with each post in discussion topics that are divided by cohort. See Read the Cohort Indicator in Posts.
Note
You cannot delete cohorts or change their names. If you need to make changes to the way you have configured the cohort feature while your course is running, please see Altering Cohort Configuration in a Running Course.
- View the live version of your course. For example, in Studio click View Live.
- Click Instructor, then click Membership.
- Scroll to the Cohort Management section at the bottom.
- Click Add Cohort.
- Supply a name for the cohort, and then click Save below the New Cohort Name field.
10.2.3.2. Assign Students to Cohorts Manually
Note
Manual assignments should be as complete as possible before your course starts. If student enrollment continues after your course starts, you should continue to assign new students to cohorts.
- View the live version of your course. For example, in Studio click View Live.
- Click Instructor, then click Membership.
- Scroll to the Cohort Management section at the bottom.
- Select a cohort from the drop down list.
- In the Add students field, enter the username or email address of a single student, or enter multiple names or addresses separated by commas or new lines. You can copy data from a CSV file of email addresses and paste it into this field.
- Click Add Students. The students are assigned to the selected manual cohort. A message appears to indicate the number of students who were added to the cohort. Because students can belong to only one cohort, the message also indicates the number of students whose assignment to another cohort was changed by this procedure.
For a report that includes the cohort assignment for every enrolled student, review the student profile information for your course. See Download or View Student Data.
10.2.3.3. Assign Students to Cohorts by Uploading a CSV File
In addition to assigning students to cohorts by entering usernames or email addresses directly on the Membership page in the Instructor Dashboard, you can also upload a .csv file containing a list of students and the cohorts that you want to assign them to.
Any assignments to cohorts that you specify in the .csv files you upload will overwrite or change existing cohort assignments. The configuration of your cohorts should be complete and stable before your course begins. You should also complete manual cohort assignments as soon as possible after any student enrolls, including any enrollments that occur while your course is running. To understand the effects of changing cohort assignments after your course has started, see Altering Cohort Configuration in a Running Course.
Note
Be aware that the contents of the .csv file are processed row by row, from top to bottom, and each row is treated independently.
For example, if your .csv file contains conflicting information such as Student A being first assigned to Cohort 1, then later in the spreadsheet being assigned to Cohort 2, the end result of your .csv upload is that Student A is assigned to Cohort 2. However, the upload results file will count Student A twice in the “Students Added” count: once when they are added to Cohort 1, and again when they are added to Cohort 2. Before submitting a file for upload, check it carefully for errors.
The requirements for the .csv file are summarized in this table.
| Requirement | Notes |
| Valid .csv file | The file must be a properly formatted comma-separated values file:
|
| File size | The file size of .csv files for upload is limited to a maximum of 2MB. |
| UTF-8 encoded | You must save the file with UTF-8 encoding so that Unicode characters display correctly. |
| Header row | You must include a header row, with column names that exactly match those specified in “Columns” below. |
| One or two columns identifying students | You must include at least one column identifying students: either “email” or “username”, or both. If both the username and an email address are provided for a student, the email address has precedence. In other words, if an email address is present, an incorrect or non- matching username is ignored. |
| One column identifying the cohort | You must include one column named “cohort” to identify the cohort to which you are assigning each student. The specified cohorts must already exist in Studio. |
| Columns with headings other than “email”, “username” and “cohort” are ignored. |
Follow these steps to assign students to cohorts by uploading a .csv file.
View the live version of your course. For example, in Studio, click View Live.
Click Instructor, then click Membership.
Scroll to the Cohort Management section at the bottom.
Under Assign students to cohorts by uploading a CSV file, click Browse to navigate to the .csv file you want to upload.
Click Upload File and Assign Students. A status message displays above the Browse button.
Verify your upload results on the Data Download page.
Under Reports Available for Download, locate the link to a .csv file with “cohort_results” and the date and time of your upload in the filename. The list of available reports is sorted chronologically, with the most recently generated files at the top.
The results file provides the following information:
| Column | Description |
| Cohort | The name of the cohort to which you are assigning students. |
| Exists | Whether the cohort was found in the system. TRUE/FALSE. If the cohort was not found (value is FALSE), no action is taken for students you assigned to that cohort in the .csv file. |
| Students Added | The number of students added to the cohort during the row by row processing of the .csv file. |
| Students Not Found | A list of email addresses or usernames (if email addresses were not supplied) of students who could not be matched by either email address or username and who were therefore not added to the cohort. |
For a report that includes the cohort assignment for every enrolled student, review the student profile information for your course. See Download or View Student Data.
10.2.3.4. Creating a Unicode-encoded CSV File
Make sure the .csv files that you upload are encoded as UTF-8, so that any Unicode characters are correctly saved and displayed.
Note
Some spreadsheet applications (for example, MS Excel) do not allow you to specify encoding when you save a spreadsheet as a .csv file. To ensure that you are able to create a .csv file that is UTF-8 encoded, use a spreadsheet application such as Google Sheets, LibreOffice, or Apache OpenOffice.
10.2.4. Altering Cohort Configuration in a Running Course
The configuration of the cohort feature should be complete and stable before your course begins. Manual cohort assignments should be completed as soon as possible after any student enrolls, including any enrollments that occur while your course is running.
If you decide that you must alter cohort configuration after your course starts and activity in the course discussion begins, be sure that you understand the consequences of these actions:
10.2.4.1. Change Student Cohort Assignments
After your course starts and students begin to contribute to the course discussion, each post that they add is visible either to everyone or to the members of a single cohort. When you change the cohort that a student is assigned to, there are three results:
- The student continues to see the posts that are visible to everyone.
- The student sees the posts that are visible to his new cohort.
- The student no longer sees the posts that are visible only to his original cohort.
The visibility of a post and its responses and comments does not change, even if the cohort assignment of its author changes. To a student, it can seem that posts have “disappeared”.
To verify the cohort assignments for your students, download the student profile report for your course. If changes are needed, you can assign students to different cohorts manually on the Membership page of the Instructor Dashboard.
10.2.4.2. Rename a Cohort
Name changes for cohorts are not supported. The Membership page of the Instructor Dashboard does not offer an option to rename your manual cohorts.
It is possible to change the value for the auto_cohort_groups policy key on
the Advanced Settings page in Studio. However, changing the names in the
listed name:value pairs does not result in any renamed auto cohorts.
Instead, changing the value for the auto_cohort_groups policy key has these
results.
The system uses the new value that you saved for the
auto_cohort_groupspolicy key to create one or more additional auto cohorts.The system begins to assign students who do not have a cohort assignment to the newly defined cohort or cohorts. Students also continue to be assigned to any auto cohorts that were not affected by your changes.
The system uniformly distributes students among all of the auto cohorts that exist when an assignment is needed. The size of each cohort is not considered.
The original cohort or cohorts remain in the system. Any students who were assigned to the original cohorts remain assigned to them.
For the results of assigning any students who remain in the original cohorts to other cohorts, see Change Student Cohort Assignments.
The system converts the original auto cohorts, which are no longer listed as values for
auto_cohort_groups, into manual cohorts. The system no longer assigns students to those cohorts automatically. These cohorts are listed as manual cohorts on the Membership page of the Instructor Dashboard.
10.2.4.3. Delete a Cohort
Deletion of cohorts is not supported. The Membership page of the Instructor Dashboard does not offer an option to delete your manual cohorts.
It is possible to change the value for the auto_cohort_groups policy key on
the Advanced Settings page in Studio. However, removing any of the listed
name:value pairs does not result in the deletion of any cohorts. Instead,
changing the value for the auto_cohort_groups policy key has these results.
The cohorts that you removed from the policy key remain in the system.
Any students who were assigned to those cohorts remain assigned to them.
For the results of assigning any students to other cohorts, see Change Student Cohort Assignments.
The system no longer assigns students to the cohorts automatically.
The cohorts are listed as manual cohorts on the Membership page of the Instructor Dashboard, and you can continue to assign students to them manually.
10.2.4.4. Disable the Cohort Feature
You can disable the cohort feature for your course. Follow the instructions for
enabling the cohort feature, but set "cohorted":
false. All discussion posts immediately become visible to all students.
If you do re-enable the cohort feature by setting "cohorted": true, all
previous student cohort assignments are reenabled, and all visibility settings
for posts are reapplied. However, any posts created while the cohort feature
was disabled will remain visible to all users.