7.4. Working with Problem Components
7.4.1. Overview of Problem Components
The problem component allows you to add interactive, automatically graded exercises to your course content. You can create many different types of problems in Studio.
All problems receive a point score, but, by default, problems do not count toward a student’s grade. If you want the problems to count toward the student’s grade, change the assignment type of the subsection that contains the problems.
This section covers the basics of Problem components: what they look like to you and your students, and the options that every problem component has. For more information about individual problem types, see Creating Exercises and Tools.
For more information, see the following topics.
7.4.2. The Student View of a Problem
All problems on the edX platform have several component parts.
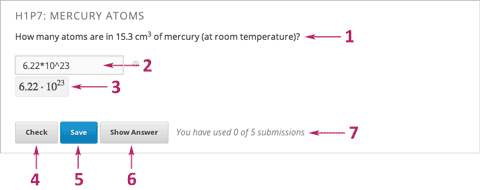
Problem text. The problem text can contain any standard HTML formatting.
Response field with the student’s answer. Students enter answers in response fields. The appearance of the response field depends on the type of the problem.
Rendered answer. For some problem types, Studio uses MathJax to render plain text as “beautiful math.”
Check button. The student clicks Check to submit a response or find out if his answer is correct. If the answer is correct, a green check mark appears. If it is incorrect, a red X appears. When the student clicks the Check button, Studio saves the grade and current state of the problem.
Save button. The student can click Save to save his current response without submitting it for a grade. This allows the student to stop working on a problem and come back to it later.
Show Answer button. This button is optional. When the student clicks Show Answer, the student sees both the correct answer (see 2 above) and the explanation (see 10 below). The instructor sets whether the Show Answer button is visible.
Attempts. The instructor may set a specific number of attempts or allow unlimited attempts for a problem. By default, the course-wide Maximum Attempts advanced setting is null, meaning that the maximum number of attempts for problems is unlimited. If the course-wide Maximum Attempts setting is changed to a specific number, the Maximum Attempts setting for individual problems defaults to that number, and cannot be set to unlimited.
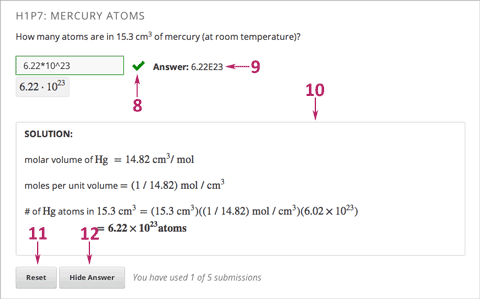
Feedback. After a student clicks Check, all problems return a green check mark or a red X.

Correct answer. Most problems require that the instructor specify a single correct answer.
Explanation. The instructor may include an explanation that appears when a student clicks Show Answer.
Reset button. Students can click Reset to clear any input that has not yet been submitted, and try again to answer the question. If the student has already submitted an answer, clicking Reset clears the submission and, if the problem contains randomized variables and randomization is set to On Reset, changes the values the student sees in the problem. If the number of Maximum Attempts that was set for this problem has been reached, the Reset button is not visible.
Hide Answer button.

Grading. The instructor may specify whether a group of problems is graded. If a group of problems is graded, a clock icon appears for that assignment in the course accordion.

Due date. The date that the problem is due. A problem that is past due does not have a Check button. It also does not accept answers or provide feedback.
Note
Problems can be open or closed. Closed problems do not have a Check button. Students can still see questions, solutions, and revealed explanations, but they cannot check their work, submit responses, or change an earlier score.
There are also some attributes of problems that are not immediately visible. You can set these attributes in Studio.
- Randomization. For some problems, the instructor can specify whether a problem will use randomly generated numbers that vary from student to student.
- Weight. Different problems in a particular problem set may be given different weights.
- Label. To improve accessibility for students who have disabilities, each problem needs a descriptive label. The label typically contains part or all of the text of the question in the problem. Most templates include a space for a label. You can find example labels in the documentation for each problem or tool type.
7.4.3. The Studio View of a Problem
All problems are written in XML. However, Studio offers two interfaces for editing problem components: the Simple Editor and the Advanced Editor.
- The Simple Editor allows you to edit problems visually, without having to work with XML.
- The Advanced Editor converts the problem to edX’s XML standard and allows you to edit that XML directly.
You can switch at any time from the Simple Editor to the Advanced Editor by clicking Advanced Editor in the top right corner of the Simple Editor interface. However, it is not possible to switch from the Advanced Editor to the Simple Editor.
7.4.3.1. The Simple Editor
Several problem templates, including multiple choice and text input problem templates, open in the Simple Editor. The following image shows a multiple choice problem in the Simple Editor.
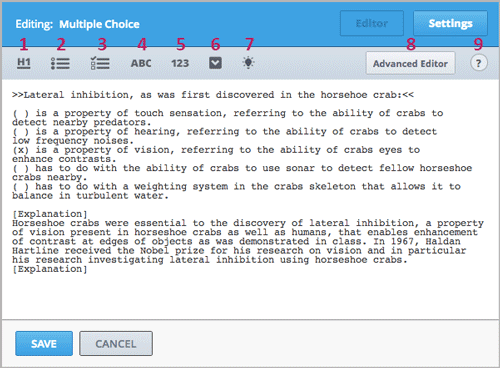
The Simple Editor includes a toolbar that helps you format the text of your problem. When you select text and then click the formatting buttons, the Simple Editor formats the text for you automatically. The toolbar buttons are the following:
- Create a level 1 heading.
- Create multiple choice options.
- Create checkbox options.
- Create text input options.
- Create numerical input options.
- Create dropdown options.
- Create an explanation that appears when students click Show Answer.
- Open the problem in the Advanced Editor.
- Open a list of formatting hints.
The following problem templates open in the Simple Editor.
- Checkbox Problem In checkbox problems, students select one or more options from a list of possible answers.
- Dropdown Problem In dropdown problems, students select one answer from a dropdown list.
- Multiple Choice Problem Multiple choice problems require students to select one answer from a list of choices that appear directly below the question.
- Numerical Input Numerical input problems require answers that include only integers, fractions, and a few common constants and operators.
- Text Input Problem In text input problems, students enter a short text answer to a question.
7.4.3.2. The Advanced Editor
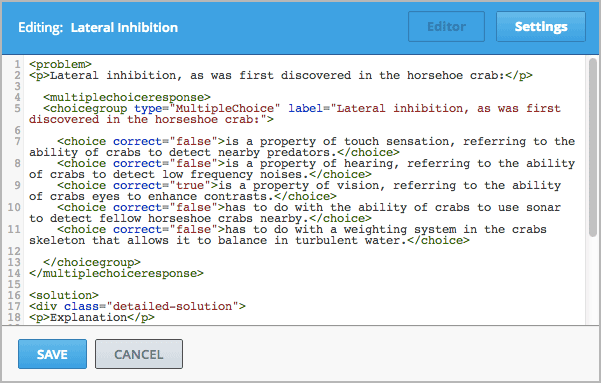
The Advanced Editor opens a problem in XML. Templates for problems such as such as drag and drop and math expression input open directly in the Advanced Editor.
The following image shows the multiple choice problem above in the Advanced Editor instead of the Simple Editor.
The following problem templates open in the Advanced Editor.
- Circuit Schematic Builder Problem In circuit schematic problems, students create and modify circuits on an interactive grid and submit computer- generated analyses of the circuits for grading.
- Custom JavaScript Problem With custom JavaScript display and grading problems, you can incorporate problem types that you’ve created in HTML into Studio via an IFrame.
- Drag and Drop Problem Drag and drop problems require students to drag text or objects to a specific location on an image.
- Image Mapped Input Problem Image mapped input problems require students to click a specific location on an image.
- Math Expression Input Problems Math expression input problems require students to enter a mathematical expression as text, such as e=m*c^2.
- Problem with Adaptive Hint These problems can give students feedback or hints based on their responses. Problems with adaptive hints can be text input or multiple choice problems.
- Problem Written in LaTeX This problem type allows you to convert problems that you’ve already written in LaTeX into the edX format. Note that this problem type is still a prototype, however, and may not be supported in the future.
- Write-Your-Own-Grader Problem Custom Python-evaluated input (also called “write-your-own-grader” problems evaluate students’ responses using an embedded Python script that you create. These problems can be any type.
7.4.4. Problem Settings
In addition to the text of the problem, problems that you create using a Problem component have the following settings. These settings appear on the Settings tab in the component editor.
- Display Name
- Maximum Attempts
- Problem Weight
- Randomization
- Show Answer
- Show Reset Button
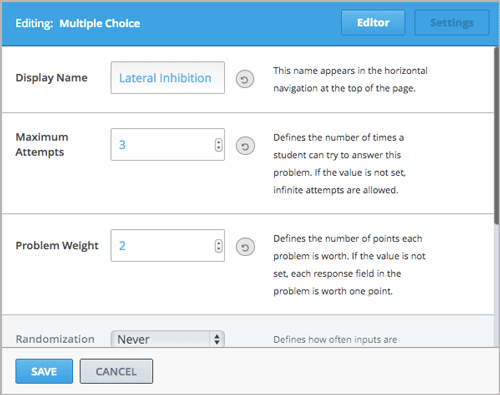
7.4.4.1. Display Name
This setting indicates the name of your problem. The display name appears as a heading over the problem in the LMS and in the course ribbon at the top of the page.
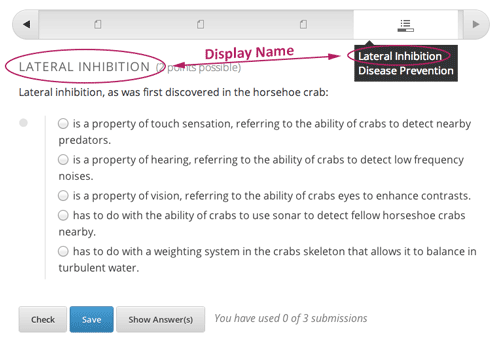
7.4.4.2. Maximum Attempts
This setting specifies the number of times a student is allowed to attempt answering the problem. By default, the course-wide Maximum Attempts advanced setting is null, meaning that the maximum number of attempts for problems is unlimited. If the course-wide Maximum Attempts setting is changed to a specific number, the Maximum Attempts setting for individual problems defaults to that number, and cannot be set to unlimited.
Note
Only questions that have a Maximum Attempts setting of 1 or higher are included on the Student Answer Distribution report that you can download during your course.
7.4.4.3. Problem Weight
Note
Studio stores scores for all problems, but scores only count toward a student’s final grade if they are in a subsection that is graded.
This setting specifies the maximum number of points possible for the problem. The problem weight appears next to the problem title.
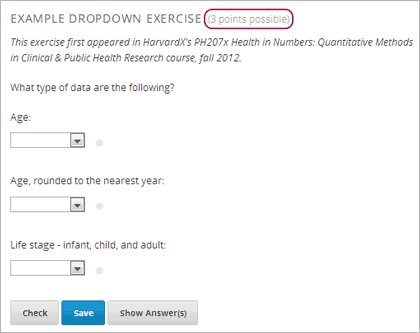
By default, each response field, or “answer space,” in a Problem component is worth one point. Any Problem component can have multiple response fields. For example, the Problem component above contains one dropdown problem that has three separate questions for students to answer, and thus has three response fields.
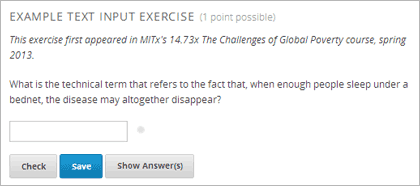
The following Problem component contains one text input problem, and has just one response field.
7.4.4.3.1. Computing Scores
The score that a student earns for a problem is the result of the following formula:
Score = Weight × (Correct answers / Response fields)
- Score is the point score that the student receives.
- Weight is the problem’s maximum possible point score.
- Correct answers is the number of response fields that contain correct answers.
- Response fields is the total number of response fields in the problem.
Examples
The following are some examples of computing scores.
Example 1
A problem’s Weight setting is left blank. The problem has two response fields. Because the problem has two response fields, the maximum score is 2.0 points.
If one response field contains a correct answer and the other response field contains an incorrect answer, the student’s score is 1.0 out of 2 points.
Example 2
A problem’s weight is set to 12. The problem has three response fields.
If a student’s response includes two correct answers and one incorrect answer, the student’s score is 8.0 out of 12 points.
Example 3
A problem’s weight is set to 2. The problem has four response fields.
If a student’s response contains one correct answer and three incorrect answers, the student’s score is 0.5 out of 2 points.
7.4.4.4. Randomization
This setting specifies whether certain values in your problem change each time a different student accesses the problem, or each time a single student tries to answer the problem. For example, the highlighted values in the problem below change each time a student submits an answer to the problem.
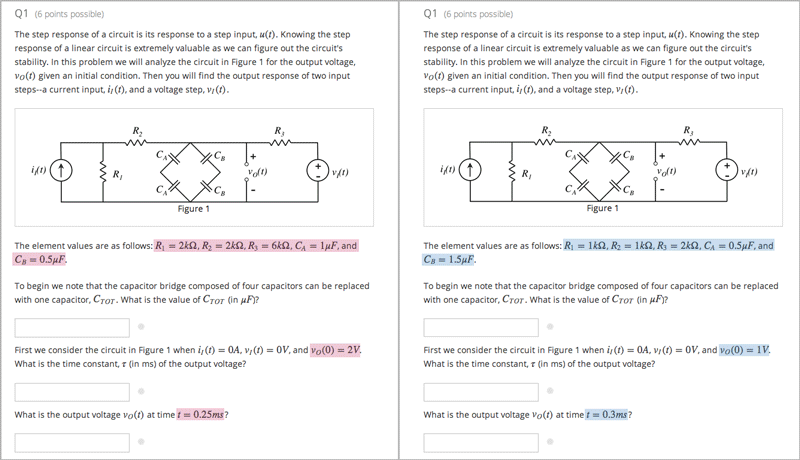
If you want to change, or “randomize,” specific values in your problem, you have to do both the following:
- Make sure that your problem contains a Python script that randomizes the values that you want.
- Enable randomization in the Problem component.
Note
Note that specifying this Randomization setting is different from problem randomization. The Randomization setting randomizes variables within a single problem. Problem randomization offers different problems or problem versions to different students. For more information, see Problem Randomization.
To enable randomization, select an option for the Randomization setting. This setting has the following options.
| Always | Students see a different version of the problem each time they click Check. |
| On Reset | Students see a different version of the problem each time they click Reset. |
| Never | All students see the same version of the problem. This is the default. |
| Per Student | Individual students see the same version of the problem each time they look at it, but that version is different from the version that other students see. |
Note
The edX Platform has a 20-seed limit for randomization.
7.4.4.5. Show Answer
This setting defines when the problem shows the answer to the student. This setting has the following options.
| Always | Always show the answer when the student clicks the Show Answer button. |
| Answered | Show the answer after the student tries to answer the problem. If the question can be, and is, reset, the answer is not shown until the student tries the problem again. (When a student answers a question, the question is considered to be both attempted and answered. When the question is reset, the question is still attempted, but not yet answered.) |
| Attempted | Show the answer after the student tries to answer the problem. If the question can be, and is, reset, the answer continues to show. (When a student answers a question, the question is considered to be both attempted and answered. When the question is reset, the question is still attempted, but not yet answered.) |
| Closed | Show the answer after the student has used up all his attempts to answer the problem or the due date has passed. |
| Finished | Show the answer after the student has answered the problem correctly, the student has no attempts left, or the problem due date has passed. |
| Correct or Past Due | Show the answer after the student has answered the problem correctly or the problem due date has passed. |
| Past Due | Show the answer after the due date for the problem has passed. |
| Never | Never show the answer. In this case, the Show Answer button does not appear next to the problem in Studio or in the LMS. |
7.4.4.6. Show Reset Button
This setting defines whether a Reset button is visible on the problem. Students can click Reset to clear any input that has not yet been submitted, and try again to answer the problem. If the student has already submitted an answer, clicking Reset clears the submission and, if the problem contains randomized variables and randomization is set to On Reset, changes the values the student sees in the problem. If the number of Maximum Attempts that was set for this problem has been reached, the Reset button is not visible.
This problem-level settimg overrides the course-level Show Reset Button for Problems setting.
7.4.5. Modifying a Released Problem
Warning
Be careful when you modify problems after they have been released! Changes that you make to published problems can affect the student experience in the course and analysis of course data.
After a student submits a response to a problem, the edX Learning Management System (LMS) stores the student’s response, the score that the student received, and the maximum score for the problem. For problems with a Maximum Attempts setting greater than 1, the LMS updates these values each time the student submits a new response to a problem. However, if an instructor changes a problem or its attributes, existing student information for that problem is not automatically updated.
For example, you may release a problem and specify that its answer is 3. After some students have submitted responses, you notice that the answer should be 2 instead of 3. When you update the problem with the correct answer, the LMS doesn’t update scores for students who answered 2 for the original problem and thus received the wrong score.
For another example, you may change the number of response fields to three. Students who submitted answers before the change have a score of 0, 1, or 2 out of 2.0 for that problem. Students who submitted answers after the change have scores of 0, 1, 2, or 3 out of 3.0 for the same problem.
If you change the weight setting for the problem in Studio, however, existing student scores update when the student’s Progress page is refreshed. In a live section, students will see the effect of these changes.
7.4.5.1. Workarounds
If you have to modify a released problem in a way that affects grading, you have two options within Studio to assure that every student has the opportunity to submit a new response and be regraded. Note that both options require you to ask your students to go back and resubmit answers to a problem.
- In the Problem component that you changed, increase the number of attempts for the problem. Then ask all your students to redo the problem.
- Delete the entire Problem component in Studio and create a new Problem component with the content and settings that you want. (If the revisions you must make are minor, duplicate the Problem component before you delete it and revise the copy.) Then ask all your students to complete the new problem.
For information about how to review and adjust student grades in the LMS, see Student Grades and Grading.
7.4.6. Additional Work with Problems
You have some further options when you work with problems. You can include more than one problem in a single problem component, or you can set up a problem that presents different versions to different students.
7.4.6.1. Multiple Problems in One Component
You may want to create a problem that has more than one response type. For example, you may want to create a numerical input problem, and then include a multiple choice question about the numerical input problem. Or, you may want a student to be able to check the answers to many problems at one time. To do this, you can include multiple problems inside a single Problem component. The problems can be different types.
Note
You cannot use a Custom JavaScript Problem in a component that contains more than one problem. Each custom JavaScript problem must be in its own component.
To create multiple problems in one component, create a new Blank Advanced Problem component, and then add the XML for each problem in the component editor. You only need to include the XML for the problem and its answers. You don’t have to include the code for other elements, such as the Check button.
Elements such as the Check, Show Answer, and Reset buttons, as well as the settings that you select for the Problem component, apply to all of the problems in that component. Thus, if you set the maximum number of attempts to 3, the student has three attempts to answer the entire set of problems in the component as a whole rather than three attempts to answer each problem individually. If a student clicks Check, the LMS scores all of the problems in the component at once. If a student clicks Show Answer, the answers for all the problems in the component appear.
7.4.6.2. Problem Randomization
You may want to present different students with different problems, or different versions of the same problem. To do this, you’ll create a Problem component for each problem or version in Studio, and then edit your course outside of Studio to randomize the problem that students see.
Note that problem randomization is different from the Randomization setting in Studio. The Randomization setting randomizes variables within a single problem. Problem randomization offers different problems or problem versions to different students.
Note
Creating problems with versions that can be randomized requires you to export your course, edit some of your course’s XML files in a text editor, and then re-import your course. We recommend that you create a backup copy of your course before you do this. We also recommend that you only edit your course files in the text editor if you’re very familiar with editing XML.
7.4.6.2.1. Terminology
Sections, subsections, units, and components have different names in the Course Outline view and in the list of files that you’ll see after you export your course and open the .xml files for editing. The following table lists the names of these elements in the Course Outline view and in a list of files.
| Course Outline View | File List |
| Section | Chapter |
| Subsection | Sequential |
| Unit | Vertical |
| Component | Discussion, HTML, problem, or video |
For example, when you want to find a specific section in your course, you’ll look in the Chapter folder when you open the list of files that your course contains. To find a unit, you’ll look in the Vertical folder.
7.4.6.2.2. Create Randomized Problems
In the unit where you want to create a randomized problem, create a separate Problem component for each version or problem that you want to randomize. For example, if you want to offer four versions or problems, you’ll create four separate Problem components. Make a note of the 32-digit unit ID that appears in the Unit Identifier field under Unit Location.
Export your course. For information about how to do this, see Exporting and Importing a Course. Save the .tar.gz file that contains your course in a memorable location so that you can find it easily.
Locate the .tar.gz file that contains your course, and then unpack the .tar.gz file so that you can see its contents in a list of folders and files.
To do this on a Windows computer, you’ll need to download a third-party program. For more information, see How to Unpack a tar File in Windows, How to Extract a Gz File, The gzip Home Page, or the Windows section of the How to Open .tar.gz Files page.
For information about how to do this on a Mac, see the Mac OS X section of the How to Open .tar.gz Files page.
In the list of folders and files, open the Vertical folder.
Note
If your unit is not published, open the Drafts folder, and then open the Vertical folder in the Drafts folder.
In the Vertical folder, locate the .xml file that has the same name as the unit ID that you noted in step 1, and then open the file in a text editor such as Sublime 2. For example, if the unit ID is e461de7fe2b84ebeabe1a97683360d31, you’ll open the e461de7fe2b84ebeabe1a97683360d31.xml file.
The file contains a list of all the components in the unit, together with the URL names of the components. For example, the following file contains four Problem components.
<vertical display_name="Test Unit">
   <problem url_name="d9d0ceb3ffc74eacb29501183e26ad6e"/>
   <problem url_name="ea66d875f4bf4a9898d8e6d2cc9f3d6f"/>
   <problem url_name="2616cd6324704f85bc315ec46521485d"/>
   <problem url_name="88987707294d4ff0ba3b86921438d0c0"/>
</vertical>
Add
<randomize> </randomize>tags around the components for the problems that you want to randomize.<vertical display_name="Test Unit"> <randomize> <problem url_name="d9d0ceb3ffc74eacb29501183e26ad6e"/> <problem url_name="ea66d875f4bf4a9898d8e6d2cc9f3d6f"/> <problem url_name="2616cd6324704f85bc315ec46521485d"/> <problem url_name="88987707294d4ff0ba3b86921438d0c0"/> </randomize> </vertical>
After you add the
<randomize> </randomize>tags, save and close the .xml file.Re-package your course as a .tar.gz file.
For information about how to do this on a Mac, see How to Create a Tar GZip File from the Command Line.
For information about how to do this on a Windows computer, see How to Make a .tar.gz on Windows.
In Studio, re-import your course.
Note
- Once you’ve implemented randomization, you can only see one of the versions or problems in Studio. You can edit that single problem directly in Studio, but to edit any of the other problems, you’ll have to export your course, edit the problems in a text editor, and then re-import the course. This is true for instructors as well as course teams.
- A .csv file for student responses contains the responses to each of the problems in the problem bank.