12.3. Managing Course Discussions
Discussions, or discussion forums, foster interaction among your students and between students and course staff. You can set up different topics to guide these interactions when you create your course, and then run and moderate discussions throughout the course to encourage participation and develop course community.
Discussions are also excellent sources of feedback and ideas for the future.
For options you can use to run and moderate discussions, see the following sections:
- Overview
- Creating Discussion Topics for Your Course
- Assign Discussion Administration Roles
- Run a Discussion
- Moderate Discussions
- Close Discussions
For information about how enabling the cohort feature for a course affects options for moderating course discussions, see Managing Discussions in Courses with Student Cohorts.
12.3.1. Overview
Students and staff use course discussions to share ideas, exchange views, consider different viewpoints, and ask questions. In a discussion, there are three hierarchical levels of interaction.
- A post is the first level of interaction. A post opens a new subject. Posts are often posed as questions, either to start a conversation or to surface an issue that requires some action. When you add a post, you categorize it as a Question or as a Discussion.
- A response is the second level of interaction. A response is a reply made directly to a post to provide a solution or continue the conversation.
- A comment is the third level of interaction. A comment is often a clarification or side note made to a specific response, rather than to the post as a whole.
The dialogue created by a post, its responses, and the comments on those responses is sometimes called a thread.
All course staff members and enrolled students can add posts, responses, and comments, and view all of the posts, responses, and comments made by other course participants. Members of the course community, both staff and students, can be given permission to moderate or administer course discussions through a set of discussion administration roles. Discussion threads are saved as part of the course history.
Note
The Participating in Course Discussions chapter describes features that are available to all discussion participants, and may be useful to students who are new to online discussion forums. You can share the chapter with your students by, for example, adding a “Never Used a Discussion Forum Before?” post that includes the information you think will be most useful to them.
12.3.2. Creating Discussion Topics for Your Course
Discussions in an edX course include both broad topics on course-wide areas of interest such as “Feedback”, “Troubleshooting”, or “Technical Help”, and the content-specific topics that you add to course units as discussion components. You create both types of discussion topics in Studio.
For details about creating discussion topics, see Create Course-Wide Discussion Topics and Create Content-Specific Discussion Topics. For details about configuring discussion topics in courses with cohorts enabled, see Setting up Discussions in Courses with Cohorts.
12.3.2.1. Create Course-Wide Discussion Topics
All courses include a page named Discussion. When you create a course, a discussion topic named “General” is available for you to include by default. You can add more course-wide discussion topics to guide how students share and find information during your course. Such course-wide topics might include Feedback, Troubleshooting, or Technical Help. Discussions in these topics can begin as soon as your course is available.
To create a course-wide discussion topic:
- Open your course in Studio.
- Select Settings, then Advanced Settings.
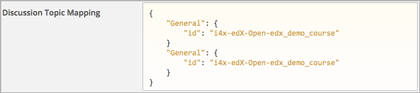
- Scroll down to the Discussion Topic Mapping policy key. By default, its value is:

- Copy the three lines provided for the General topic and paste
them above the closing brace character (
}):
- Replace the second “General” with the quoted name of your new topic.
- Change the value for the second “id” to a unique identifier. For example, append a reference to the name of the topic.
- Add a comma after the first closing brace (
},).
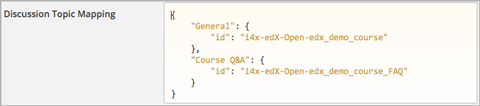
- Click Save Changes. Studio resequences and reformats your entry. Scroll back to the Discussion Topic Mapping field to verify that your entry was saved as you expect. Entries that do not contain all of the required punctuation characters revert to the previous value when you save, and no warning is presented.
When students click the Discussion page for your course, the drop-down Discussion list now includes the topic you added.

Note
In courses with cohorts enabled, the course-wide discussion topics that you add are unified. All of the posts can be read and responded to by every student, regardless of their assignement to a cohort. You have the option to configure these topics to be divided by cohort. See Example: Configuring Course-Wide Discussion Topics As Divided.
12.3.2.2. Create Content-Specific Discussion Topics
To create a content-specific discussion topic, you add a discussion component to a unit. Typically, you do this while you are designing and creating your course in Studio. Follow the instructions in Working with Discussion Components. The result is a discussion topic associated with a unit and its content.
A content-specific discussion topic is subject to the release date of the section that contains it. Students cannot contribute to a content-specific discussion topic until the containing section has been released.
Note
In courses with cohorts enabled, all content-specific discussion topics are divided by cohort when you first add them. Student posts to divided discussion topics can only be read and responded to by members of the same cohort. You can change the configuration of content-specific discussion topics to make them unified and available to all students in the course. See Make All Content-Specific Discussion Topics Unified by Default.
12.3.3. Assign Discussion Administration Roles
You can designate a team of people to help you run course discussions.
Note
The course team that you set up in Studio (or the course staff and instructors you add on the Instructor Dashboard) are not automatically granted discussion administration roles. Discussion administration roles must be explicitly granted to members of the course team for them to moderate or administer course discussions. The course author, team members with Admin access (Studio), and Instructors (Instructor Dashboard) can grant discussion administration roles.
Different options for working with discussions are available through these roles:
- Discussion moderators can edit and delete messages at any level, review messages flagged for misuse, close and reopen posts, pin posts, and endorse responses. Posts made by moderators are marked as “By: Staff” in the list of posts. Responses and comments made by moderators have a colored “Staff” identifier. This role is often given to course team members who already have the Course Staff role.
- Discussion community TAs have the same options for working with discussions as moderators. Posts made by community TAs are marked as “By: Community TA” in the list of posts on the Discussion page. Responses and comments made by community TAs have a colored “Community TA” identifier. This role is often given to students.
- Discussion admins have the same options for working with discussions as moderators, and their posts, responses, and comments have the same “Staff” identifiers. This role can be reserved for assignment to course team members who have the Instructor role only: the discussion admins can then both moderate discussions and give other users these discussion management roles whenever necessary.
Before you can assign roles to your discussion team, you need their email addresses or usernames.
- To get this information for a course team member, on the Instructor Dashboard click Membership and then select Course Staff or Instructor from the drop-down list.
- To get this information for an enrolled student, on the Instructor Dashboard click Data Download, then Download profile information as a CSV.
12.3.3.1. Assign Roles
To assign a discussion administration role, you must be the course author or an Instructor (that is, you are identified in Studio as a team member with Admin access).
- View the live version of the course.
- Click Instructor, then click Membership.
- In the Administration List Management section, use the drop-down list to select Discussion Admins, Discussion Moderators, or Discussion Community TAs.
- Under the list of users who currently have that role, enter an email address or username and click Add for the role type.
- To remove an assigned role, view the list of users and then click Revoke access.
12.3.4. Run a Discussion
On an ongoing basis, the members of your discussion team run the course discussion by making contributions, endorsing responses, marking answers as correct, and guiding student messages into pertinent threads. Techniques that you can use throughout your course to make discussions successful follow.
12.3.4.1. Use Conventions in Discussion Subjects
To identify certain types of messages and make them easier to find, you can define a set of standard tags to include in the subject of a post or in the body of a response or comment. Examples follow.
- Use “[OFFICIAL]” at the start of announcements about changes to the course.
- Provide information about corrected errors with a subject that begins “[CORRECTIONS]” or “[ERRORS]”.
- Ask students to use “[STAFF]” in the subject of each post that needs the attention of a course staff member.
Both your discussion team and your students can use tags like these to search the discussions more effectively.
When a post is created its type must be selected: either “question” or “discussion”. Members of the discussion team should be thoughtful when selecting the type for their posts, and encourage students to do the same. See Find Questions and Discussions.
12.3.4.2. Seed Discussion Topics
To help students learn how to get the most out of course discussions, and find the best discussion topic to use for their questions and conversations, you can seed discussion topics by adding posts before your course starts. Some examples follow.
- In the General topic (which is included in every course by default), add an [INTRO] post to initiate a thread for student and staff introductions.
- For each topic that you create, add the first post to it to describe the way you intend it to be used. In addition to providing guidance, these initial messages can also act as models for students to follow when they create their own posts.
- If you include discussion components along with problem components in a unit, you can add a post that encourages students to use the topic to ask for help with the problems, but reminds them not to post the answers.
12.3.4.3. Minimize Thread Proliferation
To encourage longer, threaded discussions rather than many similar, separate posts, the discussion team can use these techniques. However, be aware that long threads (with more than 200 responses and comments) can be difficult to read, and can therefore result in an unsatisfactory experience in the discussion.
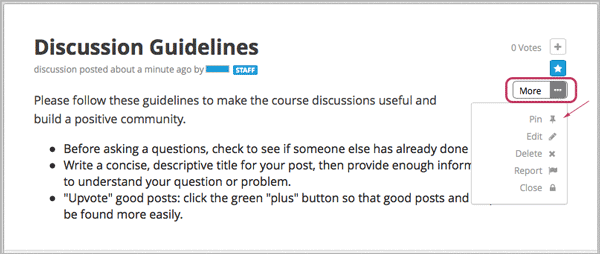
Pin a post. Pinning a post makes it appear at the top of the list of posts on the Discussion page. As a result, it is more likely that students will see and respond to pinned posts. You can write your own post and then pin it, or pin a post by any author. Select the “More” icon and then Pin.
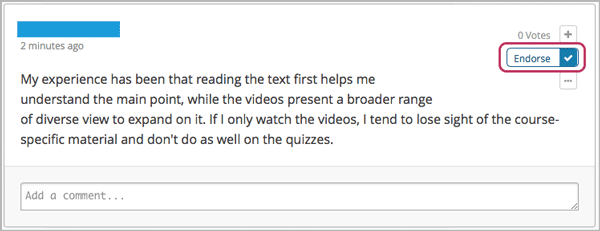
Endorse a response. Endorsing a response indicates that it provides value to the discussion. Click the “check mark” (or tick mark) icon for the response.
Mark a question as answered. You use the same procedure to mark a response as the correct answer to a question as you do to endorse contributions to a discussion: click the “check mark” (or tick mark) icon for correct answers.
Close a post. You can respond to a redundant post by (optionally) pasting in a link to the post that you prefer students to contribute to, and prevent further interaction by closing the post. Select the “More” icon and then Close to close it.
Provide post/response/comment guidelines. You can post information from the overview in this chapter, or the anatomy of edX discussions in the next chapter, in a course-wide discussion topic (such as General) to provide guidance about when to start a new thread by adding a post, responding to an existing post, or commenting on a response.
12.3.5. Moderate Discussions
The members of a course discussion team monitor discussions and keep them productive. They can also collect information, such as areas of particular confusion or interest, and relay it to the course staff.
Developing and sustaining a positive discussion culture requires that sufficient moderator time is dedicated to reviewing and responding to discussions. Keeping up-to-date with a large MOOC forum requires a commitment of 5 or more hours per week, and involves reading threads, replying to and editing posts, and communicating with the rest of the discussion team and course staff.
For information on setting up moderators for your course, see Assign Discussion Administration Roles.
12.3.5.1. Provide Guidelines for Students
You can develop a set of best practices for discussion participation and make them available to students as a course handout file or on a defined page in your course. These guidelines can define your expectations and optionally introduce features of edX discussions.
You can also share the Participating in Course Discussions chapter with your students. It describes features that are available to all discussion participants, and may be useful to students who are new to online discussion forums.
12.3.5.2. Develop a Positive Discussion Culture
Discussion monitors can cultivate qualities in their own discussion interactions to make their influence positive and their time productive.
- Encourage quality contributions: thank students whose posts have a positive impact and who answer questions.
- Check links, images, and videos in addition to the text of each message. Edit offensive or inappropriate posts quickly, and explain why.
- Review posts with a large number of votes and recognize “star posters” publicly and regularly.
- Stay on topic yourself: before responding to a post, be sure to read it completely.
- Maintain a positive attitude. Acknowledge problems and errors without assigning blame.
- Provide timely responses. More time needs to be scheduled for answering discussion questions when deadlines for homework, quizzes, and other milestones approach.
- Discourage redundancy: before responding to a post, search for similar posts. Make your response to the most pertinent or active post and then copy its URL and use it to respond to the redundant threads.
- Publicize issues raised in the discussions: add questions and their answers to an FAQ topic, or announce them on the Course Info page.
For a template that you can use to develop guidelines for your course moderators, see Guidance for Discussion Moderators.
12.3.5.3. Find Questions and Discussions
When students create posts, they specify the type of post to indicate whether they are asking for concrete information (a question) or starting an open-ended conversation (a discussion).
On the Discussion page, a question mark image identifies posts that ask questions, and a conversation bubble image identifies posts that start discussions. When an answer is provided and marked as correct for a question, a check or tick mark image replaces the question mark image. See Answer Questions and Mark Questions as Answered.
In addition to these visual cues, filters can help you find questions and discussions that need review. Above the list of posts on the Discussion page, the Show all filter is selected by default. You can also select:
- Unread, to list only the discussions and questions that you have not yet viewed.
- Unanswered, to list only questions that do not yet have any responses marked as answers.
12.3.5.4. Edit Messages
Discussion moderators, community TAs, and admins can edit the content of posts, responses, and comments. Messages that include spoilers or solutions, or that contain inappropriate or off-topic material, should be edited quickly to remove text, images, or links.
- Log in to the site and then select the course on your Current Courses dashboard.
- Open the Discussion page and then open the post with the content that requires editing. You can select a single topic from the drop-down list of discussion topics, apply a filter, or search to locate the post.
- For the post or for the response or comment that you want to edit, click the “More” icon and then Edit.
- Remove the problematic portion of the message, or replace it with standard text such as “[REMOVED BY MODERATOR]”.
- Communicate the reason for your change. For example, “Posting a solution violates the honor code.”
12.3.5.5. Delete Messages
Discussion moderators, community TAs, and discussion admins can delete the content of posts, responses, and comments. Posts that include spam or abusive language may need to be deleted, rather than edited.
- Log in to the site and then select the course on your Current Courses dashboard.
- Open the Discussion page and then open the post with the content that requires deletion. You can select a single topic from the drop-down list of discussion topics, apply a filter, or search to locate the post.
- For the post or for the response or comment that you want to delete, click the “More” icon and then Delete.
- Click OK to confirm the deletion.
Important
If a message is threatening or indicates serious harmful intent, contact campus security at your institution. Report the incident before taking any other action.
12.3.5.6. Respond to Reports of Misuse
Students have the option to report contributions that they find inappropriate. Moderators, community TAs, and admins can check for messages that have been flagged in this way and edit or delete them as needed.
- View the live version of your course and click Discussion at the top of the page.
- In the list of posts on the left side of the page, use the filter drop-down list (set to Show all by default) to select Flagged.
- Review listed posts. A post is listed if it or any of its responses or comments has been reported. The reported contribution includes a Reported identifier.
- Edit or delete the post, response, or comment. Alternatively, remove the flag: click the “More” icon and then Unreport.
12.3.5.7. Block Users
For a student who continues to misuse the course discussions, you can unenroll the student from the course. See Unenroll Students from a Course. If the enrollment period for the course is over, the student cannot re-enroll.
12.3.6. Close Discussions
You can close the discussions for your course so that students cannot add messages. Course discussions can be closed temporarily, such as during an exam period, or permanently, such as when a course ends.
When you close the discussions for a course, all of the discussion topics in course units and all of the course-wide topics are affected.
- Existing discussion contributions remain available for review.
- Students cannot add posts, respond to posts, or comment on responses. However, students can continue to vote on existing threads, follow threads, or report messages for misuse.
- Course Staff, Instructors, Discussion Admins, Discussion Moderators, and Discussion Community TAs are not affected when you close the discussions for a course. Users with these roles can continue to add to discussions.
Note
To make sure your students understand why they cannot add to discussions, you can add the dates that discussions are closed to the Course Info page and post them to a General discussion.
12.3.6.1. Start-End Date Format Specification
To close course discussions, you supply a start date and time and an end date and time in Studio. You enter the values in this format:
["YYYY-MM-DDTHH:MM", "YYYY-MM-DDTHH:MM"]
where:
- The dates and times that you enter are in the Universal Coordinated (UTC) time zone, not in your local time zone.
- You enter an actual letter T between the numeric date and time values.
- The first date and time indicate when you want course discussions to close.
- The second date and time indicate when you want course discussions to reopen.
- If you do not want the discussions to reopen, enter a date that is far in the future.
- Quotation marks enclose each date-time value.
- A comma and a space separate the start date-time from the end date-time.
- Square brackets enclose the start-end value pair.
- You can supply more than one complete start and end value pair. A comma and a space separate each pair.
For example, to close course discussions temporarily for a final exam period in July, and then permanently on 9 August 2014, you enter:
["2014-07-22T08:00", "2014-07-25T18:00"], ["2014-08-09T00:00", "2099-08-09T00:00"]
You enter these values between an additional pair of square brackets which are supplied for you in Studio.
12.3.6.2. Define When Discussions Are Closed
To define when discussions are closed to new contributions and when they reopen:
Open your course in Studio.
Select Settings, then Advanced Settings.
Scroll down to the Discussion Blackout Dates policy key.
In the field for the value, place your cursor between the supplied square brackets. Use the required date format specification to enter the start and end dates for each time period during which you want discussions to be closed.
When you enter the dates and times from the example above, the value field looks like this:
![Policy value of [["2014-07-22T08:00", "2014-07-25T18:00"], ["2014-08-09T00:00", "2099-08-09T00:00"]]](../_images/Discussion_blackout_unformatted.png)
Click Save Changes.
Studio reformats your entry to add line feeds and indentation, like this:
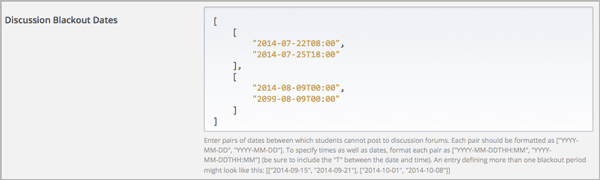
For examples of email messages that you can send to let students know when the course discussions are closed (or open), see Example Messages to Students.