6.3. Developing Course Sections
To develop sections in your course, you must first understand the following:
- What is a Section?
- Viewing Sections in the Outline
- The Student View of a Section
- Sections and Visibility to Students
- Release Statuses of Sections
Section tasks:
- Create a Section
- Change a Section Name
- Set a Section Release Date
- Publish all Units in a Section
- Hide a Section from Students
- Delete a Section
6.3.1. What Is a Section?
A section is the topmost category in your course. A section can represent a time period in your course, a chapter, or another organizing principle. A section contains one or more subsections.
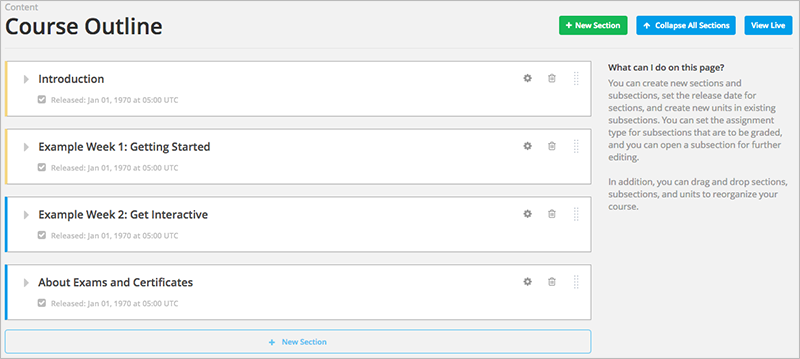
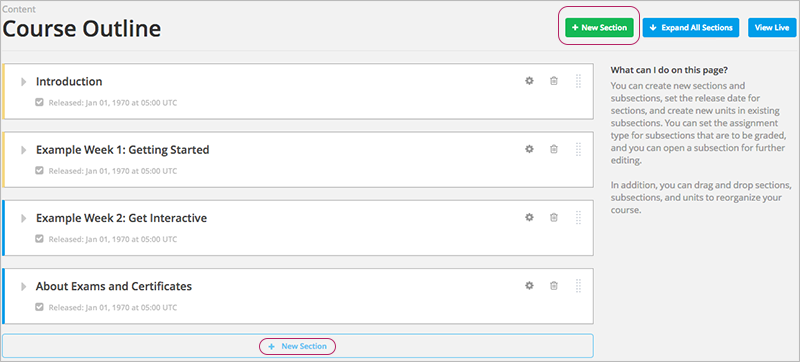
6.3.2. Viewing Sections in the Outline
The follow example shows four sections, all collapsed, in the course outline:
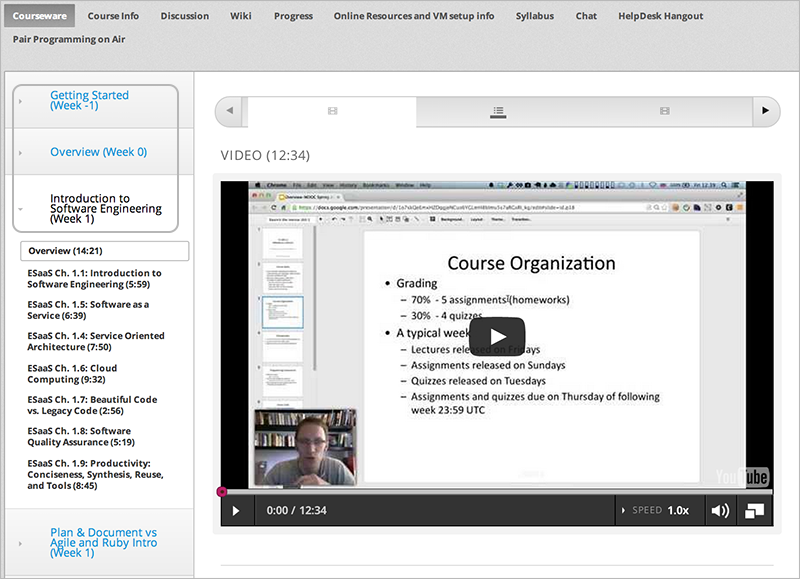
6.3.3. The Student View of a Section
Students see sections in the Courseware tab. Students can expand one section at a time to see its contents. In the following example, three sections are circled, and the third one is expanded to show its subsections:
6.3.4. Sections and Visibility to Students
Students cannot see any content in the section if the section’s release date is unscheduled or has not passed.
If a section’s release date has passed, students can see content in the section if:
- The release date for the subsection that contains that content has passed.
- The unit has been published.
- The unit is not hidden from students.
6.3.5. Release Statuses of Sections
As an course author, you control the release status of sections. For the content of a section to be visible to students, the section must be released. See the following for more information about the possible releases statuses of sections:
6.3.5.1. Unscheduled
If you do not change the course start date
default value, 1/1/2030 00:00:00 UTC, when you create a new section, its
release date will appear as Unscheduled. When the section release date is
unscheduled, students cannot see any content in that section, regardless of
the publishing status of that content.
If you have modified the course start date, when you create a new section, the default release date is the course start date.
The following example shows how an unscheduled section is displayed in the outline, summarized with a gray bar:

To make the content available to students, you must schedule the release date.
6.3.5.2. Scheduled
A section that is scheduled for release on a future date will not be visible to students until after the release date. Regardless of the publishing status of content within the section, the entire section will not visible to students.
The following example shows how a section that is scheduled for release is displayed in the outline, summarized with a green bar:

The scheduled date must pass for the section to be visible to students.
6.3.5.3. Released
A section that is released is visible to students; however, students see only subsections within the section that are also released, and units that are published.
The following example shows how a released section is displayed in the outline, summarized with a blue bar:

6.3.5.4. Released with Unpublished Changes
If you change a unit in a released section but do not publish the changes, students see the last published version of the modified unit.
The following example shows how a released section with unpublished changes is displayed in the outline, with a yellow bar. The section is expanded to show the unit with unpublished changes:
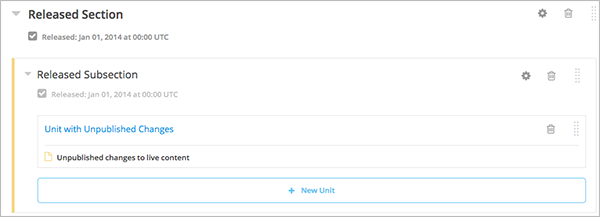
You must publish the unit for students to see the updates.
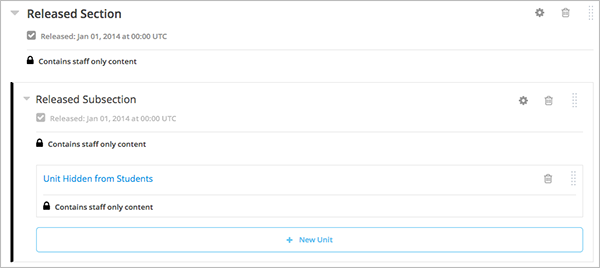
6.3.5.5. Staff Only Content
A section can contain a unit that is hidden from students and available to staff only. That unit is not visible to students, regardless of the release date of the section or subsection.
The following example shows how a section that contains a unit that is hidden from students is displayed in the outline, summarized with a black bar:
6.3.6. Create a Section
If you do not change the course start date
default value, 1/1/2030, when you create a new section, its release date
will be Unscheduled.
If you have modified the course start date, when you create a new section, the default release date is the course start date.
Caution
If the course start date is in the past, newly created sections are immediately visible to students.
To create a new section:
Click New Section at the top or bottom of the outline:
A new section is added at the end of the course content, with the section name selected.
Enter the name for the new section. Remember that students see the section name in the courseware.
Add subsections to the new section as needed.
It is recommended that you test course content as you create new sections.
6.3.7. Change a Section Name
To edit a section name, hover over the section name to show the Edit icon:
Click the Edit icon next to the section name. The name field becomes editable. Enter the new name and tab or click out of the field to save the name.
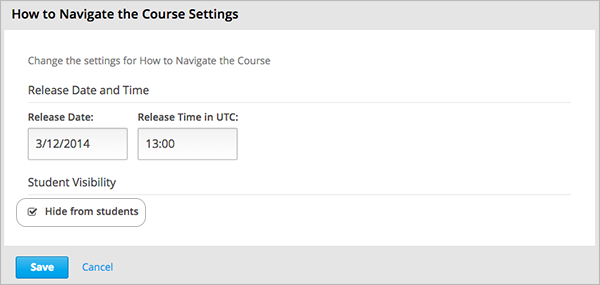
6.3.8. Set a Section Release Date
To set the section release date:
Click the Settings icon in the section box:

The Settings dialog box opens.
Enter the release date and time for the section:

Click Save.
For more information, see Release Dates.
6.3.9. Publish all Units in a Section
To publish all new and changed units in a section, click the publish icon in the box for the section:
Note
The publish icon only appears when there is new or changed content within the section.
See Unit Publishing Status for information about statuses and visibility to students.
6.3.10. Hide a Section from Students
You can hide all content in a section from students, regardless of the status of subsections and units within the section.
To hide a section from students:
Click the Settings icon in the section box:
The Settings dialog box opens.
Check Hide from students.
Click Save.
Now, no content in the section is visible to students.
To make the section visible to students, repeat these steps and clear the Hide from students checkbox.
Warning
When you clear the Hide from students checkbox for a section, not all content in the section is necessarily made visible to students. If you explicitly set a subsection or unit to be hidden from students, it remains hidden from students. Unpublished units remain unpublished, and changes to published units remain unpublished.
6.3.11. Delete a Section
When you delete a section, you delete all subsections and units within the section.
Warning
You cannot restore course content after you delete it. To ensure you do not delete content you may need later, you can move any unused content to a section in your course that you set to never release.
To delete a section:
- Click the delete icon in the section that you want to delete:

- When you receive the confirmation prompt, click Yes, delete this section.