8.7. Custom JavaScript Problem
Custom JavaScript display and grading problems (also called custom JavaScript problems or JS Input problems) allow you to create a custom problem or tool that uses JavaScript and then add the problem or tool directly into Studio. When you create a JS Input problem, Studio embeds the problem in an inline frame (IFrame) so that your students can interact with it in the LMS. You can grade your students’ work using JavaScript and some basic Python, and the grading is integrated into the edX grading system.
The JS Input problem that you create must use HTML, JavaScript, and cascading style sheets (CSS). You can use any application creation tool, such as the Google Web Toolkit (GWT), to create your JS Input problem.
Caution
You cannot use a custom JavaScript problem in a component that contains more than one problem. Each custom JavaScript problem must be in its own component. See Multiple Problems in One Component for more information.
8.7.1. Create a Custom JavaScript Display and Grading Problem
Create your JavaScript application, and then upload all files associated with that application to the Files & Uploads page.
In the unit where you want to create the problem, click Problem under Add New Component, and then click the Advanced tab.
Click Custom JavaScript Display and Grading.
In the component that appears, click Edit.
In the component editor, modify the example code according to your problem.
All problems have more than one element. Most problems conform to the same-origin policy (SOP), meaning that all elements have the same protocol, host, and port. For example, http://store.company.com:81/subdirectory_1/JSInputElement.html and http://store.company.com:81/subdirectory_2/JSInputElement.js have the same protocol (http), host (store.company.com), and port (81).
If any elements of your problem use a different protocol, host, or port, you need to bypass the SOP. For example, https://info.company.com/JSInputElement2.html uses a different protocol, host, and port. To bypass the SOP, change sop=”false” in line 8 of the example code to sop=”true”. For more information, see the same-origin policy page on the Mozilla Developer Network or on Wikipedia.
If you want your problem to have a Save button, click the Settings tab, and then set Maximum Attempts to a number larger than zero.
Click Save.
8.7.1.1. Re-create the Example Problem
To re-create the example problem above, you’ll need the following files.
- webGLDemo.html
- webGLDemo.js
- webGLDemo.css
- three.min.js
To download these files in a .zip archive, go to http://files.edx.org/JSInput.zip.
Note
If you need to bypass the SOP, you’ll also need the jschannel.js file, and your webGLDemo.html file will be slightly different. To download all these files in a .zip archive, go to http://files.edx.org/JSInput_BypassSOP.zip.
- Download and unpackage the files in either the JSInput.zip file or the JSInput_BypassSOP.zip file.
- On the Files & Uploads page, upload all the files from the .zip file.
- Create a new custom JavaScript display and grading problem component.
- On the Settings tab, set Maximum Attempts to a number larger than zero.
- In the problem component editor, replace the example code with the code below.
- Click Save.
8.7.1.2. JavaScript Input Problem Code
<problem display_name="webGLDemo">
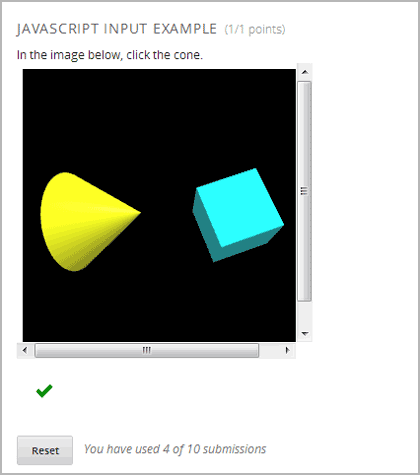
In the image below, click the cone.
<script type="loncapa/python">
import json
def vglcfn(e, ans):
'''
par is a dictionary containing two keys, "answer" and "state"
The value of answer is the JSON string returned by getGrade
The value of state is the JSON string returned by getState
'''
par = json.loads(ans)
# We can use either the value of the answer key to grade
answer = json.loads(par["answer"])
return answer["cylinder"] and not answer["cube"]
# Or we can use the value of the state key
'''
state = json.loads(par["state"])
selectedObjects = state["selectedObjects"]
return selectedObjects["cylinder"] and not selectedObjects["cube"]
'''
</script>
<customresponse cfn="vglcfn">
<jsinput
gradefn="WebGLDemo.getGrade"
get_statefn="WebGLDemo.getState"
set_statefn="WebGLDemo.setState"
width="400"
height="400"
html_file="/static/webGLDemo.html"
/>
</customresponse>
</problem>
Note
When you create this problem, keep the following in mind.
- The webGLDemo.js file defines the three JavaScript functions (WebGLDemo.getGrade, WebGLDemo.getState, and WebGLDemo.setState).
- The JavaScript input problem code uses WebGLDemo.getGrade, WebGLDemo.getState, and WebGLDemo.setState to grade, save, or restore a problem. These functions must be global in scope.
- WebGLDemo.getState and WebGLDemo.setState are optional. You only have to define these functions if you want to conserve the state of the problem.
- Width and height represent the dimensions of the IFrame that holds the application.
- When the problem opens, the cone and the cube are both blue, or “unselected.” When you click either shape once, the shape becomes yellow, or “selected.” To unselect the shape, click it again. Continue clicking the shape to select and unselect it.
- The response is graded as correct if the cone is selected (yellow) when the user clicks Check.
- Clicking Check or Save registers the problem’s current state.
8.7.2. JavaScript Input Problem XML
JSInput allows problem authors to turn stand-alone HTML files into problems that can be integrated into the edX platform. Since its aim is flexibility, it can be seen as the input and client-side equivalent of CustomResponse.
A JSInput exercise creates an IFrame in a static HTML page, and passes the return value of author-specified functions to the enclosing response type (generally CustomResponse). JSInput can also store and retrieve state.
8.7.2.1. Template
The following is the basic format of a JSInput problem:
<problem>
       <script type="loncapa/python">
def all_true(exp, ans): return ans == "hi"
       </script>
       <customresponse cfn="all_true">
           <jsinput gradefn="gradefn"
               height="500"
               get_statefn="getstate"
               set_statefn="setstate"
               html_file="/static/jsinput.html"/>
       </customresponse>
</problem>
The accepted attributes are:
| Attribute Name | Value Type | Required | Default |
|---|---|---|---|
| html_file | URL string | Yes | None |
| gradefn | Function name | Yes | gradefn |
| set_statefn | Function name | No | None |
| get_statefn | Function name | No | None |
| height | Integer | No | 500 |
| width | Integer | No | 400 |
8.7.2.2. Required Attributes
html_file
The html_file attribute specifies the HTML file that the IFrame will point to. The HTML file must be located in the content directory.
The IFrame is created using the sandbox attribute. Although pop-ups, scripts, and pointer locks are allowed, the IFrame cannot access its parent’s attributes.
The HTML file must contain a gradefn function that the JSInput file can access. To determine whether the gradefn function is accessible, in the console, make sure that gradefn returns the right thing. When JSInput uses the gradefn function, gradefn is called with gradefn.call(obj), where obj is the object-part of gradefn. For example, if gradefn is myprog.myfn, JSInput calls myprog.myfun.call(myprog). (This is to ensure “this” continues to refer to what gradefn expects.)
Aside from that, more or less anything goes. Note that currently there is no support for inheriting CSS or JavaScript from the parent (aside from the Chrome-only seamless attribute, which is set to True by default).
gradefn
The gradefn attribute specifies the name of the function that will be called when a user clicks Check, and that returns the student’s answer. Unless both the get_statefn and set_statefn attributes are also used, this answer is passed as a string to the enclosing response type. In the customresponse example above, this means cfn will be passed this answer as
ans.If the gradefn function throws an exception when a student attempts to submit a problem, the submission is aborted, and the student receives a generic alert. The alert can be customised by making the exception name
Waitfor Exception; in that case, the alert message will be the exception message.Important
To make sure the student’s latest answer is passed correctly, make sure that the gradefn function is not asynchronous. Additionally, make sure that the function returns promptly. Currently the student has no indication that her answer is being calculated or produced.
8.7.2.3. Optional Attributes
set_statefn
Sometimes a problem author will want information about a student’s previous answers (“state”) to be saved and reloaded. If the attribute set_statefn is used, the function given as its value will be passed the state as a string argument whenever there is a state, and the student returns to a problem. The function has the responsibility to then use this state approriately.
The state that is passed is:
- The previous output of gradefn (i.e., the previous answer) if get_statefn is not defined.
- The previous output of get_statefn (see below) otherwise.
It is the responsibility of the iframe to do proper verification of the argument that it receives via set_statefn.
get_statefn
Sometimes the state and the answer are quite different. For instance, a problem that involves using a javascript program that allows the student to alter a molecule may grade based on the molecule’s hydrophobicity, but from the hydrophobicity it might be incapable of restoring the state. In that case, a separate state may be stored and loaded by set_statefn. Note that if get_statefn is defined, the answer (i.e., what is passed to the enclosing response type) will be a json string with the following format:
{
    answer: `[answer string]`
    state: `[state string]`
}
The enclosing response type must then parse this as json.
height and width
The height and width attributes are straightforward: they specify the height and width of the IFrame. Both are limited by the enclosing DOM elements, so for instance there is an implicit max-width of around 900.
In the future, JSInput may attempt to make these dimensions match the HTML file’s dimensions (up to the aforementioned limits), but currently it defaults to 500 and 400 for height and width, respectively.